

Managing Project and Member Privacy
Privacy in a Social System Map is a particular kind of trust. People aren’t just


You customize your survey to suit your network in the Survey Editor Workspace: 

Parts of the Workspace
- Indicates what page you’re on, within your project.
- Indicates which project you’re currently working on.
- Shows you’re in the first tab of the project phases navigation bar – Setup
- Shows your project status. Toggle on to enable project members to submit their survey responses.
- Shows you’re in the ‘create survey’ tab of the Setup phase
- On the left you can select from your field options to drag onto the Survey Builder canvas.
- Use to view the stats on your survey fields, including the number of map members who have submitted an answer for the field.
- On the right is the Survey Builder – you’ll drag fields from the left side of the workspace to the right. There you can put them in the order you want and edit the field content.
- Enables you to preview the form.
- Clone enables you to copy another survey from your account as a starting point. Existing fields will be over-written when you clone as survey.
- Save the whole survey – don’t forget to save frequently!
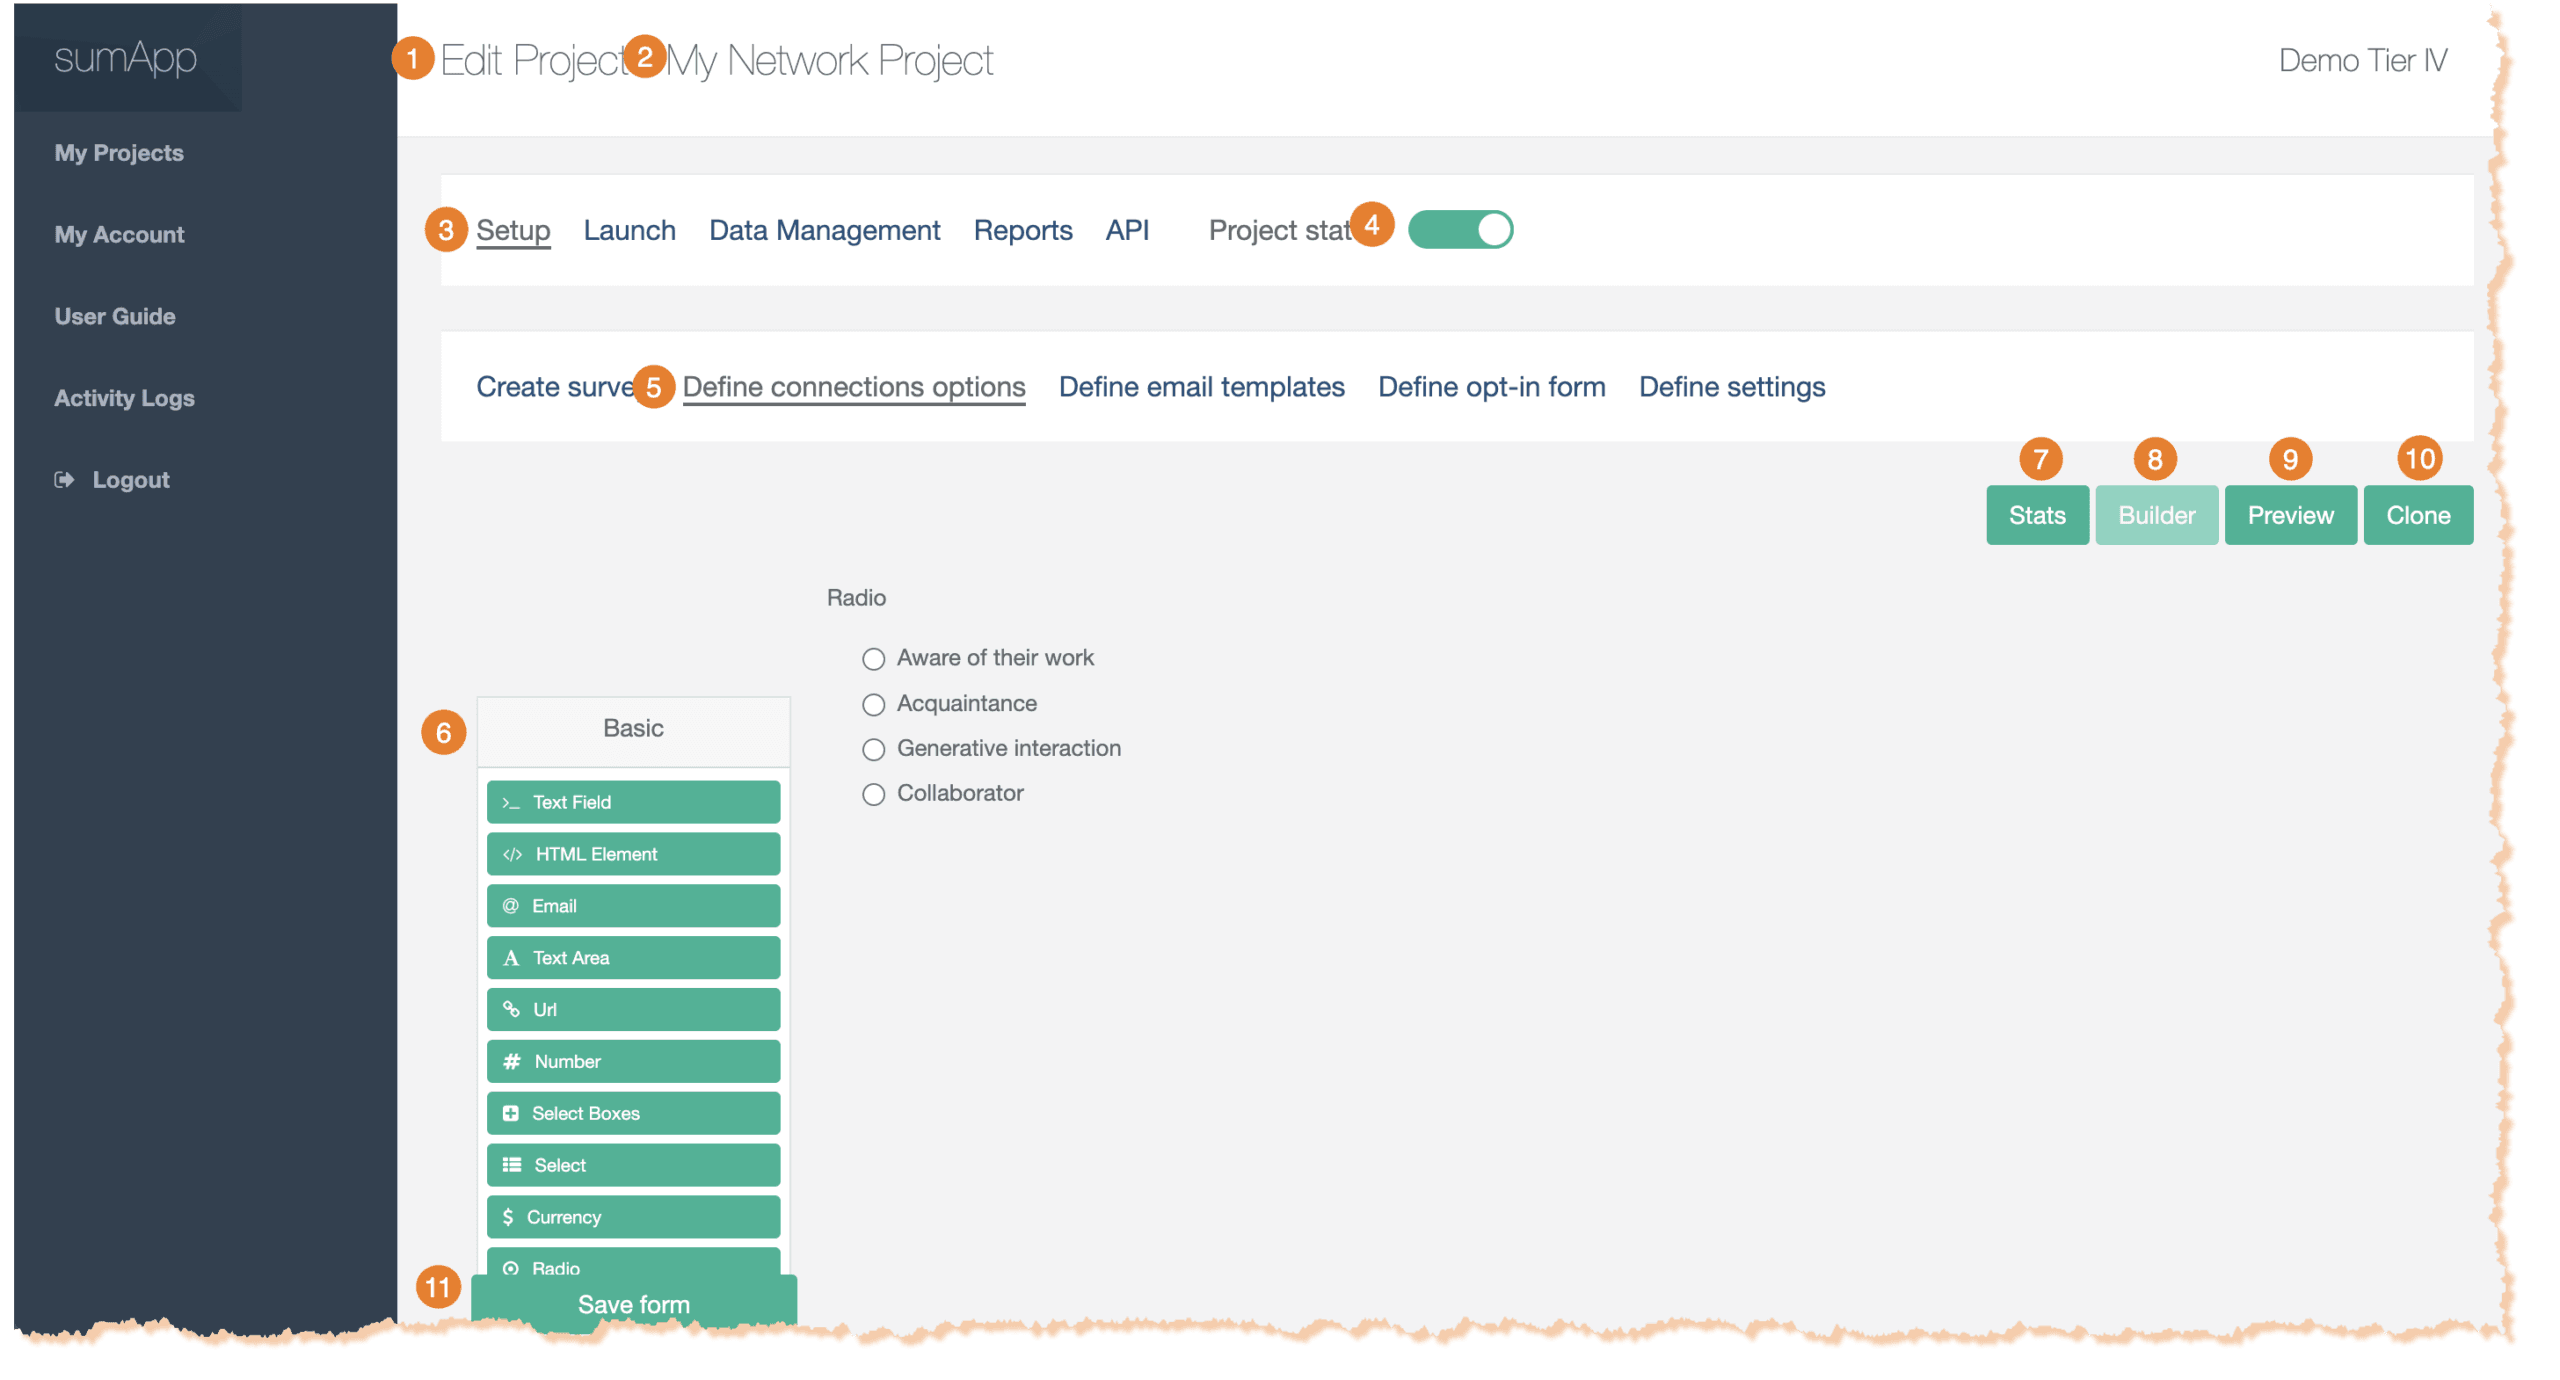
Parts of the Workspace
1) Indicates what page you’re on, within your project.
2) Indicates which project you’re currently working on.
3) Shows you’re in the first tab of the project phases navigation bar – Setup.
4) Shows your project status. Toggle on to enable project members to submit their survey responses.
5) Shows you’re in the ‘Define connection options’ tab of the Setup phase.
6) On the left you can select from your field options to drag onto the Connection options Builder canvas.
7) Use to view the stats on your connection fields, including the number of map members who have submitted a connection to another map member for the field.
8) On the right is the Connection Builder – you’ll drag fields from the left side of the workspace to the right. There you can put them in the order you want and edit the field content.
9) Enables you to preview the connection form.
10) Clone enables you to copy connection options from your account as a starting point. Existing fields will be over-written when you clone as survey.
11) Save the whole survey – don’t forget to save frequently!
You can change your options in Setup > Define connection options – #1 & #2 in image below.
Tiers I & II have a simple, single-question interface – #3 in image below.

- Edit the options in #3 in the image above.
- You can use as few or as many options as you like, but don’t use so many it becomes hard for your members to decide.
- Only one option can be selected from the list.
- The options should be general enough to encompass the range of possible connections without making an exhaustive list.
- Don’t include ‘don’t know’ as an option – that will require everyone in the network to reply regarding everyone else in the network, and it will generate a whole lot of unnecessary data.
- Set your options to be ranked with increasing strength.
- You can preview the options in the preview panel below the editor.
- Don’t forget to save! #5 in image.
- Options show up on the member view connections page in the member tiles when they are clicked open.
Defining connection options in Tiers III & IV is very similar to setting up the survey.
Parts of the workspace
1) Indicates what page you’re on, within your project.
2) Indicates which project you’re currently working on.
3) Underline shows you’re in the first tab of the project phases navigation bar – SetUp
4) Underline shows you’re in the ‘define connection options’ tab of the Set-Up phase
5) On the left is the Builder – you’ll drag fields from the right side of the workspace to the left. There you can put them in the order you want and edit the field content.
6) On the right you can select from your field options to drag onto the Builder canvas.
7) Enables you to preview the form.
8) Save the whole connection options – don’t forget to save frequently!
9) Cancels you out and doesn’t save whatever changes you’ve made since your last save.
Why have three templates?
sumApp was designed to be what we call ‘evergreen’ – in other words, we wanted a tool that didn’t just create a snapshot in time, but could also continue to evolve as the network changes and as their mapping needs become more sophisticated. An important part of that evergreen characteristic means having the ability to add new members to the map’s databases as they join the network and to invite existing members back into sumApp to show their existing relationships to the new members.
On the one hand, doing that that can be as simple as deciding never to close a survey. But if your bulk email invitations don’t differentiate which phase you’re asking members to address, you’ll confuse and annoy people. It would be bad form to ask members to do something they’ve already done, without:
- Explaining that you’re not implying they didn’t do it.
- Making clear that it’s not a re-do – that what they’ve done is safe and intact.
- Making it clear that the reason you’re asking them back is because something has changed and those changes might be relevant for them to address.
- Making sure they know it will be a super-quick thing.
- Such as: “please go take a quick peek at the 10 brand new members at the top of the list, and if you know any, share that – then you’re done!”
So – in another SNA tool, you maybe COULD simply keep the survey open (tho, naaaw, it’d still be messy for other technical reasons, but we’ll ignore those right now . . . ),
but you’d have to revise the email over and over depending on who you’re sending to.
We thought that was dumb. So we make it easier by using three different email templates, each meant to be framed for a different context, depending on what stage your members are at in the evergreen cycle.
- The initial invitation – Frame this text for the brand-new member who has never seen sumApp & has no idea what you’re up to.
- The ‘new faces’ email – Frame this one for the initiated. Those who’ve done sumApp already, or at least have chosen to ignore previous invites (they know it’s been happening whether they’ve engaged or not). Framing in ‘new faces’ should, ideally, include all the bullet points above.
- The ‘reminder’ email – This is a follow-up framed generically for everyone. Use it when you want to address everyone at once.
The email template interface
Features of the email template interface:
1) Shows you’re in the sumApp setup phase.
2) Shows you’re on the ‘define email templates’ page.
3) Input name of sender here. This is a required field. Use a name that is as recognizable as possible for the whole population. All templates will come from this sender.
4) Input email of sender. This is a required field. Can be a different email than that belonging to the ‘from’ person’s name.
5) Deadline. Not required. Will fill into the template where you’ve inserted the {survey_deadline} tag. It has no functional effect (it won’t close your survey on that date). It’s simply there to make it easy to insert a date into your emails and change it in a single place, instead of digging into each email template to change it.
6) Field tags you can use in your email. {url} is required in each email template. No other fields are required. Read more about the curly-bracket tags.
7) The Invitation Email template WYSIWYG. More about the WYSIWYG interface.
8) The New Faces Email template WYSIWYG. More about the WYSIWYG interface.
9) The Reminder Email template WYSIWYG. More about the WYSIWYG interface.
10) Cancel – this will remove all changes you’ve made since your last save.
11) Save – Don’t forget to save when you’ve made changes anywhere on this page!!
Email template tags:
You find these fields at the top of the Email Templates page – they apply to each email type in your project:
1) Input name of sender here. This is a required field. Use a name that is as recognizable as possible for the whole population. All templates will come from this sender.
2) Input email of sender. This is a required field. Can be a different email than that belonging to the ‘from’ person’s name.
3) Deadline. Not required. Will fill into the template where you’ve inserted the {survey_deadline} tag. It has no functional effect (it won’t close your survey on that date). It’s simply there to make it easy to insert a date into your emails and change it in a single place, instead of digging into each email template to change it.
You also have tags that can be used in your email templates. They function as placeholders for inserting data from other fields within sumApp into the emails. They include:
4) {first_name} inserts the first name of the member receiving the email. Not mandatory.
5) {last_name} inserts the last name of the member receiving the email. Not mandatory.
6) {network_name} inserts the project name, which you can see at the top of the page. Not mandatory.
7) {survey_deadline} inserts the date in field #3 ‘Deadline’. Not mandatory.
8) {url} inserts the unique sumApp url belonging to the user receiving the email. This field is mandatory for all three templates.
9) {segment} inserts the segment you’re assigned to the user receiving the email, if you’ve assigned one. Not mandatory.
10 {sender_name} Inserts the name in the 3@ above ‘Sender email’. Not mandatory in the body of the email.
and again – a reminder 11) the {url} tag is mandatory for all email templates. If you’ve removed it, the save button won’t work until you replace it in all 3 templates.
The WYSIWYG
What is a WYSIWYG editor?
HTML markup tells a web browser how to display the text, images and other forms of multimedia on a webpage. A WYSIWYG is an interface designed to editing HTML without having to know or see the underlying code.
It it beyond the scope of this knowledge base to explain all the parts of this particular WYSIWYG interface, but we’ll point out a few basics.
1) Indicates which template you’re working on.
2) Defines the email’s subject line – it can include tags if desired.
3) The body of the email is edited in within the WYSIWYG editor.
 A common cause of frustration using WYSIWYG editors:
You’ll often copy text from another editing tool into the email template. For instance if you’ve collaborated on the text in a google doc, or you’re pasting from Word. Each of those tools uses underlying code (such as HTML) to tell the browser or application how to render the content (headers, etc.)
Often when copying and pasting text from one editor into another, you also inadvertently copy over a bunch of hidden code as well. Sometimes that works fine & you get the formatting you want, but often it turns into a challenge. You can prevent this by copying your text into a non-formatting editor, such as NotePad before pasting it into the WYSWYG.
But if you haven’t already stripped the hidden code from your text before inserting it into a WYSIWYG, if the editor starts to behave strangely – such as not implementing changes you’re trying to make, you usually need to either examine the underlying HTML to remove junk code, or simply strip all formatting out of the text and start formatting fresh. You can either ‘view source’ or ‘remove formatting’.
4) The ‘source’ button in the WYSIWYG dashboard enables you to examine and edit the underlying HTML code. Even if you have no idea what HTML is, taking a peek will give you at least a sense of what’s going on.
5) The Tx icon will remove all hidden formatting code from the text so you can start fresh. The text to be cleaned must be selected first. You can double-check that it got removed by looking at the source code under #4.
The other buttons in the WYSWYG dashboard are either self-explanatory or not that relevant in this context.
6) If you want to start over, select ‘Reset Default’
7) The green ‘Preview’ button enables you to preview your content.
Once you’ve edited each template – don’t forget to click ‘save’ at the bottom of the page!
How sending works with each template
You send emails from the Launch > Manage Invitations page in sumApp.
Here is an overview explaining when each type is sent.
Invitation Email
- Is sent when you click the ‘Send Invitation Emails’ button or the ‘Send Invitation & New Faces Emails’ button in Launch > Manage Invitations page. It will only go out to members who have never previously been sent the first invitation.
- You can also send the Invitation Email to anyone, regardless of if they’ve been sent it before, on a case-by-case basis in the member list in Launch > Manage Members.
New Faces Email
- Is sent when you click the ‘Send Invitation & New Faces Emails’ button or the ‘Send New Faces Emails’ button in Launch > Manage Invitations page. It will only go out to members who have ALREADY been sent the first invitation at some point in the past.
- You can also send the New Faces Email to anyone, regardless of what they’ve been sent it before, on a case-by-case basis in the member list in Launch > Manage Members.
Reminder Email
- Is sent when you click the the ‘Send Reminders’ button in Launch > Manage Invitations page. It will go out to everyone in your member list, regardless of what they’ve been sent in the past.
- You can also send the Reminder Email to anyone, regardless of what they’ve been sent it before, on a case-by-case basis in the member list in Launch > Manage Members.
Custom survey filter email template – Tier IV
If you’re using the custom survey filter feature in Tier IV, you have another email template option. You can send a custom email to a sub-set of the population, based on their responses to the custom filter survey question you’re using.
You can access this extra functionality in Launch > Manage Invitations – Under the ‘Actions’ section of the page, find and click on the 5th sending button ‘Custom Filter Email’.
Why have three templates?
sumApp was designed to be what we call ‘evergreen’ – in other words, we wanted a tool that didn’t just create a snapshot in time, but could also continue to evolve as the network changes and as their mapping needs become more sophisticated. An important part of that evergreen characteristic means having the ability to add new members to the map’s databases as they join the network and to invite existing members back into sumApp to show their existing relationships to the new members.
On the one hand, doing that that can be as simple as deciding never to close a survey. But if your bulk email invitations don’t differentiate which phase you’re asking members to address, you’ll confuse and annoy people. It would be bad form to ask members to do something they’ve already done, without:
- Explaining that you’re not implying they didn’t do it.
- Making clear that it’s not a re-do – that what they’ve done is safe and intact.
- Making it clear that the reason you’re asking them back is because something has changed and those changes might be relevant for them to address.
- Making sure they know it will be a super-quick thing.
- Such as: “please go take a quick peek at the 10 brand new members at the top of the list, and if you know any, share that – then you’re done!”
So – in another SNA tool, you maybe COULD simply keep the survey open (tho, naaaw, it’d still be messy for other technical reasons, but we’ll ignore those right now . . . ),
but you’d have to revise the email over and over depending on who you’re sending to.
We thought that was dumb. So we make it easier by using three different email templates, each meant to be framed for a different context, depending on what stage your members are at in the evergreen cycle.
- The initial invitation – Frame this text for the brand-new member who has never seen sumApp & has no idea what you’re up to.
- The ‘new faces’ email – Frame this one for the initiated. Those who’ve done sumApp already, or at least have chosen to ignore previous invites (they know it’s been happening whether they’ve engaged or not). Framing in ‘new faces’ should, ideally, include all the bullet points above.
- The ‘reminder’ email – This is a follow-up framed generically for everyone. Use it when you want to address everyone at once.
The email template interface
Features of the email template interface:
1) Shows you’re in the sumApp setup phase.
2) Shows you’re on the ‘define email templates’ page.
3) Input name of sender here. This is a required field. Use a name that is as recognizable as possible for the whole population. All templates will come from this sender.
4) Input email of sender. This is a required field. Can be a different email than that belonging to the ‘from’ person’s name.
5) Deadline. Not required. Will fill into the template where you’ve inserted the {survey_deadline} tag. It has no functional effect (it won’t close your survey on that date). It’s simply there to make it easy to insert a date into your emails and change it in a single place, instead of digging into each email template to change it.
6) Field tags you can use in your email. {url} is required in each email template. No other fields are required. Read more about the curly-bracket tags.
7) The Invitation Email template WYSIWYG. More about the WYSIWYG interface.
8) The New Faces Email template WYSIWYG. More about the WYSIWYG interface.
9) The Reminder Email template WYSIWYG. More about the WYSIWYG interface.
10) Cancel – this will remove all changes you’ve made since your last save.
11) Save – Don’t forget to save when you’ve made changes anywhere on this page!!
Email template tags:
You find these fields at the top of the Email Templates page – they apply to each email type in your project:
1) Input name of sender here. This is a required field. Use a name that is as recognizable as possible for the whole population. All templates will come from this sender.
2) Input email of sender. This is a required field. Can be a different email than that belonging to the ‘from’ person’s name.
3) Deadline. Not required. Will fill into the template where you’ve inserted the {survey_deadline} tag. It has no functional effect (it won’t close your survey on that date). It’s simply there to make it easy to insert a date into your emails and change it in a single place, instead of digging into each email template to change it.
You also have tags that can be used in your email templates. They function as placeholders for inserting data from other fields within sumApp into the emails. They include:
4) {first_name} inserts the first name of the member receiving the email. Not mandatory.
5) {last_name} inserts the last name of the member receiving the email. Not mandatory.
6) {network_name} inserts the project name, which you can see at the top of the page. Not mandatory.
7) {survey_deadline} inserts the date in field #3 ‘Deadline’. Not mandatory.
8) {url} inserts the unique sumApp url belonging to the user receiving the email. This field is mandatory for all three templates.
9) {segment} inserts the segment you’re assigned to the user receiving the email, if you’ve assigned one. Not mandatory.
10 {sender_name} Inserts the name in the 3@ above ‘Sender email’. Not mandatory in the body of the email.
and again – a reminder 11) the {url} tag is mandatory for all email templates. If you’ve removed it, the save button won’t work until you replace it in all 3 templates.
The WYSIWYG
What is a WYSIWYG editor?
HTML markup tells a web browser how to display the text, images and other forms of multimedia on a webpage. A WYSIWYG is an interface designed to editing HTML without having to know or see the underlying code.
It it beyond the scope of this knowledge base to explain all the parts of this particular WYSIWYG interface, but we’ll point out a few basics.
1) Indicates which template you’re working on.
2) Defines the email’s subject line – it can include tags if desired.
3) The body of the email is edited in within the WYSIWYG editor.
A common cause of frustration using WYSIWYG editors:
You’ll often copy text from another editing tool into the email template. For instance if you’ve collaborated on the text in a google doc, or you’re pasting from Word. Each of those tools uses underlying code (such as HTML) to tell the browser or application how to render the content (headers, etc.)
Often when copying and pasting text from one editor into another, you also inadvertently copy over a bunch of hidden code as well. Sometimes that works fine & you get the formatting you want, but often it turns into a challenge. You can prevent this by copying your text into a non-formatting editor, such as NotePad before pasting it into the WYSWYG.
But if you haven’t already stripped the hidden code from your text before inserting it into a WYSIWYG, if the editor starts to behave strangely – such as not implementing changes you’re trying to make, you usually need to either examine the underlying HTML to remove junk code, or simply strip all formatting out of the text and start formatting fresh. You can either ‘view source’ or ‘remove formatting’.
4) The ‘source’ button in the WYSIWYG dashboard enables you to examine and edit the underlying HTML code. Even if you have no idea what HTML is, taking a peek will give you at least a sense of what’s going on.
5) The Tx icon will remove all hidden formatting code from the text so you can start fresh. The text to be cleaned must be selected first. You can double-check that it got removed by looking at the source code under #4.
The other buttons in the WYSWYG dashboard are either self-explanatory or not that relevant in this context.
6) If you want to start over, select ‘Reset Default’
7) The green ‘Preview’ button enables you to preview your content.
Once you’ve edited each template – don’t forget to click ‘save’ at the bottom of the page!
How sending works with each template
You send emails from the Launch > Manage Invitations page in sumApp.
Here is an overview explaining when each type is sent.
Invitation Email
- Is sent when you click the ‘Send Invitation Emails’ button or the ‘Send Invitation & New Faces Emails’ button in Launch > Manage Invitations page. It will only go out to members who have never previously been sent the first invitation.
- You can also send the Invitation Email to anyone, regardless of if they’ve been sent it before, on a case-by-case basis in the member list in Launch > Manage Members.
New Faces Email
- Is sent when you click the ‘Send Invitation & New Faces Emails’ button or the ‘Send New Faces Emails’ button in Launch > Manage Invitations page. It will only go out to members who have ALREADY been sent the first invitation at some point in the past.
- You can also send the New Faces Email to anyone, regardless of what they’ve been sent it before, on a case-by-case basis in the member list in Launch > Manage Members.
Reminder Email
- Is sent when you click the the ‘Send Reminders’ button in Launch > Manage Invitations page. It will go out to everyone in your member list, regardless of what they’ve been sent in the past.
- You can also send the Reminder Email to anyone, regardless of what they’ve been sent it before, on a case-by-case basis in the member list in Launch > Manage Members.
Custom survey filter email template – Tier IV
If you’re using the custom survey filter feature in Tier IV, you have another email template option. You can send a custom email to a sub-set of the population, based on their responses to the custom filter survey question you’re using.
You can access this extra functionality in Launch > Manage Invitations – Under the ‘Actions’ section of the page, find and click on the 5th sending button ‘Custom Filter Email’.
Why have three templates?
sumApp was designed to be what we call ‘evergreen’ – in other words, we wanted a tool that didn’t just create a snapshot in time, but could also continue to evolve as the network changes and as their mapping needs become more sophisticated. An important part of that evergreen characteristic means having the ability to add new members to the map’s databases as they join the network and to invite existing members back into sumApp to show their existing relationships to the new members.
On the one hand, doing that that can be as simple as deciding never to close a survey. But if your bulk email invitations don’t differentiate which phase you’re asking members to address, you’ll confuse and annoy people. It would be bad form to ask members to do something they’ve already done, without:
- Explaining that you’re not implying they didn’t do it.
- Making clear that it’s not a re-do – that what they’ve done is safe and intact.
- Making it clear that the reason you’re asking them back is because something has changed and those changes might be relevant for them to address.
- Making sure they know it will be a super-quick thing.
- Such as: “please go take a quick peek at the 10 brand new members at the top of the list, and if you know any, share that – then you’re done!”
So – in another SNA tool, you maybe COULD simply keep the survey open (tho, naaaw, it’d still be messy for other technical reasons, but we’ll ignore those right now . . . ),
but you’d have to revise the email over and over depending on who you’re sending to.
We thought that was dumb. So we make it easier by using three different email templates, each meant to be framed for a different context, depending on what stage your members are at in the evergreen cycle.
- The initial invitation – Frame this text for the brand-new member who has never seen sumApp & has no idea what you’re up to.
- The ‘new faces’ email – Frame this one for the initiated. Those who’ve done sumApp already, or at least have chosen to ignore previous invites (they know it’s been happening whether they’ve engaged or not). Framing in ‘new faces’ should, ideally, include all the bullet points above.
- The ‘reminder’ email – This is a follow-up framed generically for everyone. Use it when you want to address everyone at once.
The email template interface
Features of the email template interface:
1) Shows you’re in the sumApp setup phase.
2) Shows you’re on the ‘define email templates’ page.
3) Input name of sender here. This is a required field. Use a name that is as recognizable as possible for the whole population. All templates will come from this sender.
4) Input email of sender. This is a required field. Can be a different email than that belonging to the ‘from’ person’s name.
5) Deadline. Not required. Will fill into the template where you’ve inserted the {survey_deadline} tag. It has no functional effect (it won’t close your survey on that date). It’s simply there to make it easy to insert a date into your emails and change it in a single place, instead of digging into each email template to change it.
6) Field tags you can use in your email. {url} is required in each email template. No other fields are required. Read more about the curly-bracket tags.
7) The Invitation Email template WYSIWYG. More about the WYSIWYG interface.
8) The New Faces Email template WYSIWYG. More about the WYSIWYG interface.
9) The Reminder Email template WYSIWYG. More about the WYSIWYG interface.
10) Cancel – this will remove all changes you’ve made since your last save.
11) Save – Don’t forget to save when you’ve made changes anywhere on this page!!
Email template tags:
You find these fields at the top of the Email Templates page – they apply to each email type in your project:
1) Input name of sender here. This is a required field. Use a name that is as recognizable as possible for the whole population. All templates will come from this sender.
2) Input email of sender. This is a required field. Can be a different email than that belonging to the ‘from’ person’s name.
3) Deadline. Not required. Will fill into the template where you’ve inserted the {survey_deadline} tag. It has no functional effect (it won’t close your survey on that date). It’s simply there to make it easy to insert a date into your emails and change it in a single place, instead of digging into each email template to change it.
You also have tags that can be used in your email templates. They function as placeholders for inserting data from other fields within sumApp into the emails. They include:
4) {first_name} inserts the first name of the member receiving the email. Not mandatory.
5) {last_name} inserts the last name of the member receiving the email. Not mandatory.
6) {network_name} inserts the project name, which you can see at the top of the page. Not mandatory.
7) {survey_deadline} inserts the date in field #3 ‘Deadline’. Not mandatory.
8) {url} inserts the unique sumApp url belonging to the user receiving the email. This field is mandatory for all three templates.
9) {segment} inserts the segment you’re assigned to the user receiving the email, if you’ve assigned one. Not mandatory.
10 {sender_name} Inserts the name in the 3@ above ‘Sender email’. Not mandatory in the body of the email.
and again – a reminder 11) the {url} tag is mandatory for all email templates. If you’ve removed it, the save button won’t work until you replace it in all 3 templates.
The WYSIWYG
What is a WYSIWYG editor?
HTML markup tells a web browser how to display the text, images and other forms of multimedia on a webpage. A WYSIWYG is an interface designed to editing HTML without having to know or see the underlying code.
It it beyond the scope of this knowledge base to explain all the parts of this particular WYSIWYG interface, but we’ll point out a few basics.
1) Indicates which template you’re working on.
2) Defines the email’s subject line – it can include tags if desired.
3) The body of the email is edited in within the WYSIWYG editor.
A common cause of frustration using WYSIWYG editors:
You’ll often copy text from another editing tool into the email template. For instance if you’ve collaborated on the text in a google doc, or you’re pasting from Word. Each of those tools uses underlying code (such as HTML) to tell the browser or application how to render the content (headers, etc.)
Often when copying and pasting text from one editor into another, you also inadvertently copy over a bunch of hidden code as well. Sometimes that works fine & you get the formatting you want, but often it turns into a challenge. You can prevent this by copying your text into a non-formatting editor, such as NotePad before pasting it into the WYSWYG.
But if you haven’t already stripped the hidden code from your text before inserting it into a WYSIWYG, if the editor starts to behave strangely – such as not implementing changes you’re trying to make, you usually need to either examine the underlying HTML to remove junk code, or simply strip all formatting out of the text and start formatting fresh. You can either ‘view source’ or ‘remove formatting’.
4) The ‘source’ button in the WYSIWYG dashboard enables you to examine and edit the underlying HTML code. Even if you have no idea what HTML is, taking a peek will give you at least a sense of what’s going on.
5) The Tx icon will remove all hidden formatting code from the text so you can start fresh. The text to be cleaned must be selected first. You can double-check that it got removed by looking at the source code under #4.
The other buttons in the WYSWYG dashboard are either self-explanatory or not that relevant in this context.
6) If you want to start over, select ‘Reset Default’
7) The green ‘Preview’ button enables you to preview your content.
Once you’ve edited each template – don’t forget to click ‘save’ at the bottom of the page!
How sending works with each template
You send emails from the Launch > Manage Invitations page in sumApp.
Here is an overview explaining when each type is sent.
Invitation Email
- Is sent when you click the ‘Send Invitation Emails’ button or the ‘Send Invitation & New Faces Emails’ button in Launch > Manage Invitations page. It will only go out to members who have never previously been sent the first invitation.
- You can also send the Invitation Email to anyone, regardless of if they’ve been sent it before, on a case-by-case basis in the member list in Launch > Manage Members.
New Faces Email
- Is sent when you click the ‘Send Invitation & New Faces Emails’ button or the ‘Send New Faces Emails’ button in Launch > Manage Invitations page. It will only go out to members who have ALREADY been sent the first invitation at some point in the past.
- You can also send the New Faces Email to anyone, regardless of what they’ve been sent it before, on a case-by-case basis in the member list in Launch > Manage Members.
Reminder Email
- Is sent when you click the the ‘Send Reminders’ button in Launch > Manage Invitations page. It will go out to everyone in your member list, regardless of what they’ve been sent in the past.
- You can also send the Reminder Email to anyone, regardless of what they’ve been sent it before, on a case-by-case basis in the member list in Launch > Manage Members.
Custom survey filter email template – Tier IV
If you’re using the custom survey filter feature in Tier IV, you have another email template option. You can send a custom email to a sub-set of the population, based on their responses to the custom filter survey question you’re using.
You can access this extra functionality in Launch > Manage Invitations – Under the ‘Actions’ section of the page, find and click on the 5th sending button ‘Custom Filter Email’.
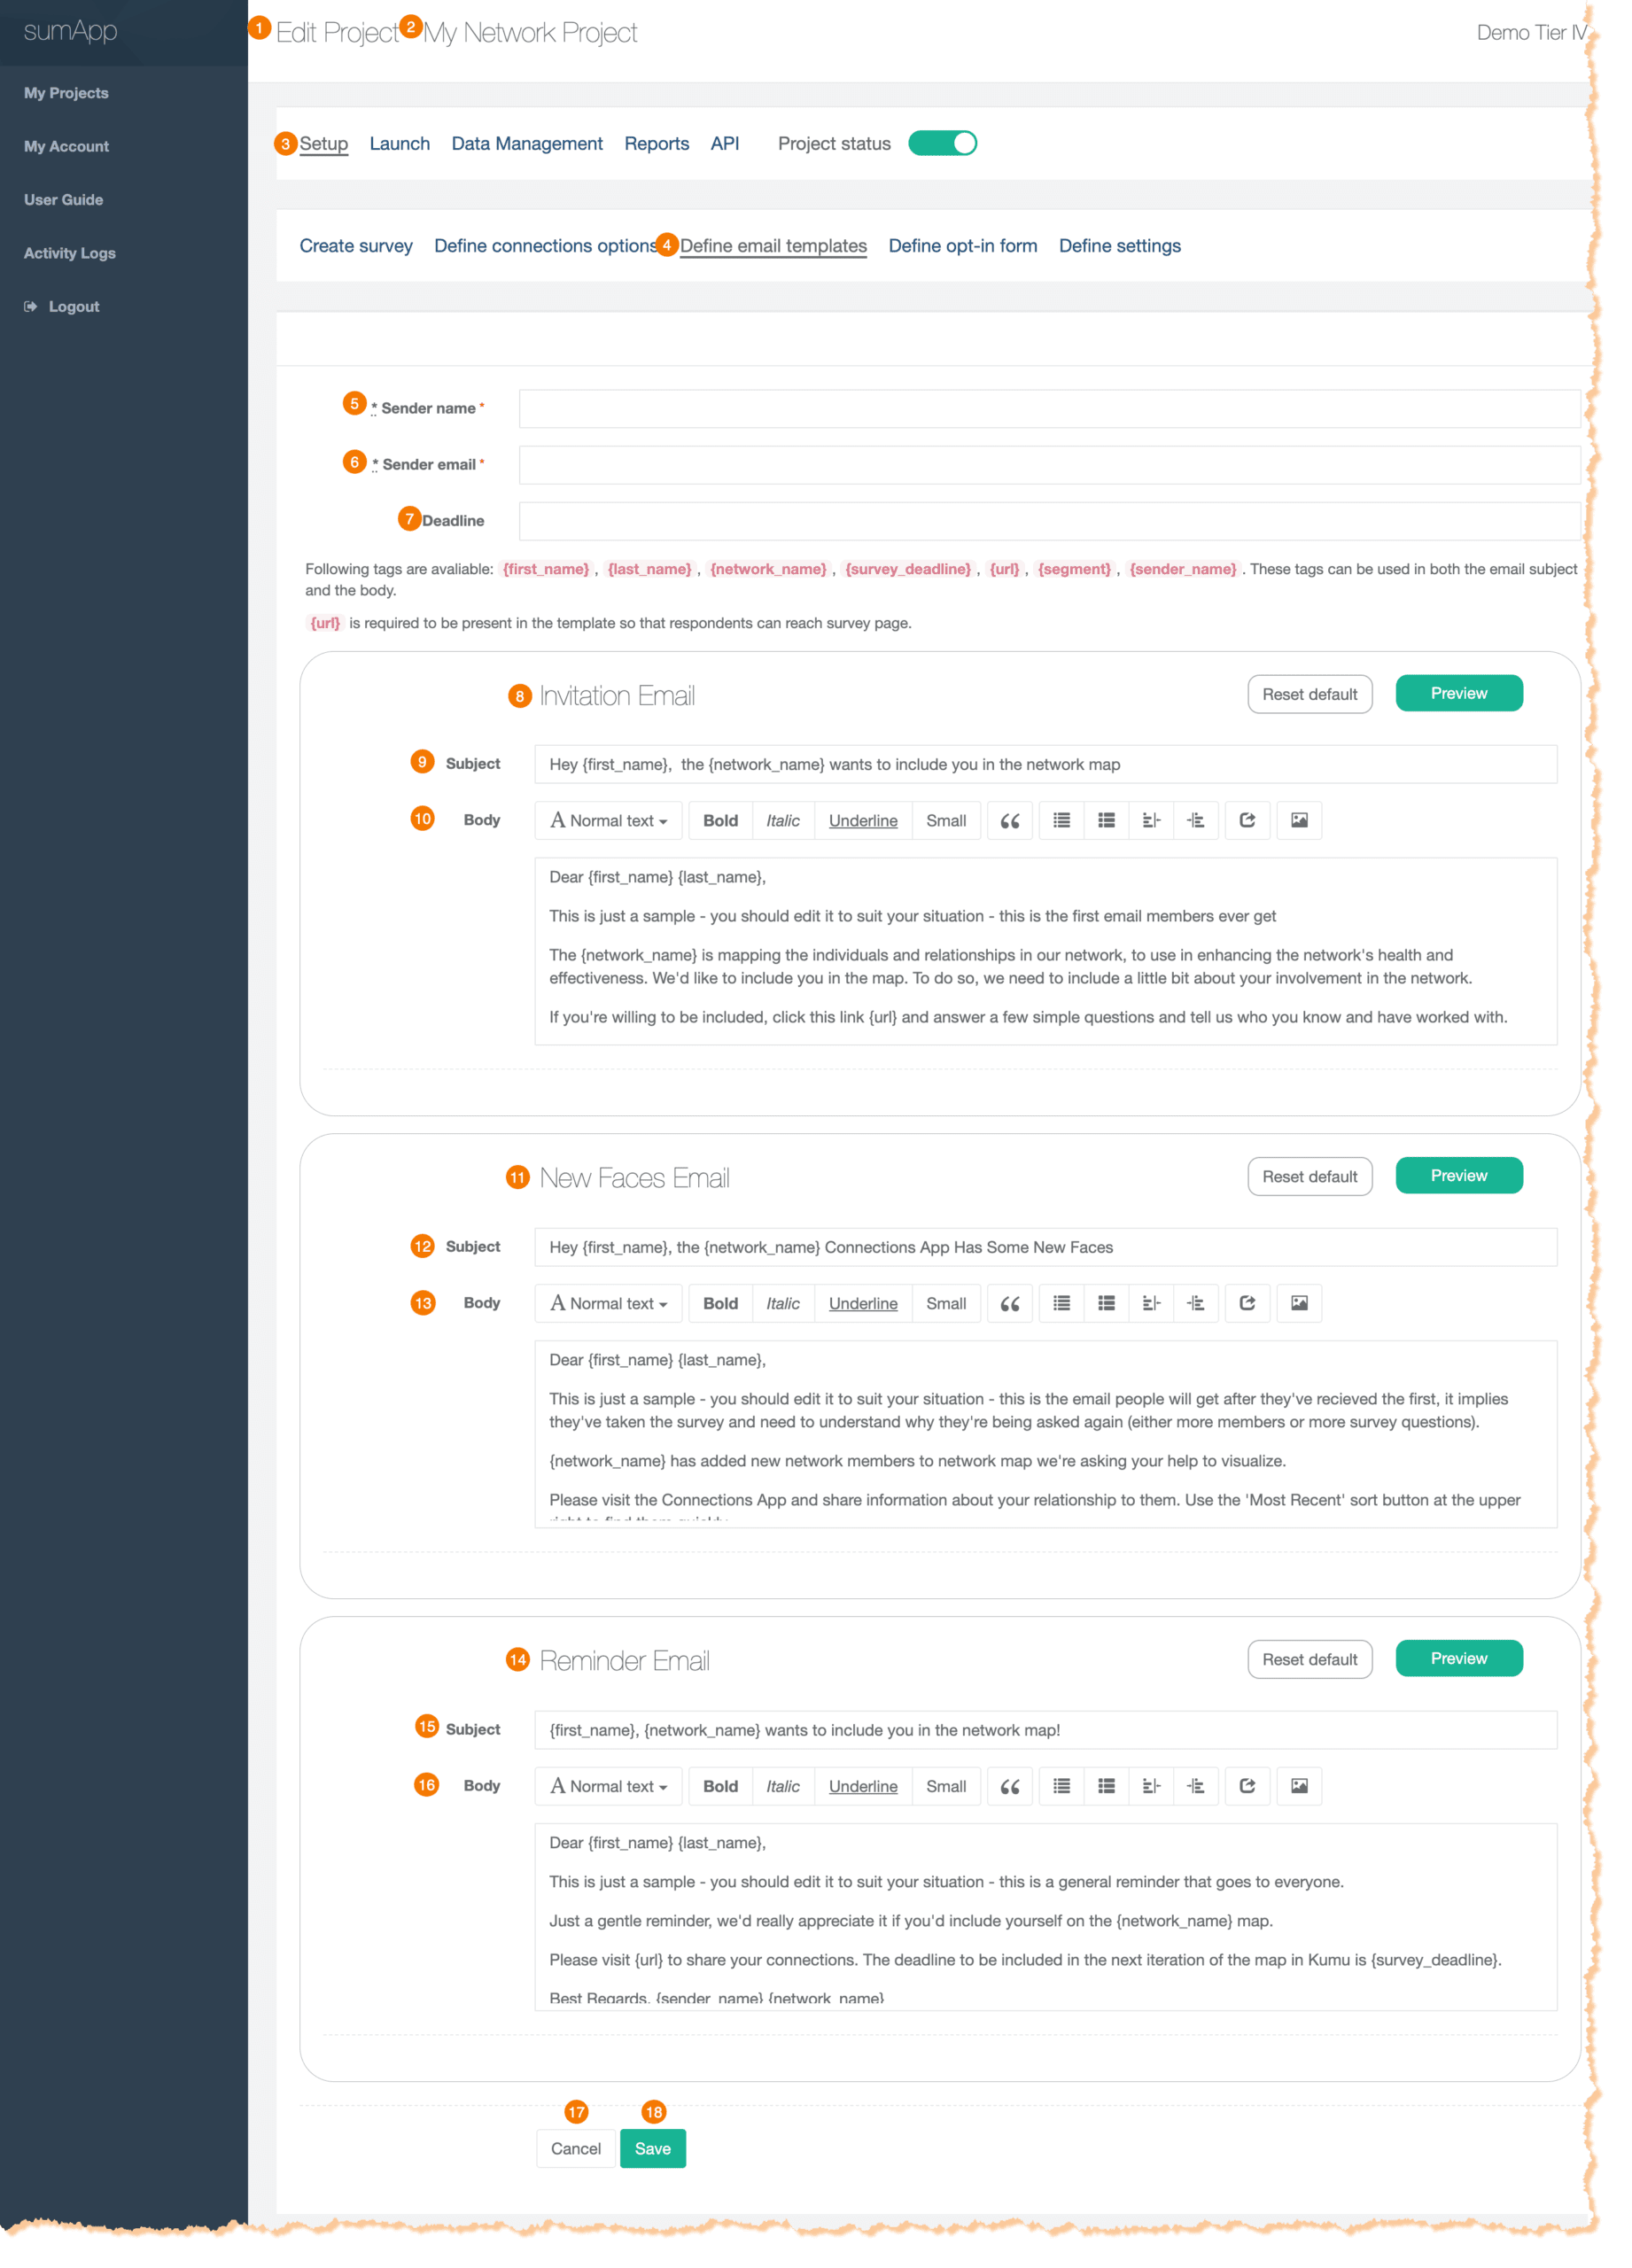
Parts of the Workspace
1) Indicates what page you’re on, within your project.
2) Indicates which project you’re currently working on.
3) Shows you’re in the first tab of the project phases navigation bar – Setup.
4) Shows you’re in the ‘Define email templates’ tab of the Setup phase.
5) Add the sender name you want to appear when map members receive an email from your project.
6) Add the email address you want to appear when map members receive an email from your project.
7) Add a deadline if you would like to include a date for map members to add responses by. Must use {survey_deadline} in your template for the date to appear.
8) The Template.
9) The Invitation Email Customizable Subject Line.
10) The Invitation Email Customizable Body.
11) The Email Template.
12) The New Faces Email Customizable Subject Line.
13) The New Faces Email Customizable Body.
14) The Email Template.
15) The Reminder Email Customizable Subject Line.
16) The Reminder Email Customizable Body.
17) Cancel button. Changes will not be saved!
18) Save button. Be sure to save changes frequently!
Tier II
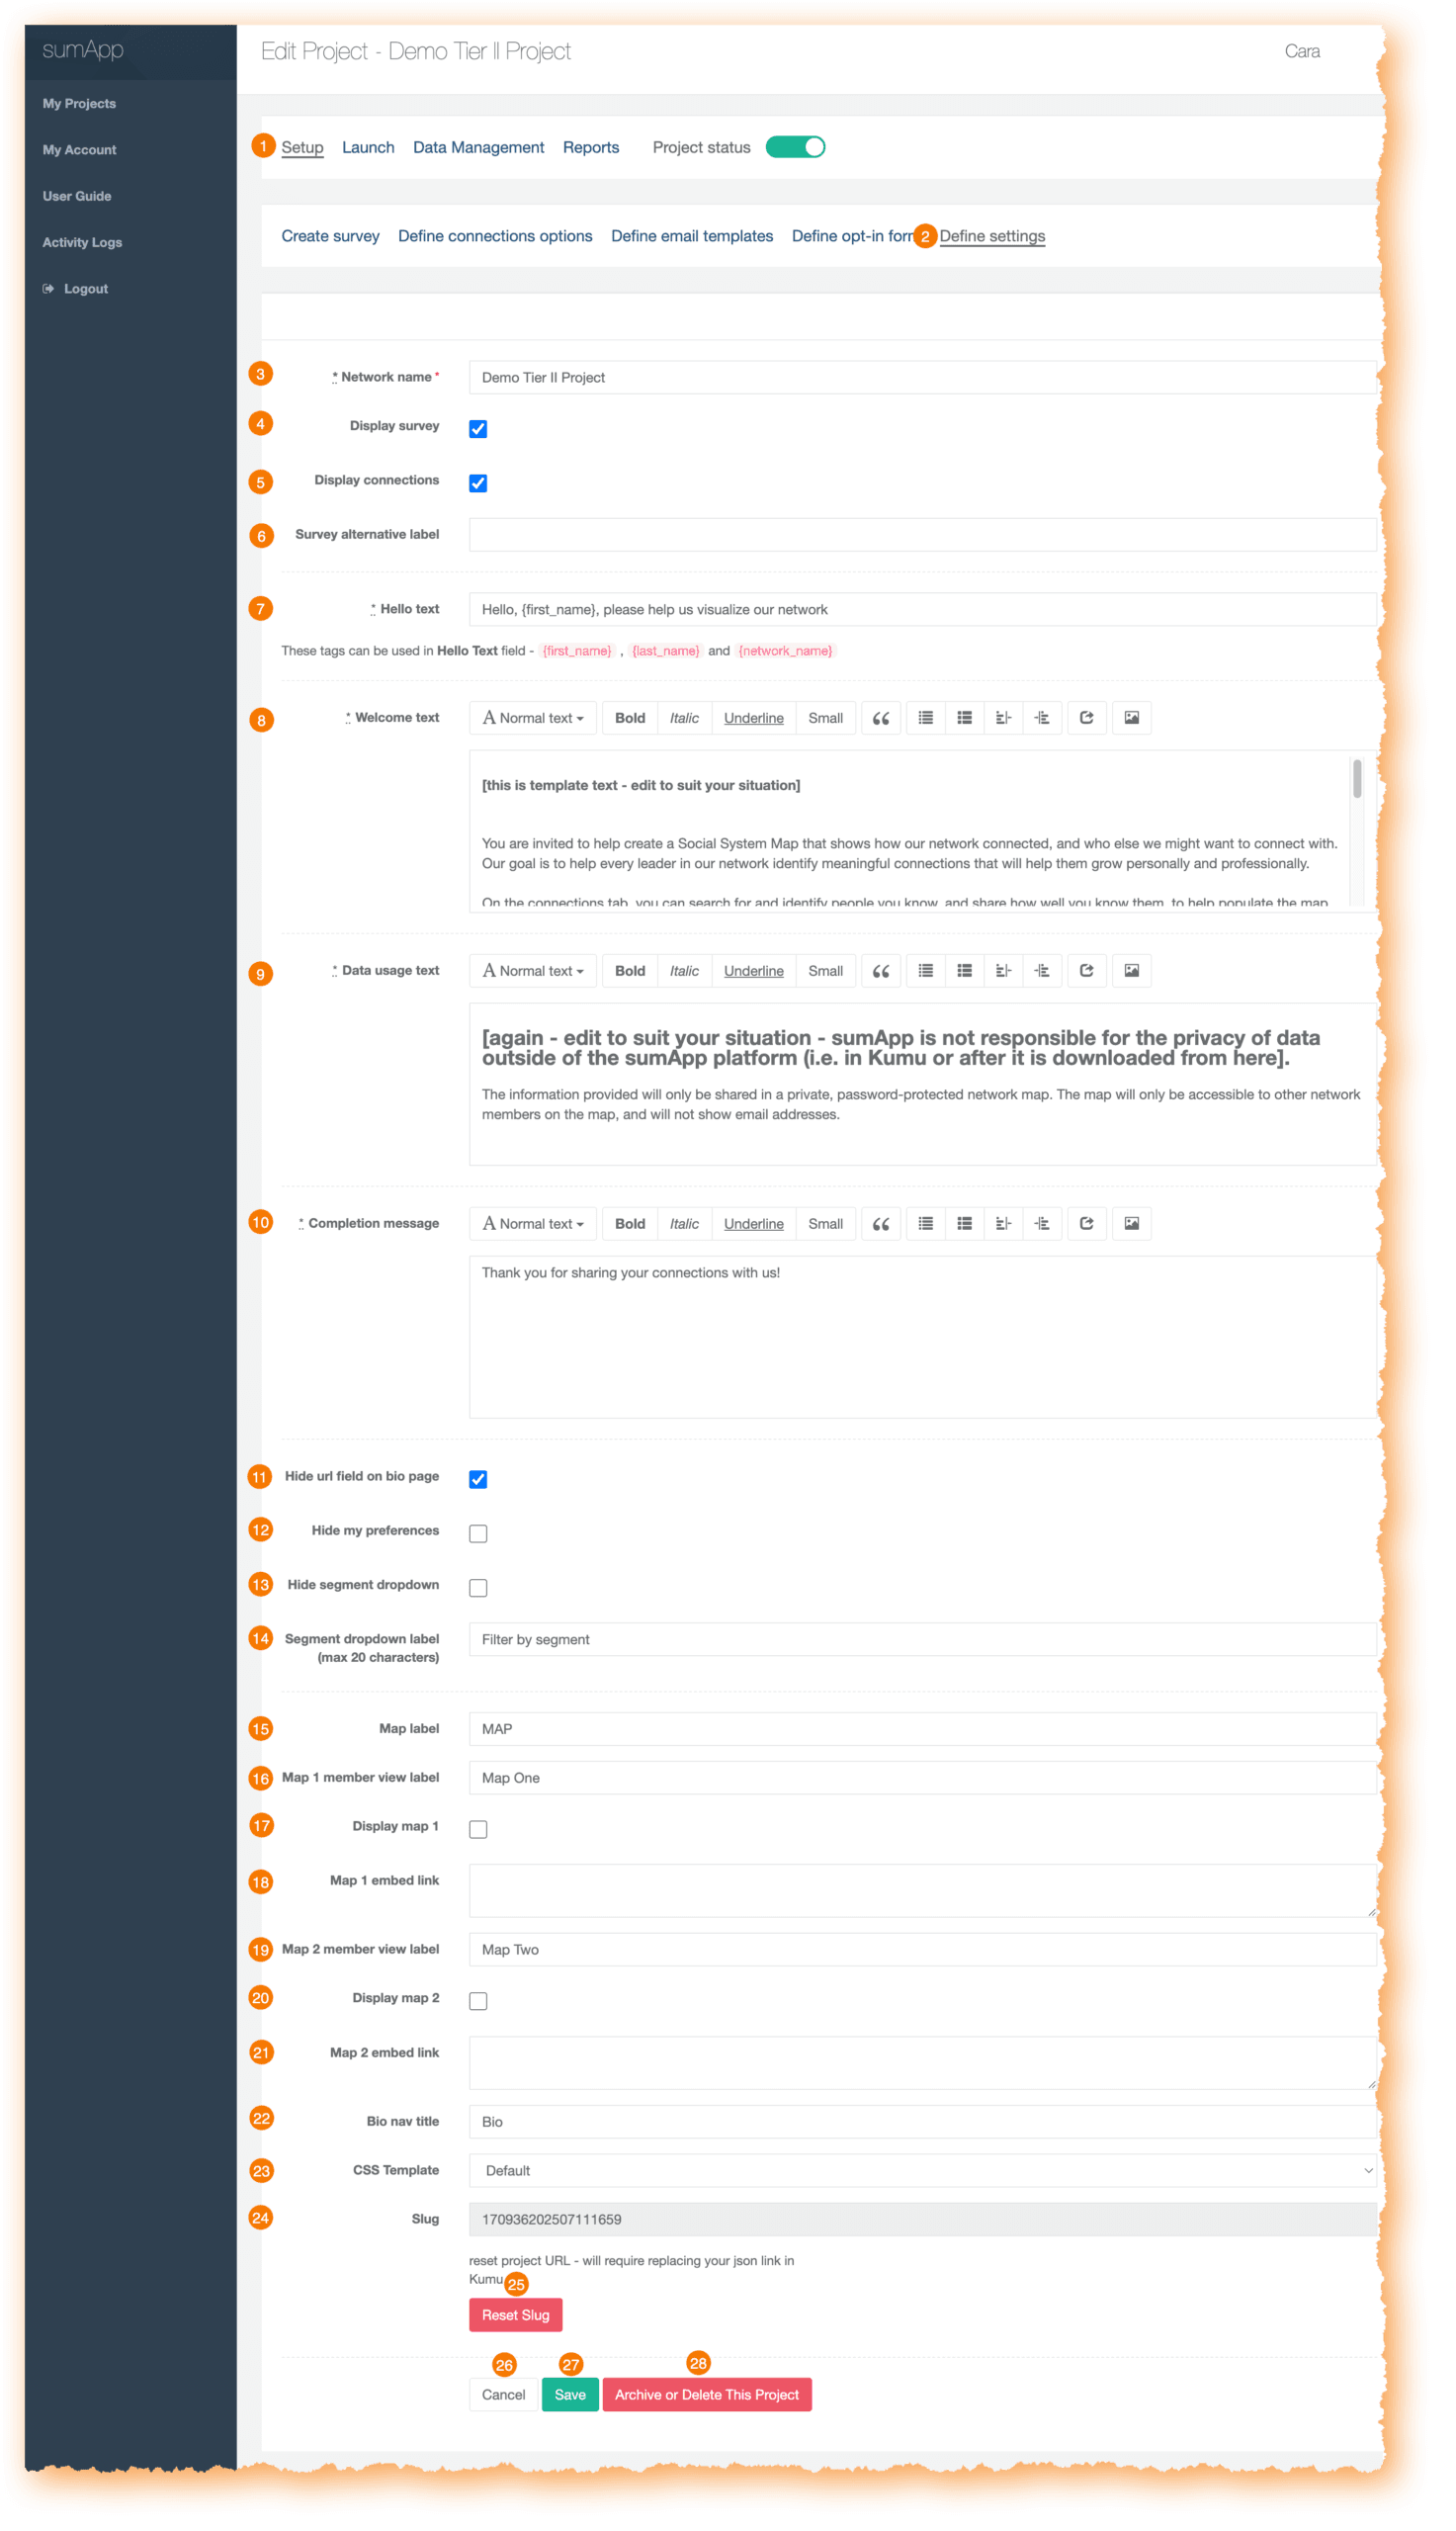
Parts of the Tier II Workspace
- Shows you’re in the first tab of the project phases navigation bar – Setup.
- Shows you’re in the ‘Define settings’ tab of the Setup phase.
- Updates your Network name.
- Turn on/off displaying your survey for map members. Default is on.
- Turn on/off displaying the connection tab of your survey. Default is on.
- Give your survey tab an alternative label.
- Change the hello text for your project member’s profile page.
- Change the Welcome text for your project member’s profile page.
- Change the Data usage text for your project member’s profile page.
- Change the Completion message when a project member submits their survey.
- Turn on/off to Hide the url field on the bio page. Default is on.
- Turn on/off to Hide the my preferences section of the project member profile. Default is off.
- Turn on/off to Hide the segment dropdown. Default is off.
- Change the Segment filter dropdown label on the project member’s connections tab.
- Change the label of your map in a project member’s view. If you only have one map connected, this is the label that will display.
- Change the label of map 1. Only updates if you have two maps connected and displayed.
- Turn on/off to display map 1. Default is off.
- Field to paste your map 1 embed link.
- Change the label of map 2.
- Turn on/off to display map 2. Default is off.
- Field to paste your map 2 embed link.
- Change the label of the Bio tab for project members.
- Change the CSS template of your project. Default is on at the start of a new project.
- Your project slug. This field is uneditable.
- Reset your project slug button. Use extreme caution before using this.
- ‘Cancel’ button.
- ‘Save’ button.
- ‘Archive or Delete This Project’ button.
Tier IV
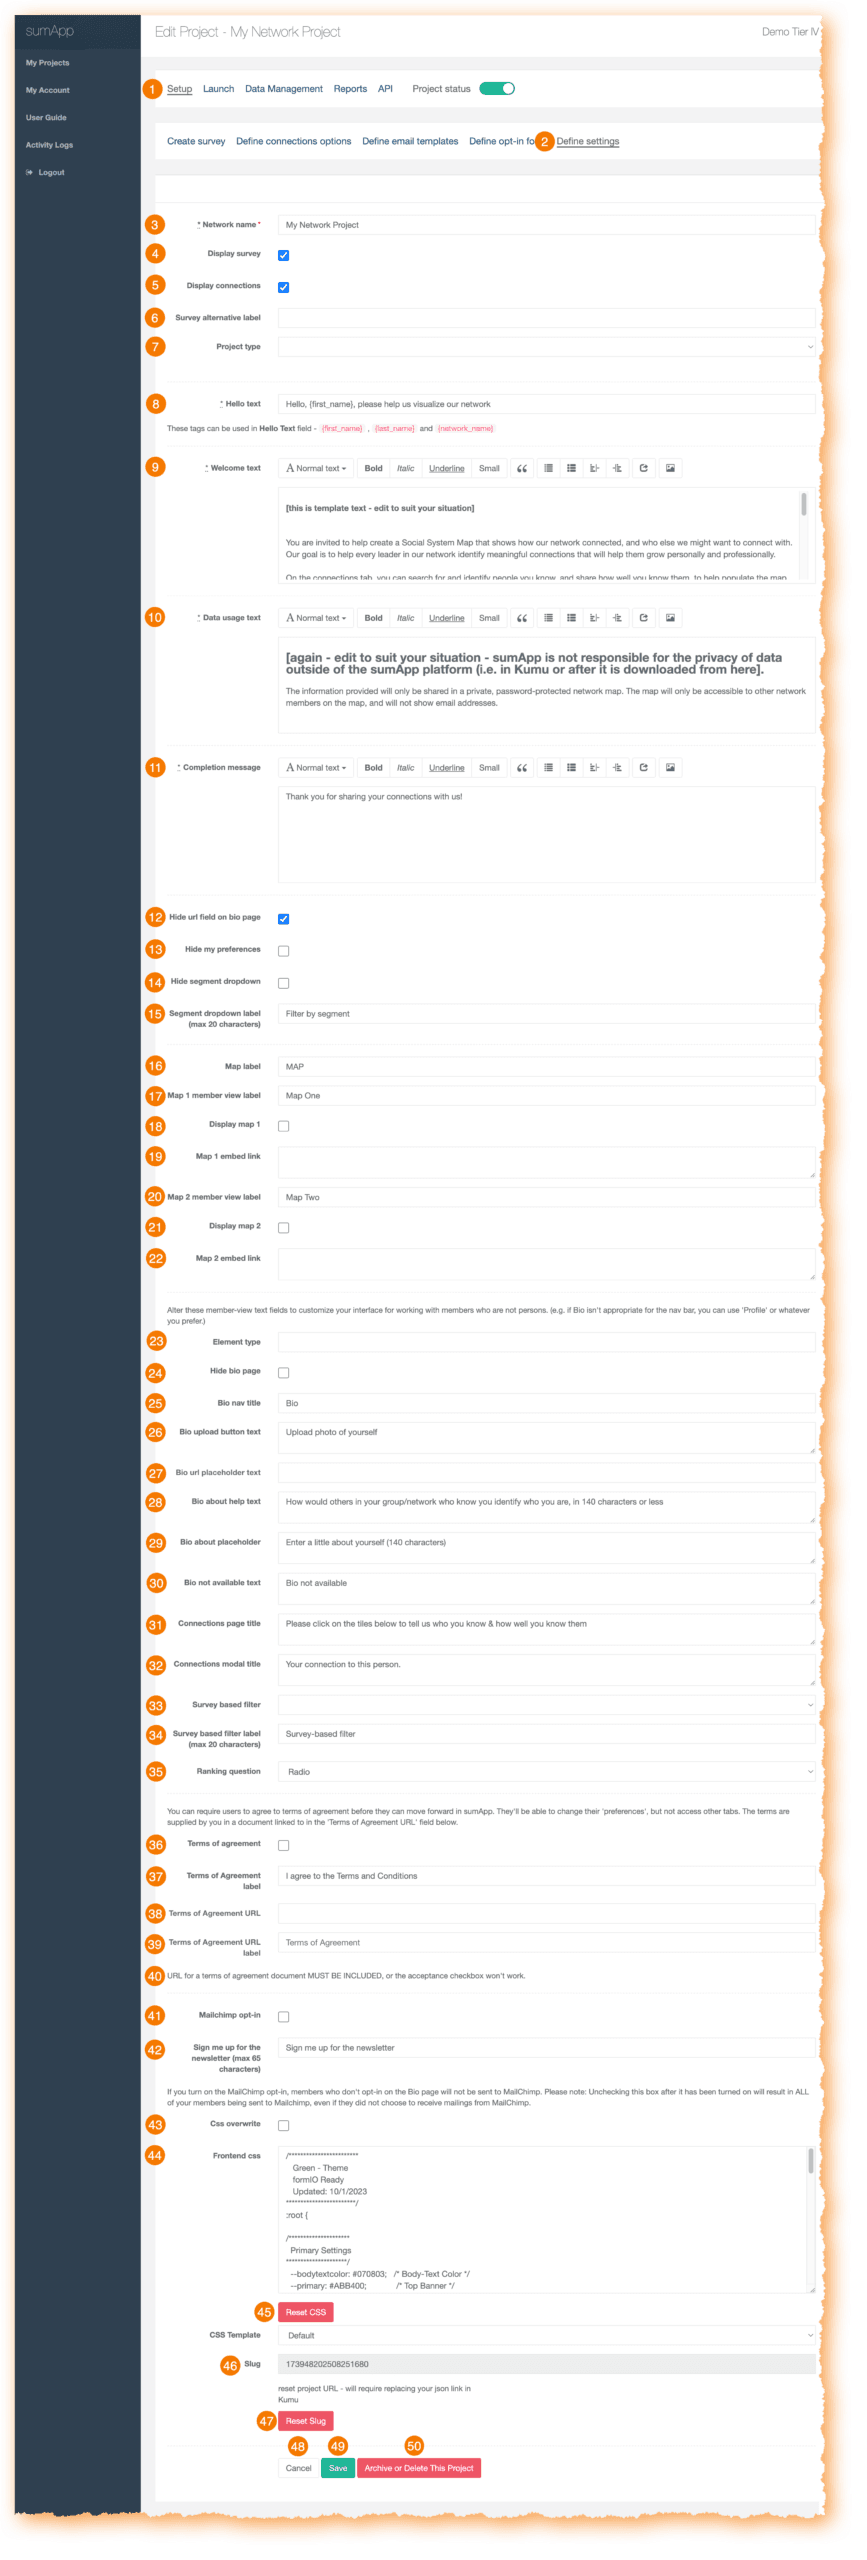
Parts of the Tier IV Workspace
- Shows you’re in the first tab of the project phases navigation bar – Setup.
- Shows you’re in the ‘Define settings’ tab of the Setup phase.
- Updates your Network name.
- Turn on/off displaying your survey for map members. Default is on.
- Turn on/off displaying the connection tab of your survey. Default is on.
- Give your survey tab an alternative label.
- Option to select your project type. Options are persons or organizations. The default project type is unselected.
- Change the hello text for your project member’s profile page.
- Change the Welcome text for your project member’s profile page.
- Change the Data usage text for your project member’s profile page.
- Change the Completion message when a project member submits their survey.
- Turn on/off to Hide the url field on the bio page. Default is on.
- Turn on/off to Hide the my preferences section of the project member profile. Default is off.
- Turn on/off to Hide the segment dropdown. Default is off.
- Updates the Segment filter dropdown label on the project member’s connections tab.
- Updates the label of your map in a project member’s view. If you only have one map connected, this is the label that will display.
- Change the label of map 1. Only updates if you have two maps connected and displayed.
- Turn on/off to display map 1. Default is off.
- Field to paste your map 1 embed link.
- Change the label of map 2.
- Turn on/off to display map 2. Default is off.
- Field to paste your map 2 embed link.
- Field to customize your element label.
- Turn on/off to hide bio page. Default is off.
- Change the label of the Bio tab for project members.
- Change the photo upload button text.
- Change the bio url placeholder text.
- Change the bio about help text.
- Change the bio about placeholder.
- Change the bio not available text.
- Change the connections page title.
- Change the connections modal tile.
- Change the survey-based filter type.
- Change the survey-based filter label.
- Change the survey question used as your ranking question.
- Turn on/off to enable project members to agree to a Terms of Agreement. Default is off.
- Changes the CSS template of your project. Default is on at the start of a new project.
- Your project slug. This field is uneditable.
- Reset your project slug button. Use extreme caution before using this.
- ‘Cancel’ button.
- ‘Save’ button.
- ‘Archive or Delete This Project’ button.