

Managing Project and Member Privacy
Privacy in a Social System Map is a particular kind of trust. People aren’


Settings for all Tiers
The aspects of the Member Views (outside of the survey and the connection options) that can be edited are managed in Setup > Settings:

Features of the settings page are:
1) Indicates you’re in the ‘Setup’ phase of sumApp.
2) Shows you’re on the ‘Define Settings’ page.
3) Network name – shows at top of all member view pages, in ‘network_name’ tags, and on your project list. Originally defined when creating the project, it can be changed here. Each project name must be unique.
4) Tiers II, III & IV include the survey. It can be toggled off and on, depending on your context. Checking the checkbox will show the survey in the member view, unchecking it will hide it from the member view.
5) The ‘Hello Text’ shows at the top of the member view bio page and connections page – you edit to suit your situation and can use tags to personalize the page.
6) List of tags available in the hello text
7) Welcome text – shows in body of the member view bio page. Use it to invite, orient and direct your members in the use and purpose of sumApp and your mapping project.
8) Data usage text – shows right under the welcome text on the member view bio page. Use this to be explicit about how member’s data will be used.
9) Completion message – shows when members click on ‘Finish’ at the bottom of the member view connections page. Use it to thank members and suggest/link to next steps if appropriate.
10) When checked, shows the map page option in the member view. Use this once you have at least a prototype map started in Kumu to embed the prototype into sumApp. Helps members understand why you’re collecting this data from them, enables them to start to engage with the map and to offer feedback into the map design.
11) Insert the map embed code from Kumu here so that map shows up in the map tab. How to add the embed.
12) Cancel changes made above.
13) Save changes made above.
14) Archive or delete this project. Requires account password.
Extra settings in Tier IV
Tier IV was originally created because we needed to be able to change the member view language in places to accommodate projects that looked at connections between organizations as opposed to individuals. The settings page reflects that additional needed flexibility.
You’ll see these additional fields in your settings page if you have a Tier IV account.
Tier IV Settings:
1) Element type – this doesn’t show anywhere in the sumApp interface, but it is exported with your dataset, so that if you’re merging data-sets you can specify what kinds of elements sumApp is generating. Can be whatever makes sense, such as ‘organization’, ‘team’, ‘project’ – What kind of entity are you surveying, if not persons?
2) Bio nav title – if you’re surveying organizations, ‘bio’ doesn’t make a lot of sense. You can change it to something like ‘Profile’ – shows on member view navigation bar.
3) Bio upload button text. Can change the button text on the member view bio page to something more appropriate for the entity you are surveying – such as ‘logo’.
4) Bio about help text. Shows underneath the bio field on the member view bio page. Can be edited to suit your type of entity.
5) Bio about placeholder. The text in the member view bio page bio field can be edited to suit your type of entity.
6) Bio not available. This text shows up in the member tiles on the member view connections page when a member has not yet input anything into their bio field. Can be edited to suit the entity type you’re dealing with.
7) Connections page title. Shows just above the sorting buttons on the member view connections page. Can be edited to suit the type of entity you are dealing with.
8) Connections modal title. Shows in the popped-open member tile, below the image and bio, above the connection questions. Can be edited to suit the type of entity you are dealing with.
Settings for all Tiers
The aspects of the Member Views (outside of the survey and the connection options) that can be edited are managed in Setup > Settings:
Features of the settings page are:
1) Indicates you’re in the ‘Setup’ phase of sumApp.
2) Shows you’re on the ‘Define Settings’ page.
3) Network name – shows at top of all member view pages, in ‘network_name’ tags, and on your project list. Originally defined when creating the project, it can be changed here. Each project name must be unique.
4) Tiers II, III & IV include the survey. It can be toggled off and on, depending on your context. Checking the checkbox will show the survey in the member view, unchecking it will hide it from the member view.
5) The ‘Hello Text’ shows at the top of the member view bio page and connections page – you edit to suit your situation and can use tags to personalize the page.
6) List of tags available in the hello text
7) Welcome text – shows in body of the member view bio page. Use it to invite, orient and direct your members in the use and purpose of sumApp and your mapping project.
8) Data usage text – shows right under the welcome text on the member view bio page. Use this to be explicit about how member’s data will be used.
9) Completion message – shows when members click on ‘Finish’ at the bottom of the member view connections page. Use it to thank members and suggest/link to next steps if appropriate.
10) When checked, shows the map page option in the member view. Use this once you have at least a prototype map started in Kumu to embed the prototype into sumApp. Helps members understand why you’re collecting this data from them, enables them to start to engage with the map and to offer feedback into the map design.
11) Insert the map embed code from Kumu here so that map shows up in the map tab. How to add the embed.
12) Cancel changes made above.
13) Save changes made above.
14) Archive or delete this project. Requires account password.
Extra settings in Tier IV
Tier IV was originally created because we needed to be able to change the member view language in places to accommodate projects that looked at connections between organizations as opposed to individuals. The settings page reflects that additional needed flexibility.
You’ll see these additional fields in your settings page if you have a Tier IV account.
Tier IV Settings:
1) Element type – this doesn’t show anywhere in the sumApp interface, but it is exported with your dataset, so that if you’re merging data-sets you can specify what kinds of elements sumApp is generating. Can be whatever makes sense, such as ‘organization’, ‘team’, ‘project’ – What kind of entity are you surveying, if not persons?
2) Bio nav title – if you’re surveying organizations, ‘bio’ doesn’t make a lot of sense. You can change it to something like ‘Profile’ – shows on member view navigation bar.
3) Bio upload button text. Can change the button text on the member view bio page to something more appropriate for the entity you are surveying – such as ‘logo’.
4) Bio about help text. Shows underneath the bio field on the member view bio page. Can be edited to suit your type of entity.
5) Bio about placeholder. The text in the member view bio page bio field can be edited to suit your type of entity.
6) Bio not available. This text shows up in the member tiles on the member view connections page when a member has not yet input anything into their bio field. Can be edited to suit the entity type you’re dealing with.
7) Connections page title. Shows just above the sorting buttons on the member view connections page. Can be edited to suit the type of entity you are dealing with.
8) Connections modal title. Shows in the popped-open member tile, below the image and bio, above the connection questions. Can be edited to suit the type of entity you are dealing with.
Settings for all Tiers
The aspects of the Member Views (outside of the survey and the connection options) that can be edited are managed in Setup > Settings:
Features of the settings page are:
1) Indicates you’re in the ‘Setup’ phase of sumApp.
2) Shows you’re on the ‘Define Settings’ page.
3) Network name – shows at top of all member view pages, in ‘network_name’ tags, and on your project list. Originally defined when creating the project, it can be changed here. Each project name must be unique.
4) Tiers II, III & IV include the survey. It can be toggled off and on, depending on your context. Checking the checkbox will show the survey in the member view, unchecking it will hide it from the member view.
5) The ‘Hello Text’ shows at the top of the member view bio page and connections page – you edit to suit your situation and can use tags to personalize the page.
6) List of tags available in the hello text
7) Welcome text – shows in body of the member view bio page. Use it to invite, orient and direct your members in the use and purpose of sumApp and your mapping project.
8) Data usage text – shows right under the welcome text on the member view bio page. Use this to be explicit about how member’s data will be used.
9) Completion message – shows when members click on ‘Finish’ at the bottom of the member view connections page. Use it to thank members and suggest/link to next steps if appropriate.
10) When checked, shows the map page option in the member view. Use this once you have at least a prototype map started in Kumu to embed the prototype into sumApp. Helps members understand why you’re collecting this data from them, enables them to start to engage with the map and to offer feedback into the map design.
11) Insert the map embed code from Kumu here so that map shows up in the map tab. How to add the embed.
12) Cancel changes made above.
13) Save changes made above.
14) Archive or delete this project. Requires account password.
Extra settings in Tier IV
Tier IV was originally created because we needed to be able to change the member view language in places to accommodate projects that looked at connections between organizations as opposed to individuals. The settings page reflects that additional needed flexibility.
You’ll see these additional fields in your settings page if you have a Tier IV account.
Tier IV Settings:
1) Element type – this doesn’t show anywhere in the sumApp interface, but it is exported with your dataset, so that if you’re merging data-sets you can specify what kinds of elements sumApp is generating. Can be whatever makes sense, such as ‘organization’, ‘team’, ‘project’ – What kind of entity are you surveying, if not persons?
2) Bio nav title – if you’re surveying organizations, ‘bio’ doesn’t make a lot of sense. You can change it to something like ‘Profile’ – shows on member view navigation bar.
3) Bio upload button text. Can change the button text on the member view bio page to something more appropriate for the entity you are surveying – such as ‘logo’.
4) Bio about help text. Shows underneath the bio field on the member view bio page. Can be edited to suit your type of entity.
5) Bio about placeholder. The text in the member view bio page bio field can be edited to suit your type of entity.
6) Bio not available. This text shows up in the member tiles on the member view connections page when a member has not yet input anything into their bio field. Can be edited to suit the entity type you’re dealing with.
7) Connections page title. Shows just above the sorting buttons on the member view connections page. Can be edited to suit the type of entity you are dealing with.
8) Connections modal title. Shows in the popped-open member tile, below the image and bio, above the connection questions. Can be edited to suit the type of entity you are dealing with.
Settings for all Tiers
The aspects of the Member Views (outside of the survey and the connection options) that can be edited are managed in Setup > Settings:
Features of the settings page are:
1) Indicates you’re in the ‘Setup’ phase of sumApp.
2) Shows you’re on the ‘Define Settings’ page.
3) Network name – shows at top of all member view pages, in ‘network_name’ tags, and on your project list. Originally defined when creating the project, it can be changed here. Each project name must be unique.
4) Tiers II, III & IV include the survey. It can be toggled off and on, depending on your context. Checking the checkbox will show the survey in the member view, unchecking it will hide it from the member view.
5) The ‘Hello Text’ shows at the top of the member view bio page and connections page – you edit to suit your situation and can use tags to personalize the page.
6) List of tags available in the hello text
7) Welcome text – shows in body of the member view bio page. Use it to invite, orient and direct your members in the use and purpose of sumApp and your mapping project.
8) Data usage text – shows right under the welcome text on the member view bio page. Use this to be explicit about how member’s data will be used.
9) Completion message – shows when members click on ‘Finish’ at the bottom of the member view connections page. Use it to thank members and suggest/link to next steps if appropriate.
10) When checked, shows the map page option in the member view. Use this once you have at least a prototype map started in Kumu to embed the prototype into sumApp. Helps members understand why you’re collecting this data from them, enables them to start to engage with the map and to offer feedback into the map design.
11) Insert the map embed code from Kumu here so that map shows up in the map tab. How to add the embed.
12) Cancel changes made above.
13) Save changes made above.
14) Archive or delete this project. Requires account password.
Extra settings in Tier IV
Tier IV was originally created because we needed to be able to change the member view language in places to accommodate projects that looked at connections between organizations as opposed to individuals. The settings page reflects that additional needed flexibility.
You’ll see these additional fields in your settings page if you have a Tier IV account.
Tier IV Settings:
1) Element type – this doesn’t show anywhere in the sumApp interface, but it is exported with your dataset, so that if you’re merging data-sets you can specify what kinds of elements sumApp is generating. Can be whatever makes sense, such as ‘organization’, ‘team’, ‘project’ – What kind of entity are you surveying, if not persons?
2) Bio nav title – if you’re surveying organizations, ‘bio’ doesn’t make a lot of sense. You can change it to something like ‘Profile’ – shows on member view navigation bar.
3) Bio upload button text. Can change the button text on the member view bio page to something more appropriate for the entity you are surveying – such as ‘logo’.
4) Bio about help text. Shows underneath the bio field on the member view bio page. Can be edited to suit your type of entity.
5) Bio about placeholder. The text in the member view bio page bio field can be edited to suit your type of entity.
6) Bio not available. This text shows up in the member tiles on the member view connections page when a member has not yet input anything into their bio field. Can be edited to suit the entity type you’re dealing with.
7) Connections page title. Shows just above the sorting buttons on the member view connections page. Can be edited to suit the type of entity you are dealing with.
8) Connections modal title. Shows in the popped-open member tile, below the image and bio, above the connection questions. Can be edited to suit the type of entity you are dealing with.
Settings for all Tiers
The aspects of the Member Views (outside of the survey and the connection options) that can be edited are managed in Setup > Settings:
Features of the settings page are:
1) Indicates you’re in the ‘Setup’ phase of sumApp.
2) Shows you’re on the ‘Define Settings’ page.
3) Network name – shows at top of all member view pages, in ‘network_name’ tags, and on your project list. Originally defined when creating the project, it can be changed here. Each project name must be unique.
4) Tiers II, III & IV include the survey. It can be toggled off and on, depending on your context. Checking the checkbox will show the survey in the member view, unchecking it will hide it from the member view.
5) The ‘Hello Text’ shows at the top of the member view bio page and connections page – you edit to suit your situation and can use tags to personalize the page.
6) List of tags available in the hello text
7) Welcome text – shows in body of the member view bio page. Use it to invite, orient and direct your members in the use and purpose of sumApp and your mapping project.
8) Data usage text – shows right under the welcome text on the member view bio page. Use this to be explicit about how member’s data will be used.
9) Completion message – shows when members click on ‘Finish’ at the bottom of the member view connections page. Use it to thank members and suggest/link to next steps if appropriate.
10) When checked, shows the map page option in the member view. Use this once you have at least a prototype map started in Kumu to embed the prototype into sumApp. Helps members understand why you’re collecting this data from them, enables them to start to engage with the map and to offer feedback into the map design.
11) Insert the map embed code from Kumu here so that map shows up in the map tab. How to add the embed.
12) Cancel changes made above.
13) Save changes made above.
14) Archive or delete this project. Requires account password.
Extra settings in Tier IV
Tier IV was originally created because we needed to be able to change the member view language in places to accommodate projects that looked at connections between organizations as opposed to individuals. The settings page reflects that additional needed flexibility.
You’ll see these additional fields in your settings page if you have a Tier IV account.
Tier IV Settings:
1) Element type – this doesn’t show anywhere in the sumApp interface, but it is exported with your dataset, so that if you’re merging data-sets you can specify what kinds of elements sumApp is generating. Can be whatever makes sense, such as ‘organization’, ‘team’, ‘project’ – What kind of entity are you surveying, if not persons?
2) Bio nav title – if you’re surveying organizations, ‘bio’ doesn’t make a lot of sense. You can change it to something like ‘Profile’ – shows on member view navigation bar.
3) Bio upload button text. Can change the button text on the member view bio page to something more appropriate for the entity you are surveying – such as ‘logo’.
4) Bio about help text. Shows underneath the bio field on the member view bio page. Can be edited to suit your type of entity.
5) Bio about placeholder. The text in the member view bio page bio field can be edited to suit your type of entity.
6) Bio not available. This text shows up in the member tiles on the member view connections page when a member has not yet input anything into their bio field. Can be edited to suit the entity type you’re dealing with.
7) Connections page title. Shows just above the sorting buttons on the member view connections page. Can be edited to suit the type of entity you are dealing with.
8) Connections modal title. Shows in the popped-open member tile, below the image and bio, above the connection questions. Can be edited to suit the type of entity you are dealing with.
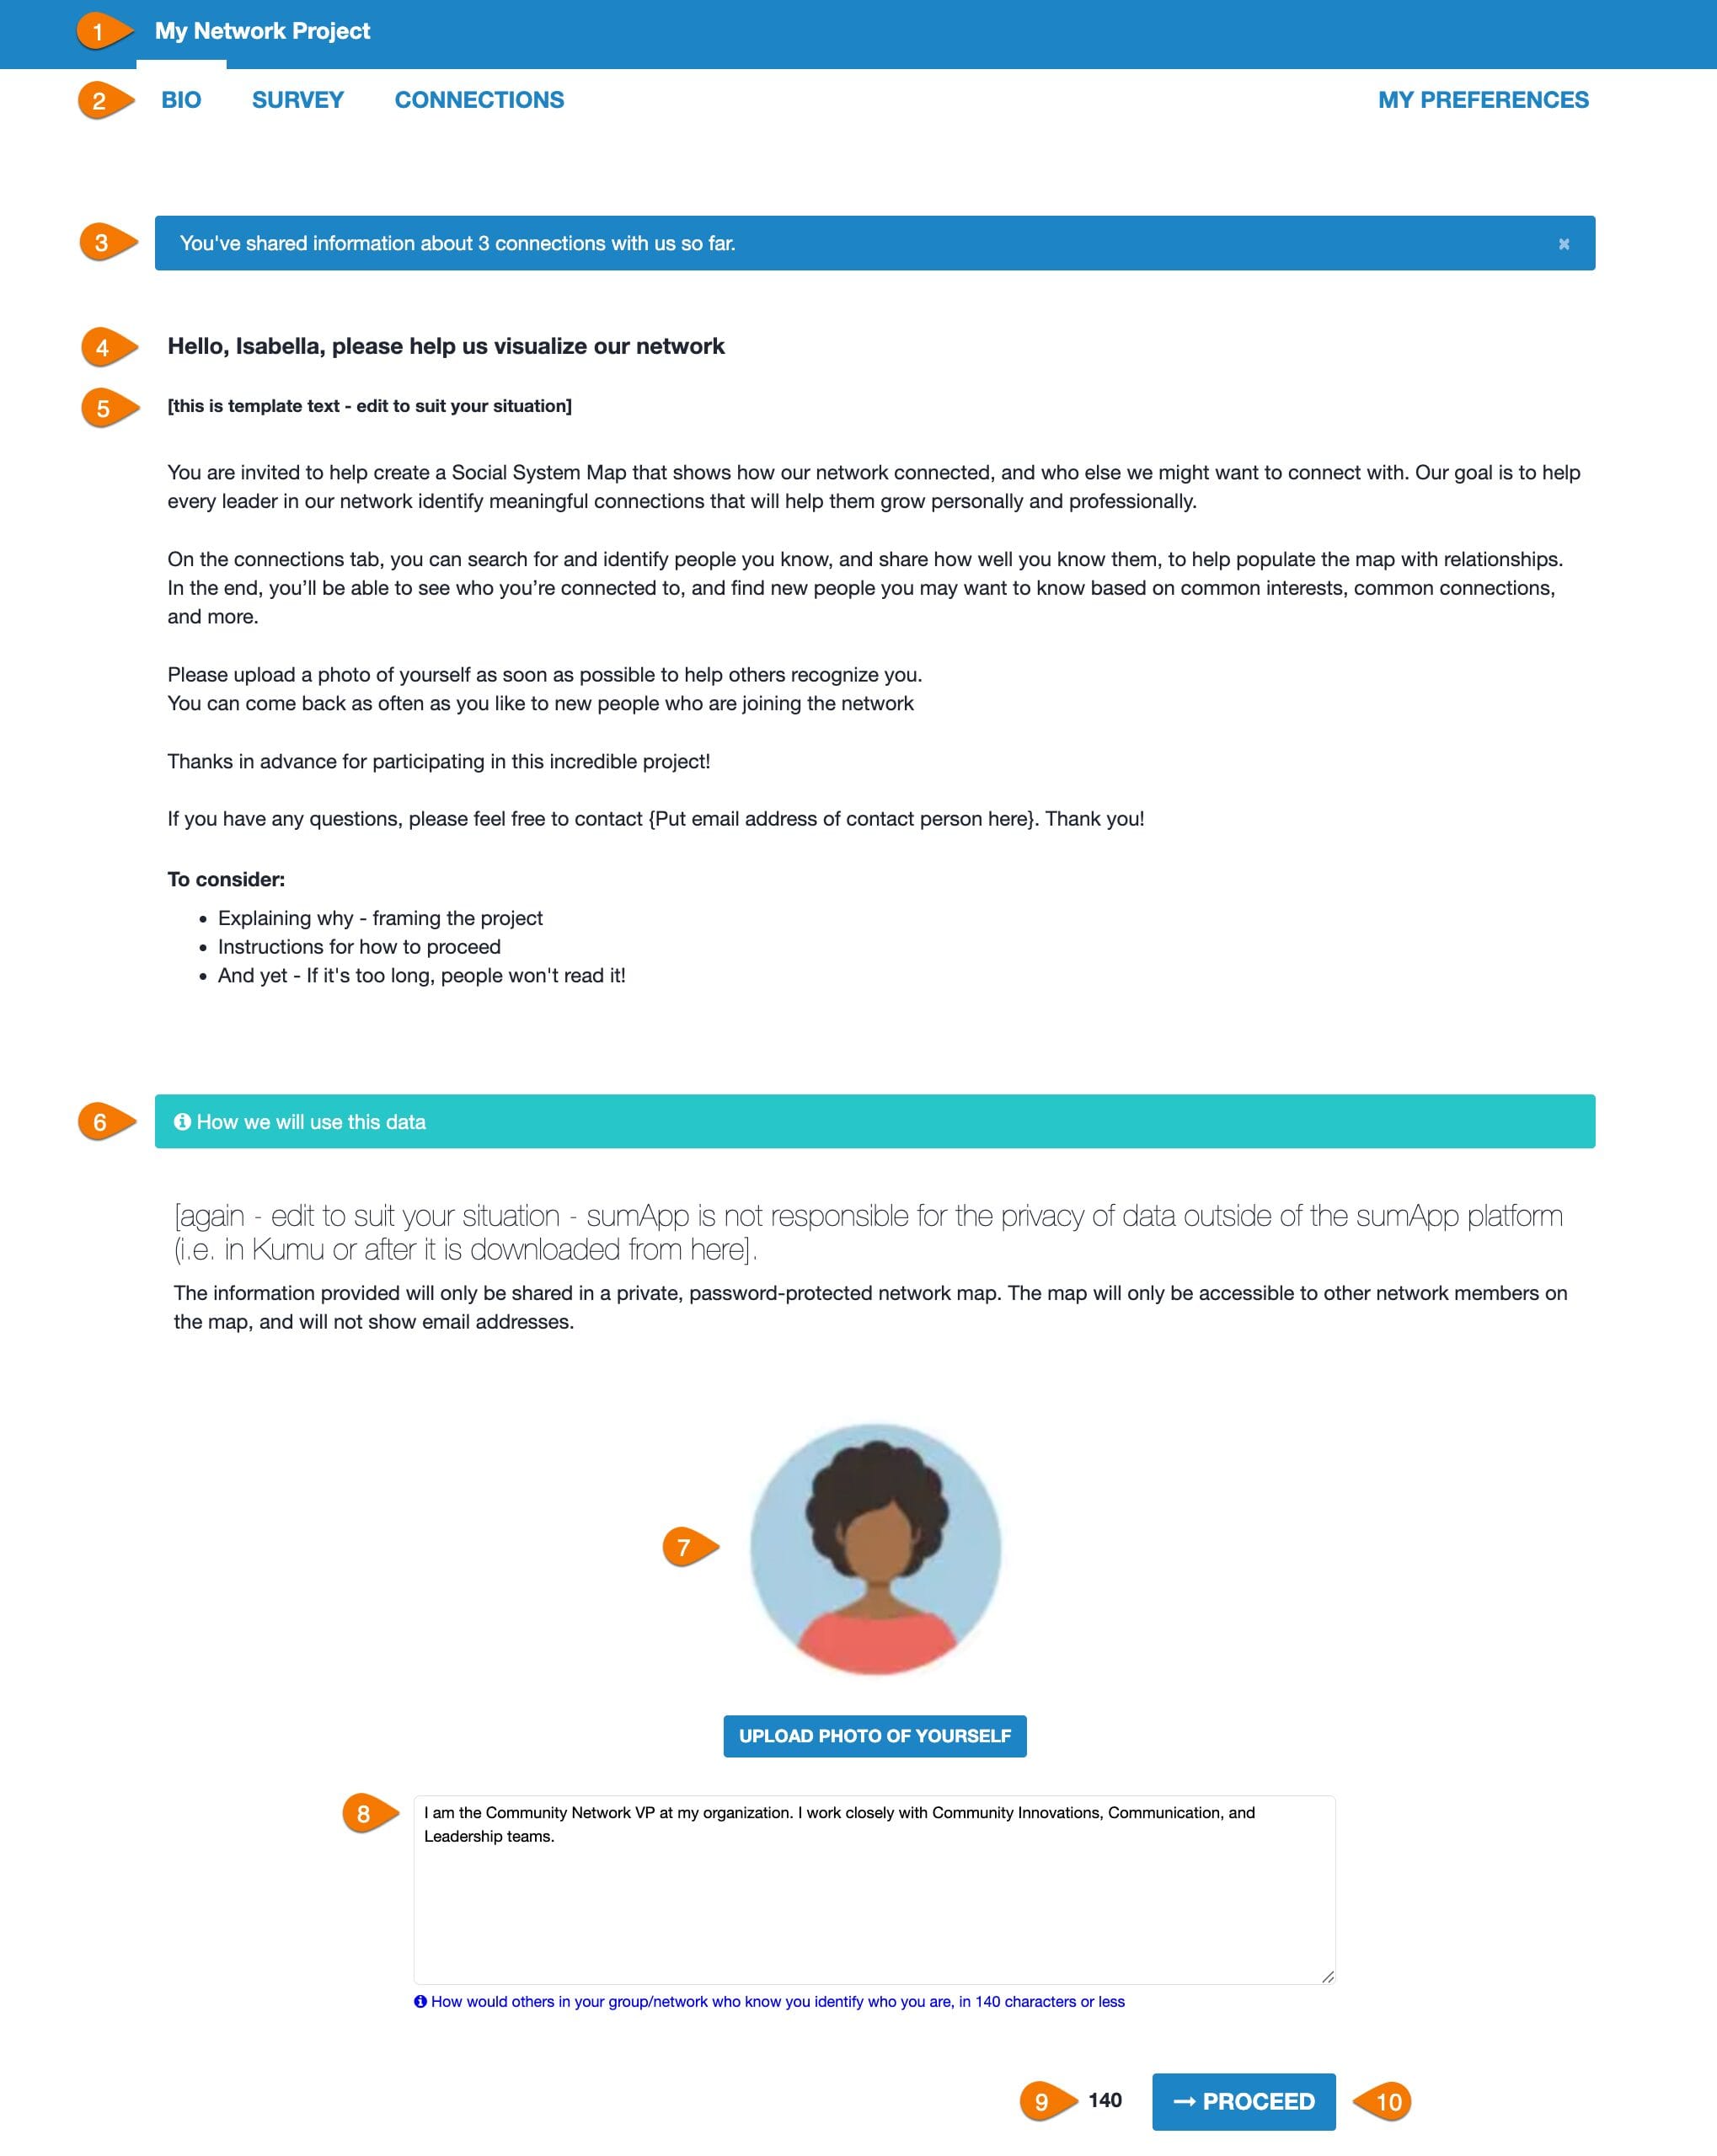
The Bio page is the first page your members will see when they click on the link included in their sumApp invitation email. It is meant to help orient your members to the project’s process and purpose and give each member the opportunity to help others in the network identify them easily on the Connections page.
Features of the Bio page
1) Project name – defined when the project was created. Can be changed in
2) Member View Navigation Bar. Members can skip forward through the app to whichever page they want to see. The Bio tab is editable in Tier IV, in
3) If the member has already shared connections in the connections page, the blue info bar at the top tells them how many they’ve shared.
4) ‘Hello Text’. Editable in all Tiers,
5) ‘Welcome Text’. Editable in all Tiers,
6) ‘Data Usage Text’. Editable in all Tiers, Make sure you are clear and accurate about how private or public the map and the data in it will be.
7) The profile picture upload. Members who have a Gravitar account associated with the email address you are using, their ‘gravitar’ will be pulled in automatically. They can replace it using the upload function if desired. Helps members easily identify one another on the connections page and you can show the picture in the member nodes in the Kumu map. The text on the blue button is editable in Tier IV, in Settings.
8) An (old-school) tweet-sized space for member to share a little info about themselves to help others in the network identify them easily. Limit is 140 characters (not words!). The light blue description text below the field is editable in Tier IV, in Settings.
9) Character countdown showing how many unused characters remain in the field (in #8).
10) Proceed button – saves bio text and proceeds to the survey page.
You can change your options in Setup > Define connection options – #1 & #2 in image below.
Tiers I & II have a simple, single-question interface – #3 in image below.
- Edit the options in #3 in the image above.
- You can use as few or as many options as you like, but don’t use so many it becomes hard for your members to decide.
- Only one option can be selected from the list.
- The options should be general enough to encompass the range of possible connections without making an exhaustive list.
- Don’t include ‘don’t know’ as an option – that will require everyone in the network to reply regarding everyone else in the network, and it will generate a whole lot of unnecessary data.
- Set your options to be ranked with increasing strength.
- You can preview the options in the preview panel below the editor.
- Don’t forget to save! #5 in image.
- Options show up on the member view connections page in the member tiles when they are clicked open.
Settings for all Tiers
The aspects of the Member Views (outside of the survey and the connection options) that can be edited are managed in Setup > Settings:
Features of the settings page are:
1) Indicates you’re in the ‘Setup’ phase of sumApp.
2) Shows you’re on the ‘Define Settings’ page.
3) Network name – shows at top of all member view pages, in ‘network_name’ tags, and on your project list. Originally defined when creating the project, it can be changed here. Each project name must be unique.
4) Tiers II, III & IV include the survey. It can be toggled off and on, depending on your context. Checking the checkbox will show the survey in the member view, unchecking it will hide it from the member view.
5) The ‘Hello Text’ shows at the top of the member view bio page and connections page – you edit to suit your situation and can use tags to personalize the page.
6) List of tags available in the hello text
7) Welcome text – shows in body of the member view bio page. Use it to invite, orient and direct your members in the use and purpose of sumApp and your mapping project.
8) Data usage text – shows right under the welcome text on the member view bio page. Use this to be explicit about how member’s data will be used.
9) Completion message – shows when members click on ‘Finish’ at the bottom of the member view connections page. Use it to thank members and suggest/link to next steps if appropriate.
10) When checked, shows the map page option in the member view. Use this once you have at least a prototype map started in Kumu to embed the prototype into sumApp. Helps members understand why you’re collecting this data from them, enables them to start to engage with the map and to offer feedback into the map design.
11) Insert the map embed code from Kumu here so that map shows up in the map tab. How to add the embed.
12) Cancel changes made above.
13) Save changes made above.
14) Archive or delete this project. Requires account password.
Extra settings in Tier IV
Tier IV was originally created because we needed to be able to change the member view language in places to accommodate projects that looked at connections between organizations as opposed to individuals. The settings page reflects that additional needed flexibility.
You’ll see these additional fields in your settings page if you have a Tier IV account.
Tier IV Settings:
1) Element type – this doesn’t show anywhere in the sumApp interface, but it is exported with your dataset, so that if you’re merging data-sets you can specify what kinds of elements sumApp is generating. Can be whatever makes sense, such as ‘organization’, ‘team’, ‘project’ – What kind of entity are you surveying, if not persons?
2) Bio nav title – if you’re surveying organizations, ‘bio’ doesn’t make a lot of sense. You can change it to something like ‘Profile’ – shows on member view navigation bar.
3) Bio upload button text. Can change the button text on the member view bio page to something more appropriate for the entity you are surveying – such as ‘logo’.
4) Bio about help text. Shows underneath the bio field on the member view bio page. Can be edited to suit your type of entity.
5) Bio about placeholder. The text in the member view bio page bio field can be edited to suit your type of entity.
6) Bio not available. This text shows up in the member tiles on the member view connections page when a member has not yet input anything into their bio field. Can be edited to suit the entity type you’re dealing with.
7) Connections page title. Shows just above the sorting buttons on the member view connections page. Can be edited to suit the type of entity you are dealing with.
8) Connections modal title. Shows in the popped-open member tile, below the image and bio, above the connection questions. Can be edited to suit the type of entity you are dealing with.
You customize your survey to suit your network in the Survey Editor Workspace: 

Parts of the Workspace
- Indicates what page you’re on, within your project.
- Indicates which project you’re currently working on.
- Shows you’re in the first tab of the project phases navigation bar – Setup
- Shows your project status. Toggle on to enable project members to submit their survey responses.
- Shows you’re in the ‘create survey’ tab of the Setup phase
- On the left you can select from your field options to drag onto the Survey Builder canvas.
- Use to view the stats on your survey fields, including the number of map members who have submitted an answer for the field.
- On the right is the Survey Builder – you’ll drag fields from the left side of the workspace to the right. There you can put them in the order you want and edit the field content.
- Enables you to preview the form.
- Clone enables you to copy another survey from your account as a starting point. Existing fields will be over-written when you clone as survey.
- Save the whole survey – don’t forget to save frequently!
Settings for all Tiers
The aspects of the Member Views (outside of the survey and the connection options) that can be edited are managed in Setup > Settings:
Features of the settings page are:
1) Indicates you’re in the ‘Setup’ phase of sumApp.
2) Shows you’re on the ‘Define Settings’ page.
3) Network name – shows at top of all member view pages, in ‘network_name’ tags, and on your project list. Originally defined when creating the project, it can be changed here. Each project name must be unique.
4) Tiers II, III & IV include the survey. It can be toggled off and on, depending on your context. Checking the checkbox will show the survey in the member view, unchecking it will hide it from the member view.
5) The ‘Hello Text’ shows at the top of the member view bio page and connections page – you edit to suit your situation and can use tags to personalize the page.
6) List of tags available in the hello text
7) Welcome text – shows in body of the member view bio page. Use it to invite, orient and direct your members in the use and purpose of sumApp and your mapping project.
8) Data usage text – shows right under the welcome text on the member view bio page. Use this to be explicit about how member’s data will be used.
9) Completion message – shows when members click on ‘Finish’ at the bottom of the member view connections page. Use it to thank members and suggest/link to next steps if appropriate.
10) When checked, shows the map page option in the member view. Use this once you have at least a prototype map started in Kumu to embed the prototype into sumApp. Helps members understand why you’re collecting this data from them, enables them to start to engage with the map and to offer feedback into the map design.
11) Insert the map embed code from Kumu here so that map shows up in the map tab. How to add the embed.
12) Cancel changes made above.
13) Save changes made above.
14) Archive or delete this project. Requires account password.
Extra settings in Tier IV
Tier IV was originally created because we needed to be able to change the member view language in places to accommodate projects that looked at connections between organizations as opposed to individuals. The settings page reflects that additional needed flexibility.
You’ll see these additional fields in your settings page if you have a Tier IV account.
Tier IV Settings:
1) Element type – this doesn’t show anywhere in the sumApp interface, but it is exported with your dataset, so that if you’re merging data-sets you can specify what kinds of elements sumApp is generating. Can be whatever makes sense, such as ‘organization’, ‘team’, ‘project’ – What kind of entity are you surveying, if not persons?
2) Bio nav title – if you’re surveying organizations, ‘bio’ doesn’t make a lot of sense. You can change it to something like ‘Profile’ – shows on member view navigation bar.
3) Bio upload button text. Can change the button text on the member view bio page to something more appropriate for the entity you are surveying – such as ‘logo’.
4) Bio about help text. Shows underneath the bio field on the member view bio page. Can be edited to suit your type of entity.
5) Bio about placeholder. The text in the member view bio page bio field can be edited to suit your type of entity.
6) Bio not available. This text shows up in the member tiles on the member view connections page when a member has not yet input anything into their bio field. Can be edited to suit the entity type you’re dealing with.
7) Connections page title. Shows just above the sorting buttons on the member view connections page. Can be edited to suit the type of entity you are dealing with.
8) Connections modal title. Shows in the popped-open member tile, below the image and bio, above the connection questions. Can be edited to suit the type of entity you are dealing with.
Settings for all Tiers
The aspects of the Member Views (outside of the survey and the connection options) that can be edited are managed in Setup > Settings:
Features of the settings page are:
1) Indicates you’re in the ‘Setup’ phase of sumApp.
2) Shows you’re on the ‘Define Settings’ page.
3) Network name – shows at top of all member view pages, in ‘network_name’ tags, and on your project list. Originally defined when creating the project, it can be changed here. Each project name must be unique.
4) Tiers II, III & IV include the survey. It can be toggled off and on, depending on your context. Checking the checkbox will show the survey in the member view, unchecking it will hide it from the member view.
5) The ‘Hello Text’ shows at the top of the member view bio page and connections page – you edit to suit your situation and can use tags to personalize the page.
6) List of tags available in the hello text
7) Welcome text – shows in body of the member view bio page. Use it to invite, orient and direct your members in the use and purpose of sumApp and your mapping project.
8) Data usage text – shows right under the welcome text on the member view bio page. Use this to be explicit about how member’s data will be used.
9) Completion message – shows when members click on ‘Finish’ at the bottom of the member view connections page. Use it to thank members and suggest/link to next steps if appropriate.
10) When checked, shows the map page option in the member view. Use this once you have at least a prototype map started in Kumu to embed the prototype into sumApp. Helps members understand why you’re collecting this data from them, enables them to start to engage with the map and to offer feedback into the map design.
11) Insert the map embed code from Kumu here so that map shows up in the map tab. How to add the embed.
12) Cancel changes made above.
13) Save changes made above.
14) Archive or delete this project. Requires account password.
Extra settings in Tier IV
Tier IV was originally created because we needed to be able to change the member view language in places to accommodate projects that looked at connections between organizations as opposed to individuals. The settings page reflects that additional needed flexibility.
You’ll see these additional fields in your settings page if you have a Tier IV account.
Tier IV Settings:
1) Element type – this doesn’t show anywhere in the sumApp interface, but it is exported with your dataset, so that if you’re merging data-sets you can specify what kinds of elements sumApp is generating. Can be whatever makes sense, such as ‘organization’, ‘team’, ‘project’ – What kind of entity are you surveying, if not persons?
2) Bio nav title – if you’re surveying organizations, ‘bio’ doesn’t make a lot of sense. You can change it to something like ‘Profile’ – shows on member view navigation bar.
3) Bio upload button text. Can change the button text on the member view bio page to something more appropriate for the entity you are surveying – such as ‘logo’.
4) Bio about help text. Shows underneath the bio field on the member view bio page. Can be edited to suit your type of entity.
5) Bio about placeholder. The text in the member view bio page bio field can be edited to suit your type of entity.
6) Bio not available. This text shows up in the member tiles on the member view connections page when a member has not yet input anything into their bio field. Can be edited to suit the entity type you’re dealing with.
7) Connections page title. Shows just above the sorting buttons on the member view connections page. Can be edited to suit the type of entity you are dealing with.
8) Connections modal title. Shows in the popped-open member tile, below the image and bio, above the connection questions. Can be edited to suit the type of entity you are dealing with.
Settings for all Tiers
The aspects of the Member Views (outside of the survey and the connection options) that can be edited are managed in Setup > Settings:
Features of the settings page are:
1) Indicates you’re in the ‘Setup’ phase of sumApp.
2) Shows you’re on the ‘Define Settings’ page.
3) Network name – shows at top of all member view pages, in ‘network_name’ tags, and on your project list. Originally defined when creating the project, it can be changed here. Each project name must be unique.
4) Tiers II, III & IV include the survey. It can be toggled off and on, depending on your context. Checking the checkbox will show the survey in the member view, unchecking it will hide it from the member view.
5) The ‘Hello Text’ shows at the top of the member view bio page and connections page – you edit to suit your situation and can use tags to personalize the page.
6) List of tags available in the hello text
7) Welcome text – shows in body of the member view bio page. Use it to invite, orient and direct your members in the use and purpose of sumApp and your mapping project.
8) Data usage text – shows right under the welcome text on the member view bio page. Use this to be explicit about how member’s data will be used.
9) Completion message – shows when members click on ‘Finish’ at the bottom of the member view connections page. Use it to thank members and suggest/link to next steps if appropriate.
10) When checked, shows the map page option in the member view. Use this once you have at least a prototype map started in Kumu to embed the prototype into sumApp. Helps members understand why you’re collecting this data from them, enables them to start to engage with the map and to offer feedback into the map design.
11) Insert the map embed code from Kumu here so that map shows up in the map tab. How to add the embed.
12) Cancel changes made above.
13) Save changes made above.
14) Archive or delete this project. Requires account password.
Extra settings in Tier IV
Tier IV was originally created because we needed to be able to change the member view language in places to accommodate projects that looked at connections between organizations as opposed to individuals. The settings page reflects that additional needed flexibility.
You’ll see these additional fields in your settings page if you have a Tier IV account.
Tier IV Settings:
1) Element type – this doesn’t show anywhere in the sumApp interface, but it is exported with your dataset, so that if you’re merging data-sets you can specify what kinds of elements sumApp is generating. Can be whatever makes sense, such as ‘organization’, ‘team’, ‘project’ – What kind of entity are you surveying, if not persons?
2) Bio nav title – if you’re surveying organizations, ‘bio’ doesn’t make a lot of sense. You can change it to something like ‘Profile’ – shows on member view navigation bar.
3) Bio upload button text. Can change the button text on the member view bio page to something more appropriate for the entity you are surveying – such as ‘logo’.
4) Bio about help text. Shows underneath the bio field on the member view bio page. Can be edited to suit your type of entity.
5) Bio about placeholder. The text in the member view bio page bio field can be edited to suit your type of entity.
6) Bio not available. This text shows up in the member tiles on the member view connections page when a member has not yet input anything into their bio field. Can be edited to suit the entity type you’re dealing with.
7) Connections page title. Shows just above the sorting buttons on the member view connections page. Can be edited to suit the type of entity you are dealing with.
8) Connections modal title. Shows in the popped-open member tile, below the image and bio, above the connection questions. Can be edited to suit the type of entity you are dealing with.
Sometimes the segment filter on the connections page just isn’t enough. Your population is huge and you need another variable to help members filter the whole list down to a manageable number.
In that case – in a Tier IV account – you can use the Custom Survey Filter feature. If you have a Tier IV account, when you click on any list-type (checkbox, select, radio button) field on your survey canvas (on the left side of the workspace) to open the field editor, you’ll see the custom filter checkbox below the option list (at #2 in the image below).
Facts about the custom survey filter feature
- You can only use one question field as a custom filter.
- Select a field where it’s most likely that people who have selected the same response have a greater likelihood of knowing one another than people who didn’t. As in #1 in the image below.
- When the custom filter checkbox for a specific question is checked off, the responses to that question will become a filter on the connections page of the member view. When an option is selected (from the list under #3 above), everyone who selected that option will show in the member list, and everyone who didn’t select it will be removed from the list.
- The member can select multiple options.
- The member can combine the segment filter with the custom survey filter to further narrow the list.
- The numbers listed to the right of the question options indicate how many people in the network have chosen that option.
- Don’t forget to save the whole page (upper right green ‘save’ button) after closing the field editor pop-up!
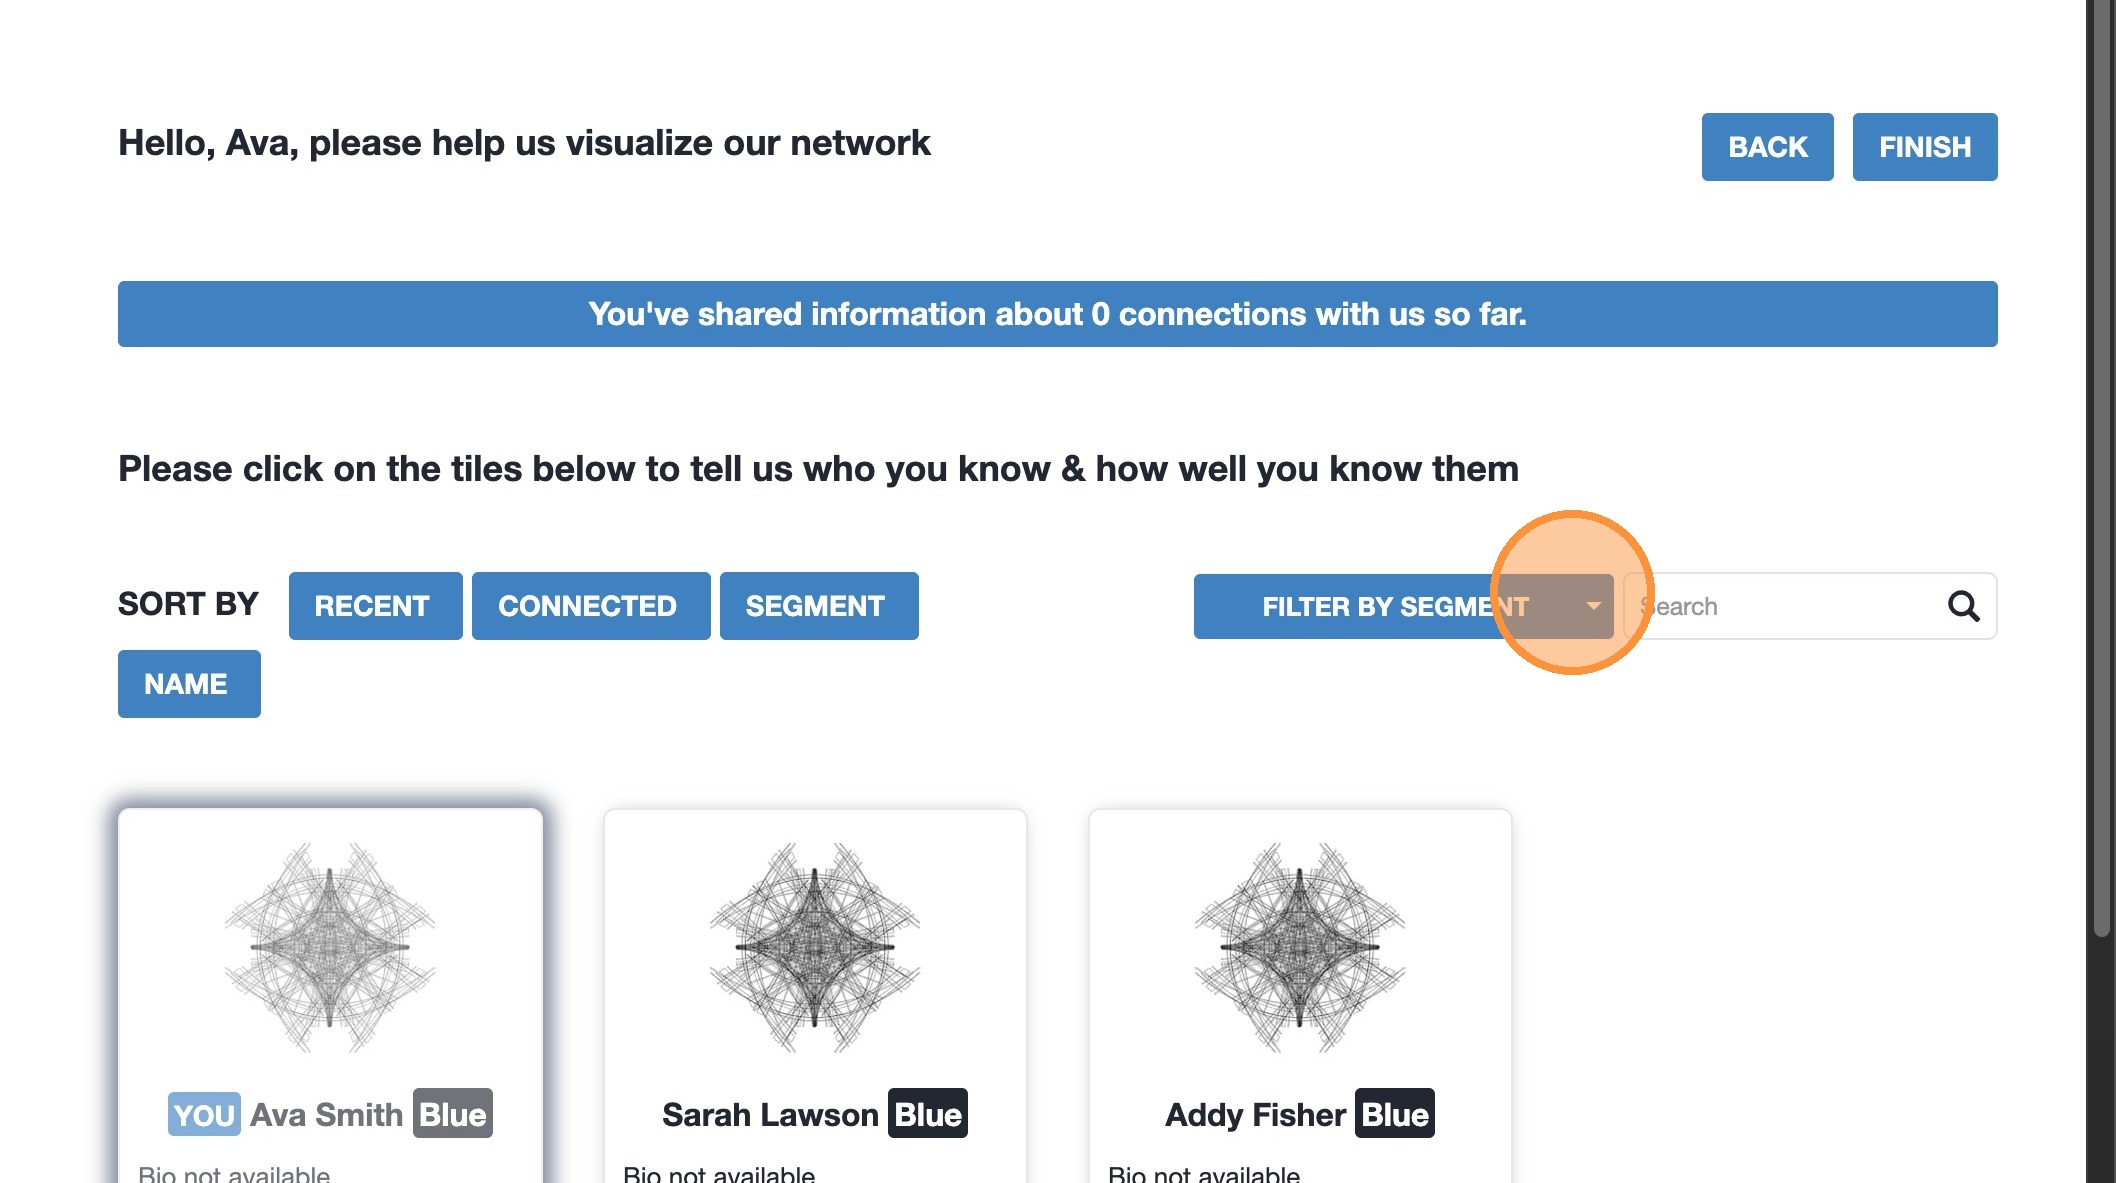
1. Click “Connections” to find members you want to add a connection to.
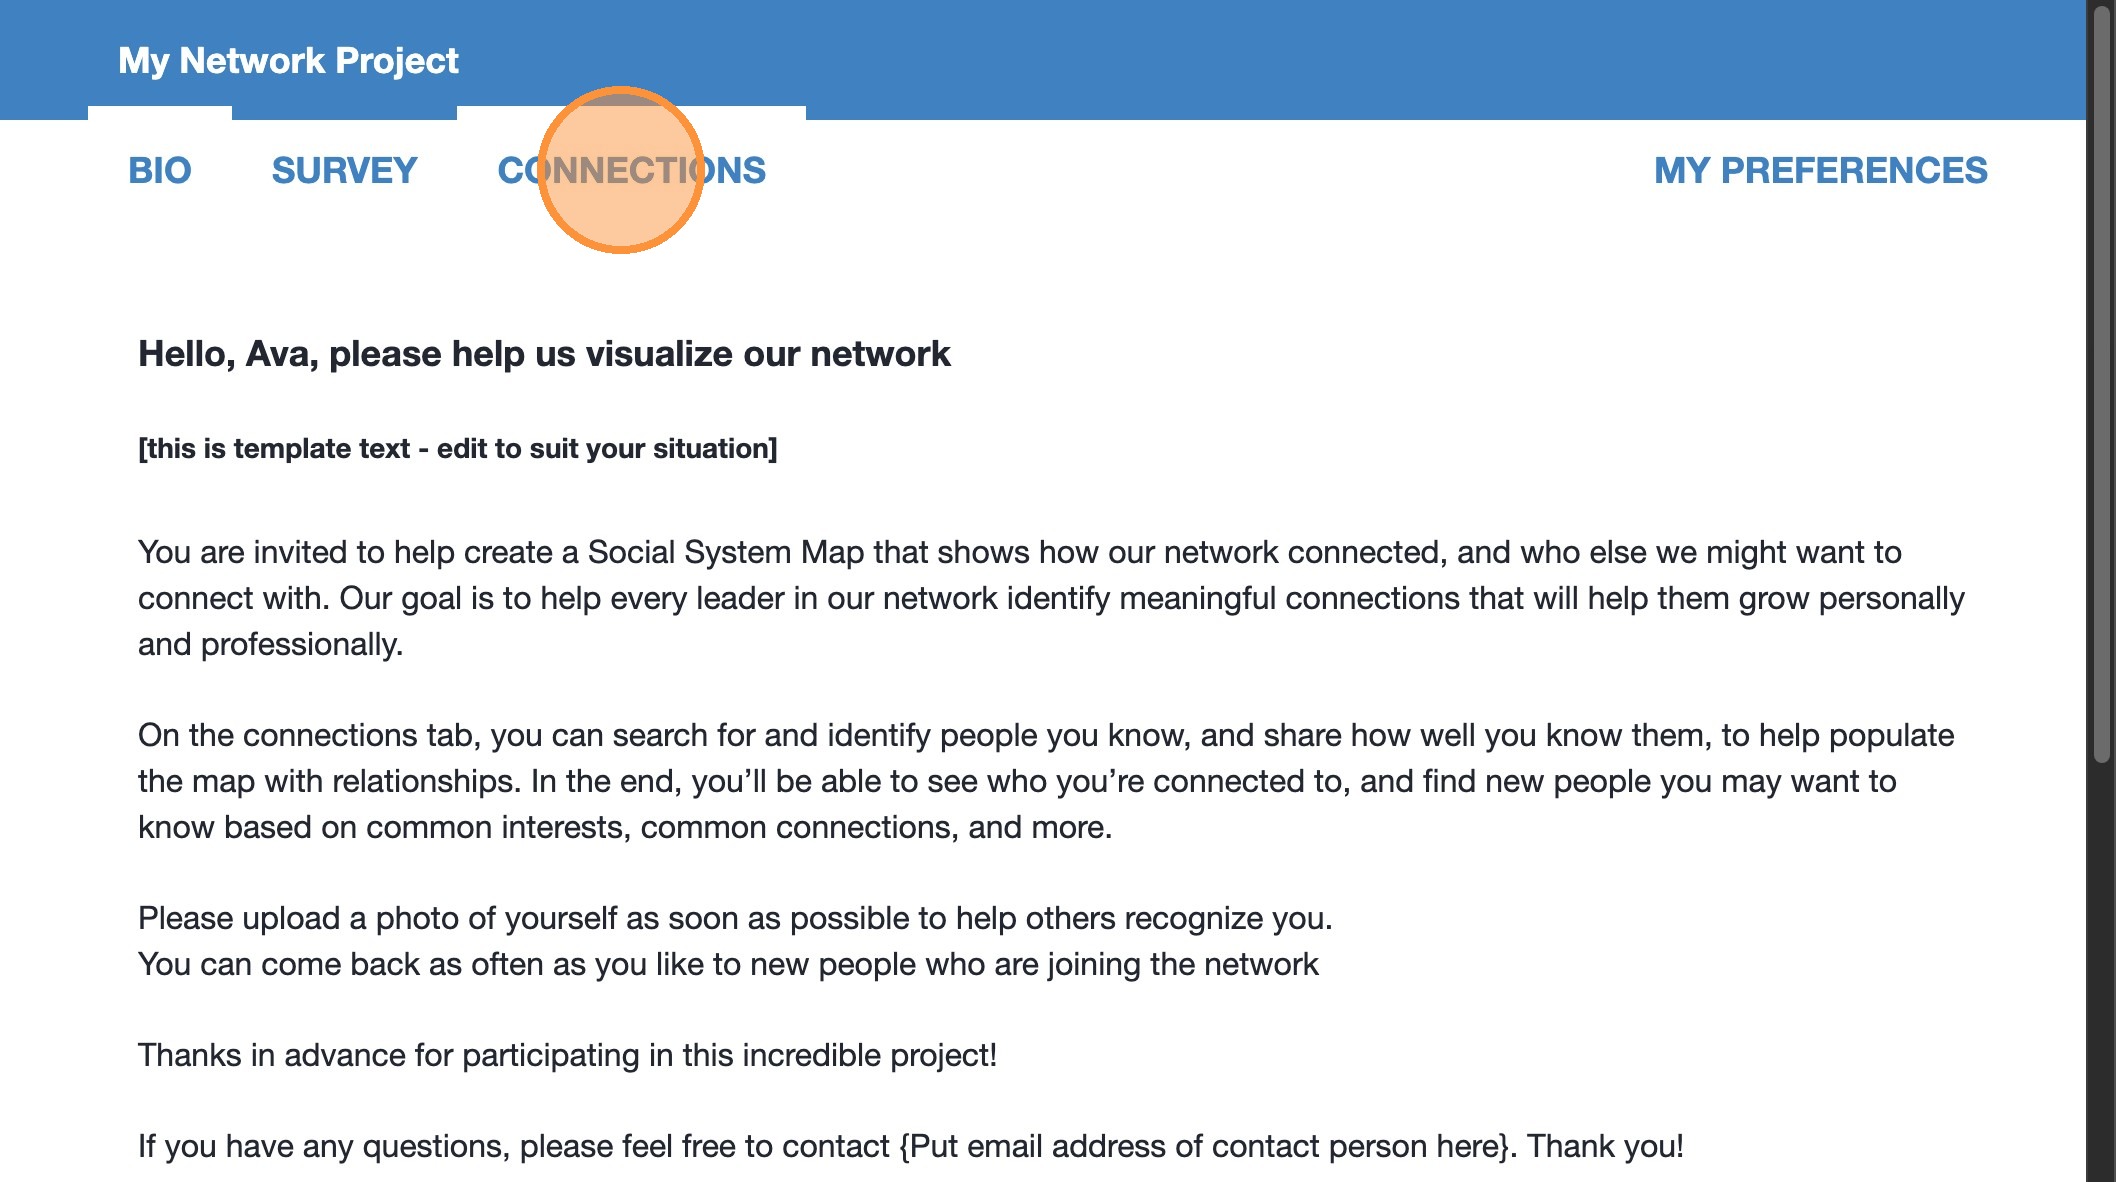
2. Select “Filter by segment” to view the segments in your network.
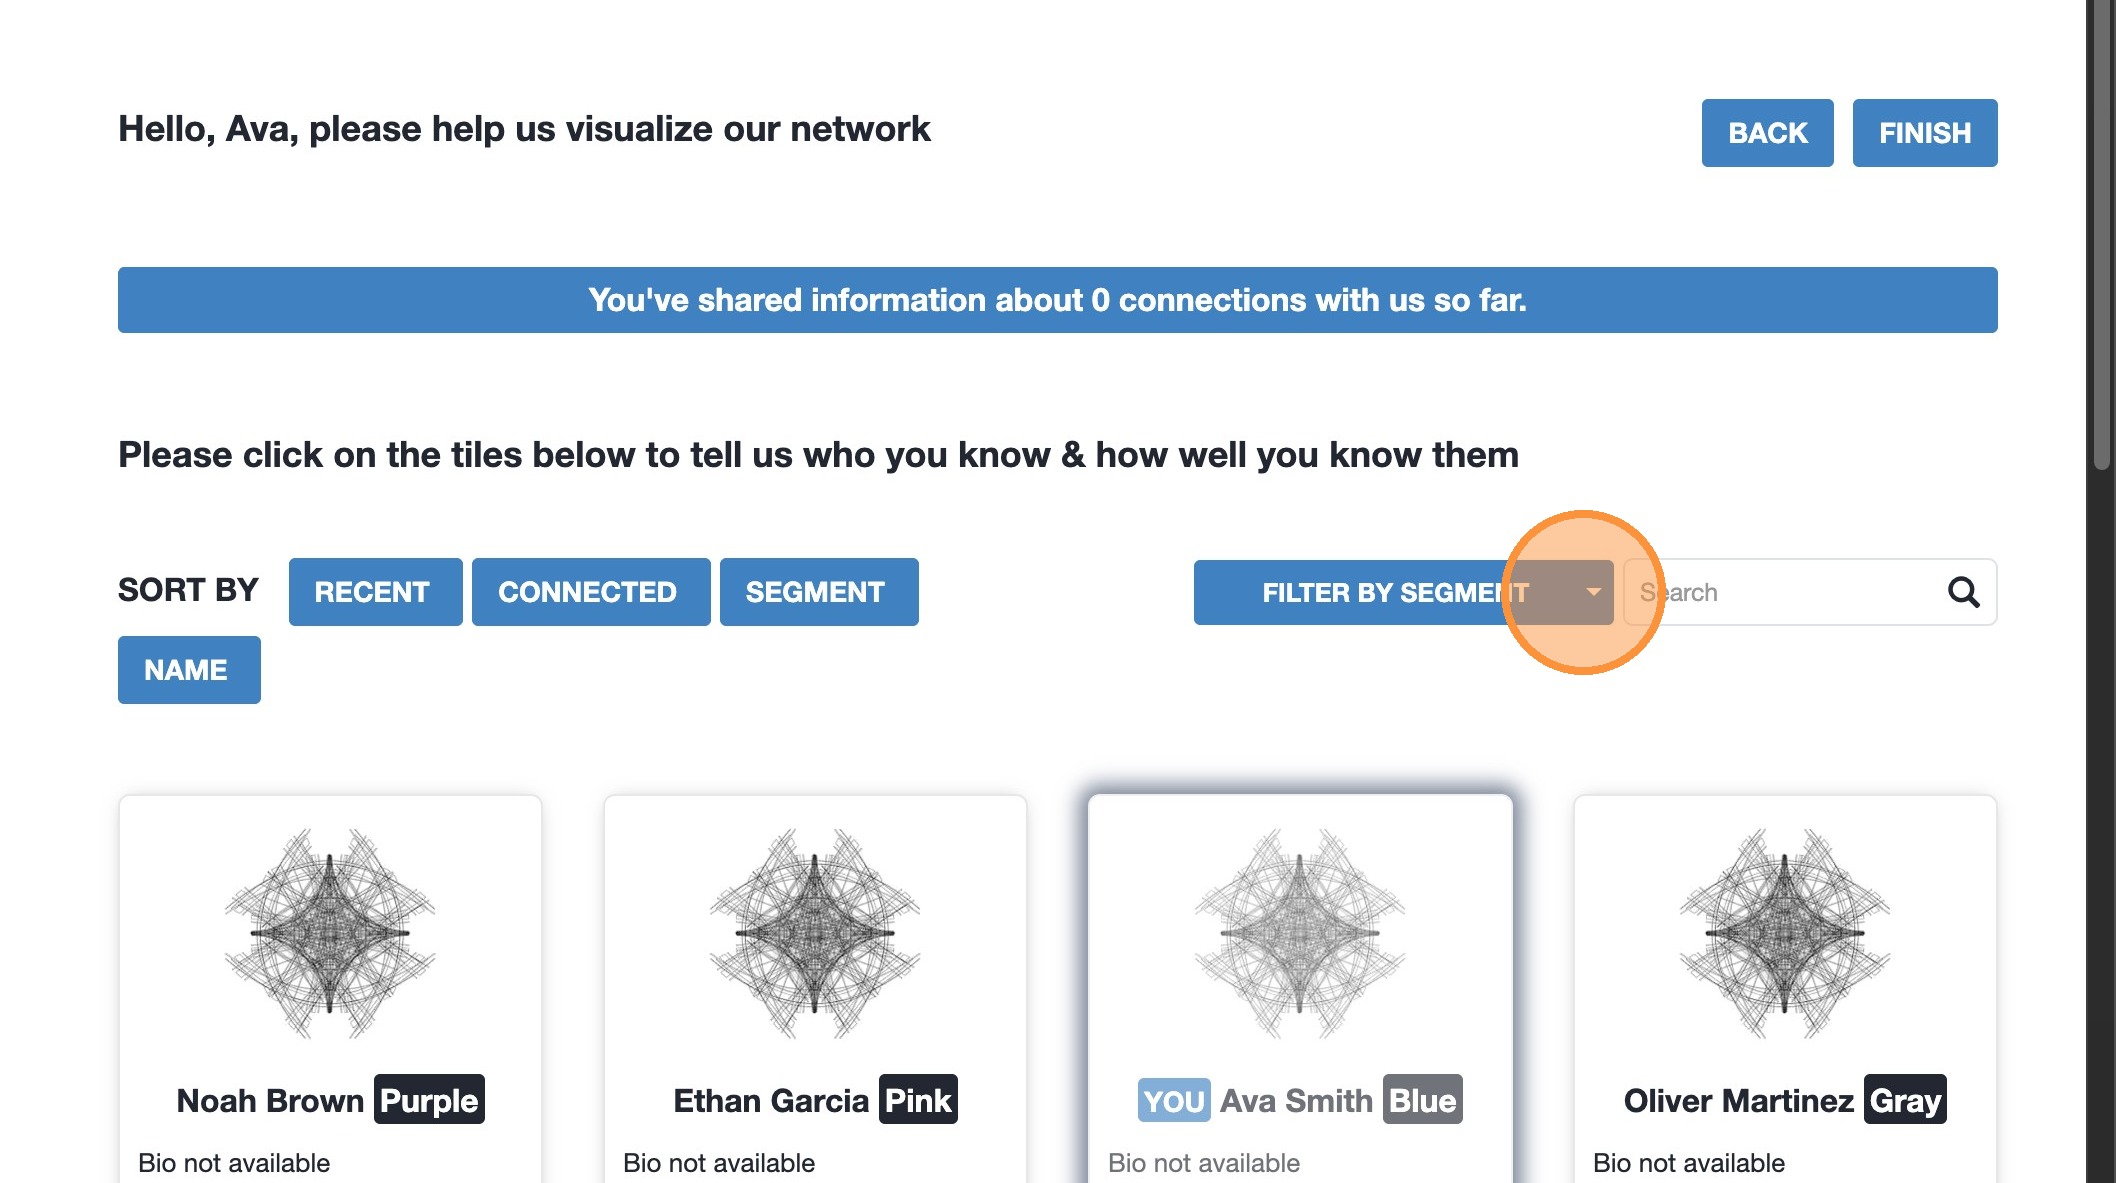
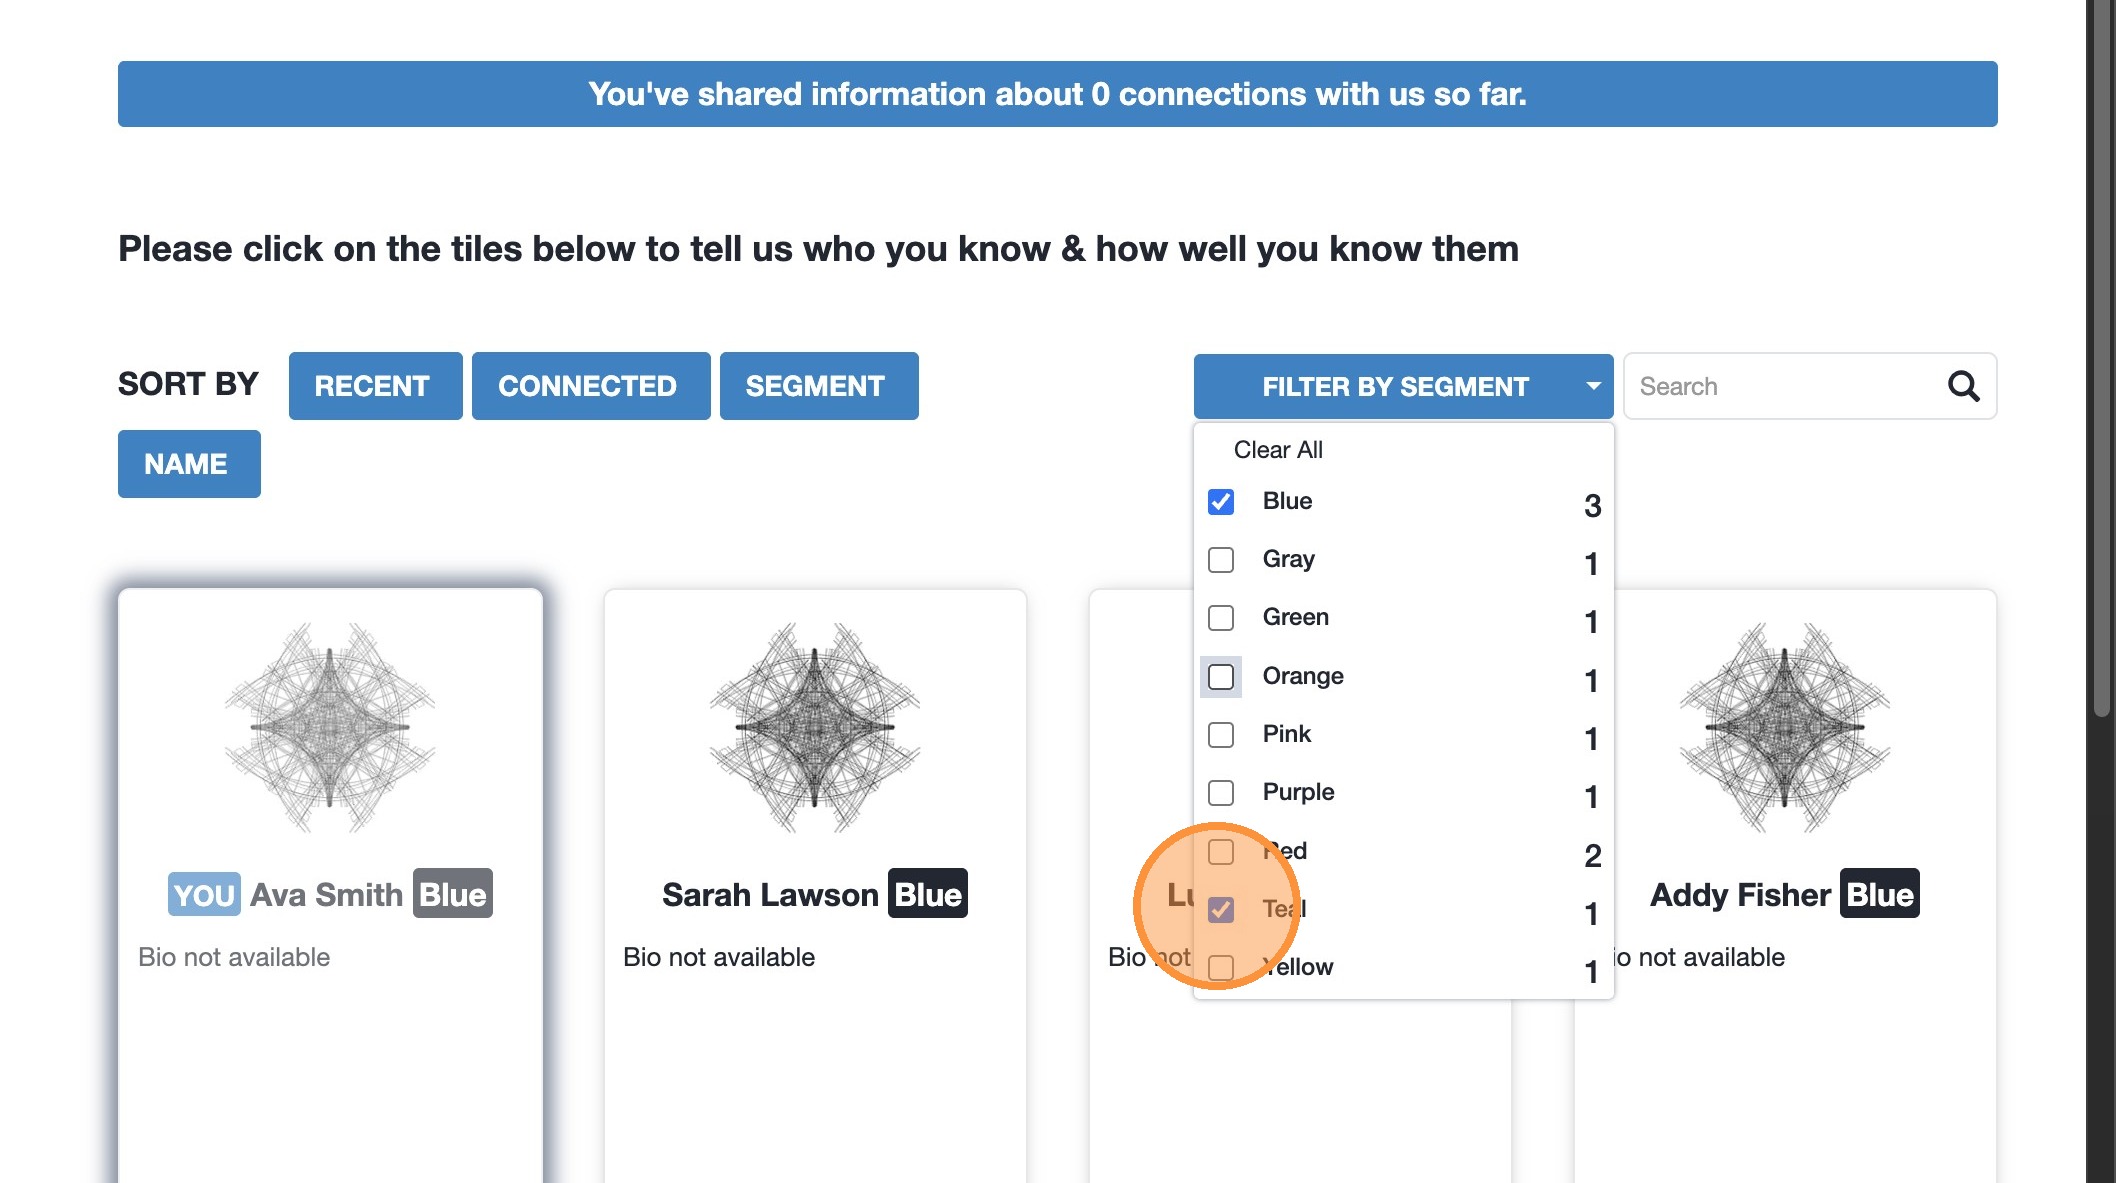
3. Select the Segment(s) you want to filter on.
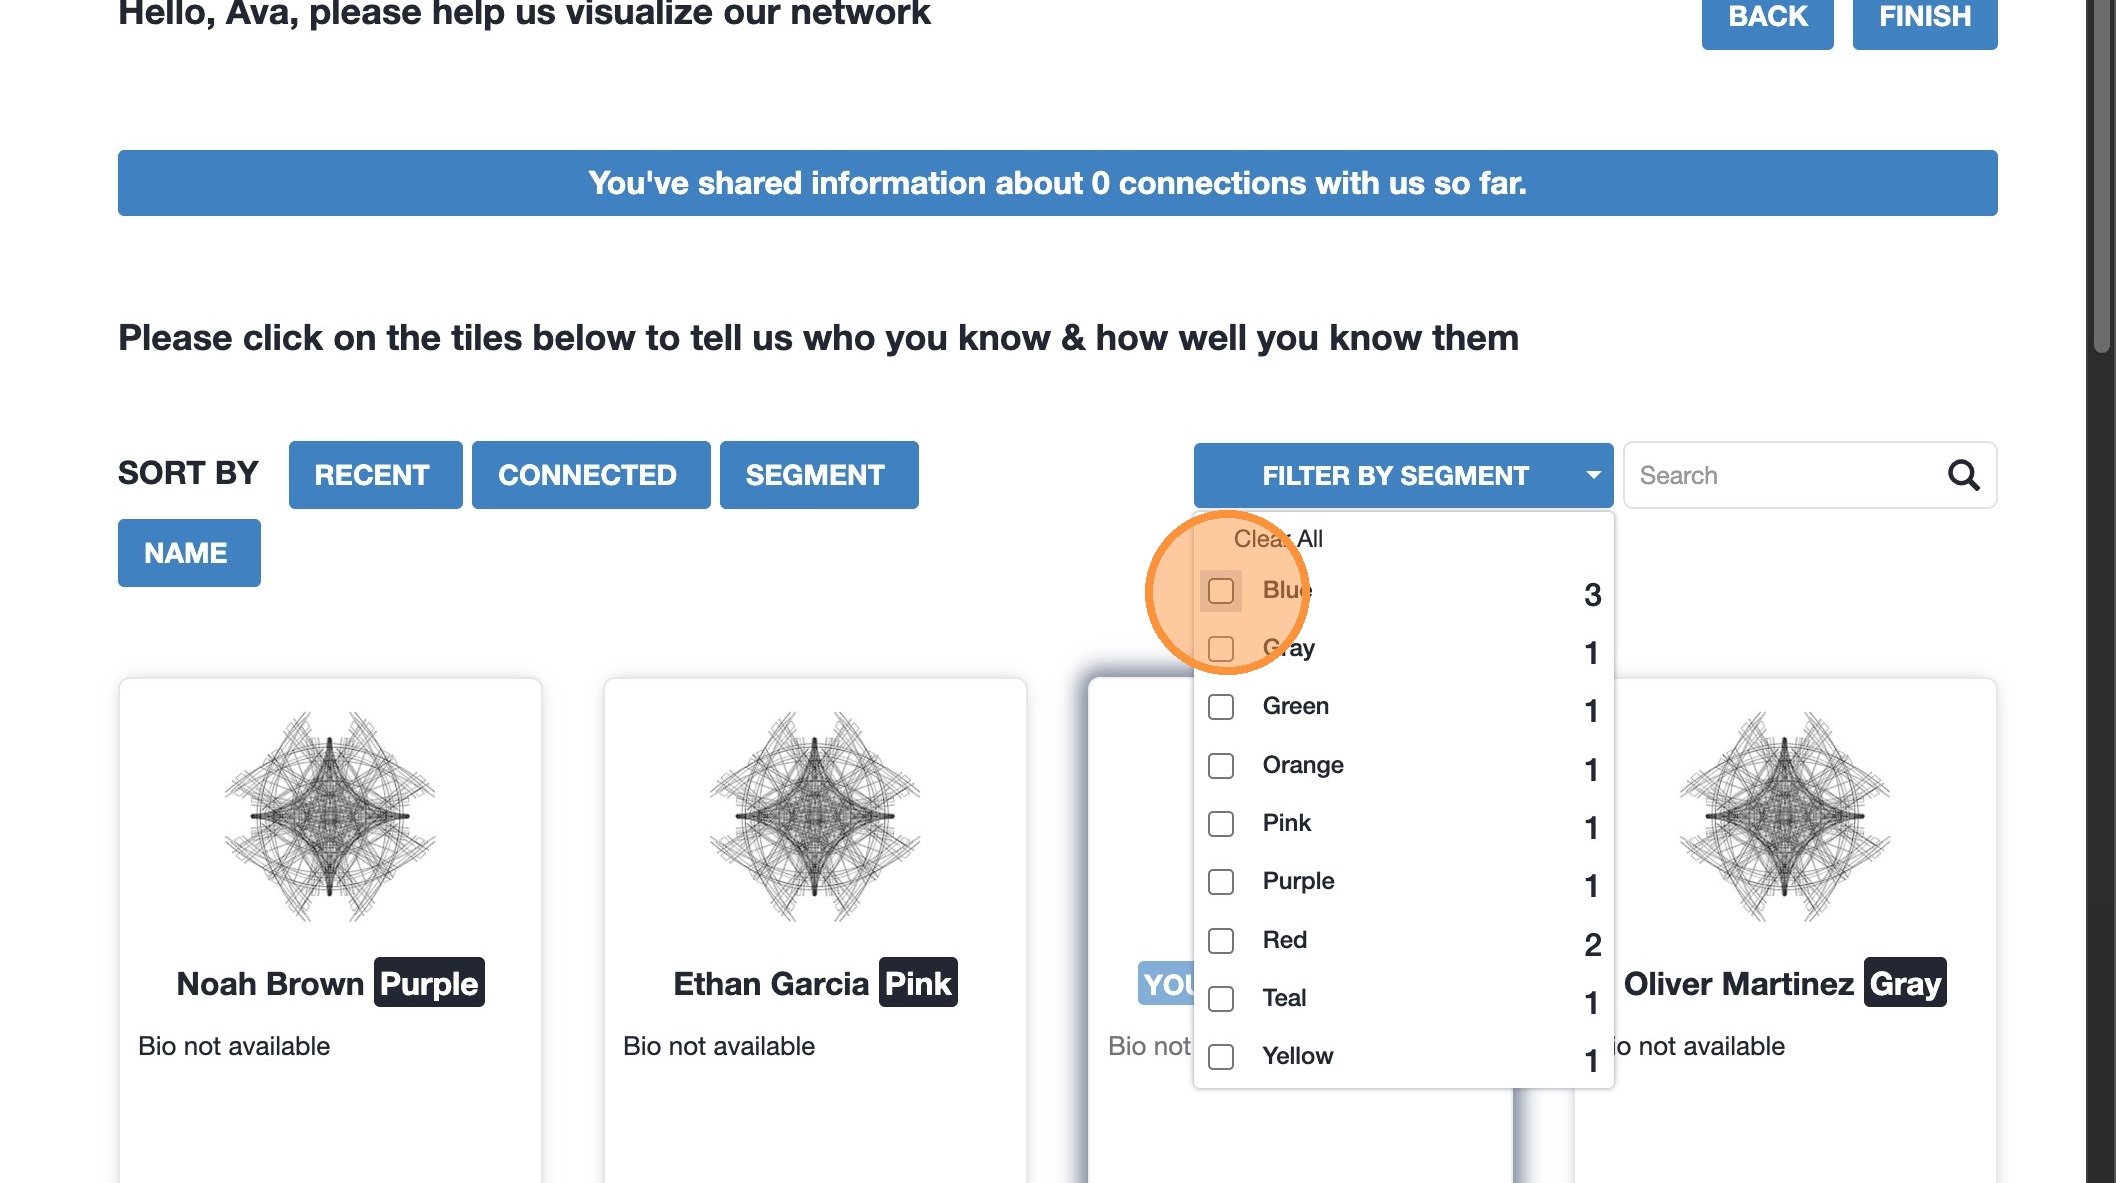
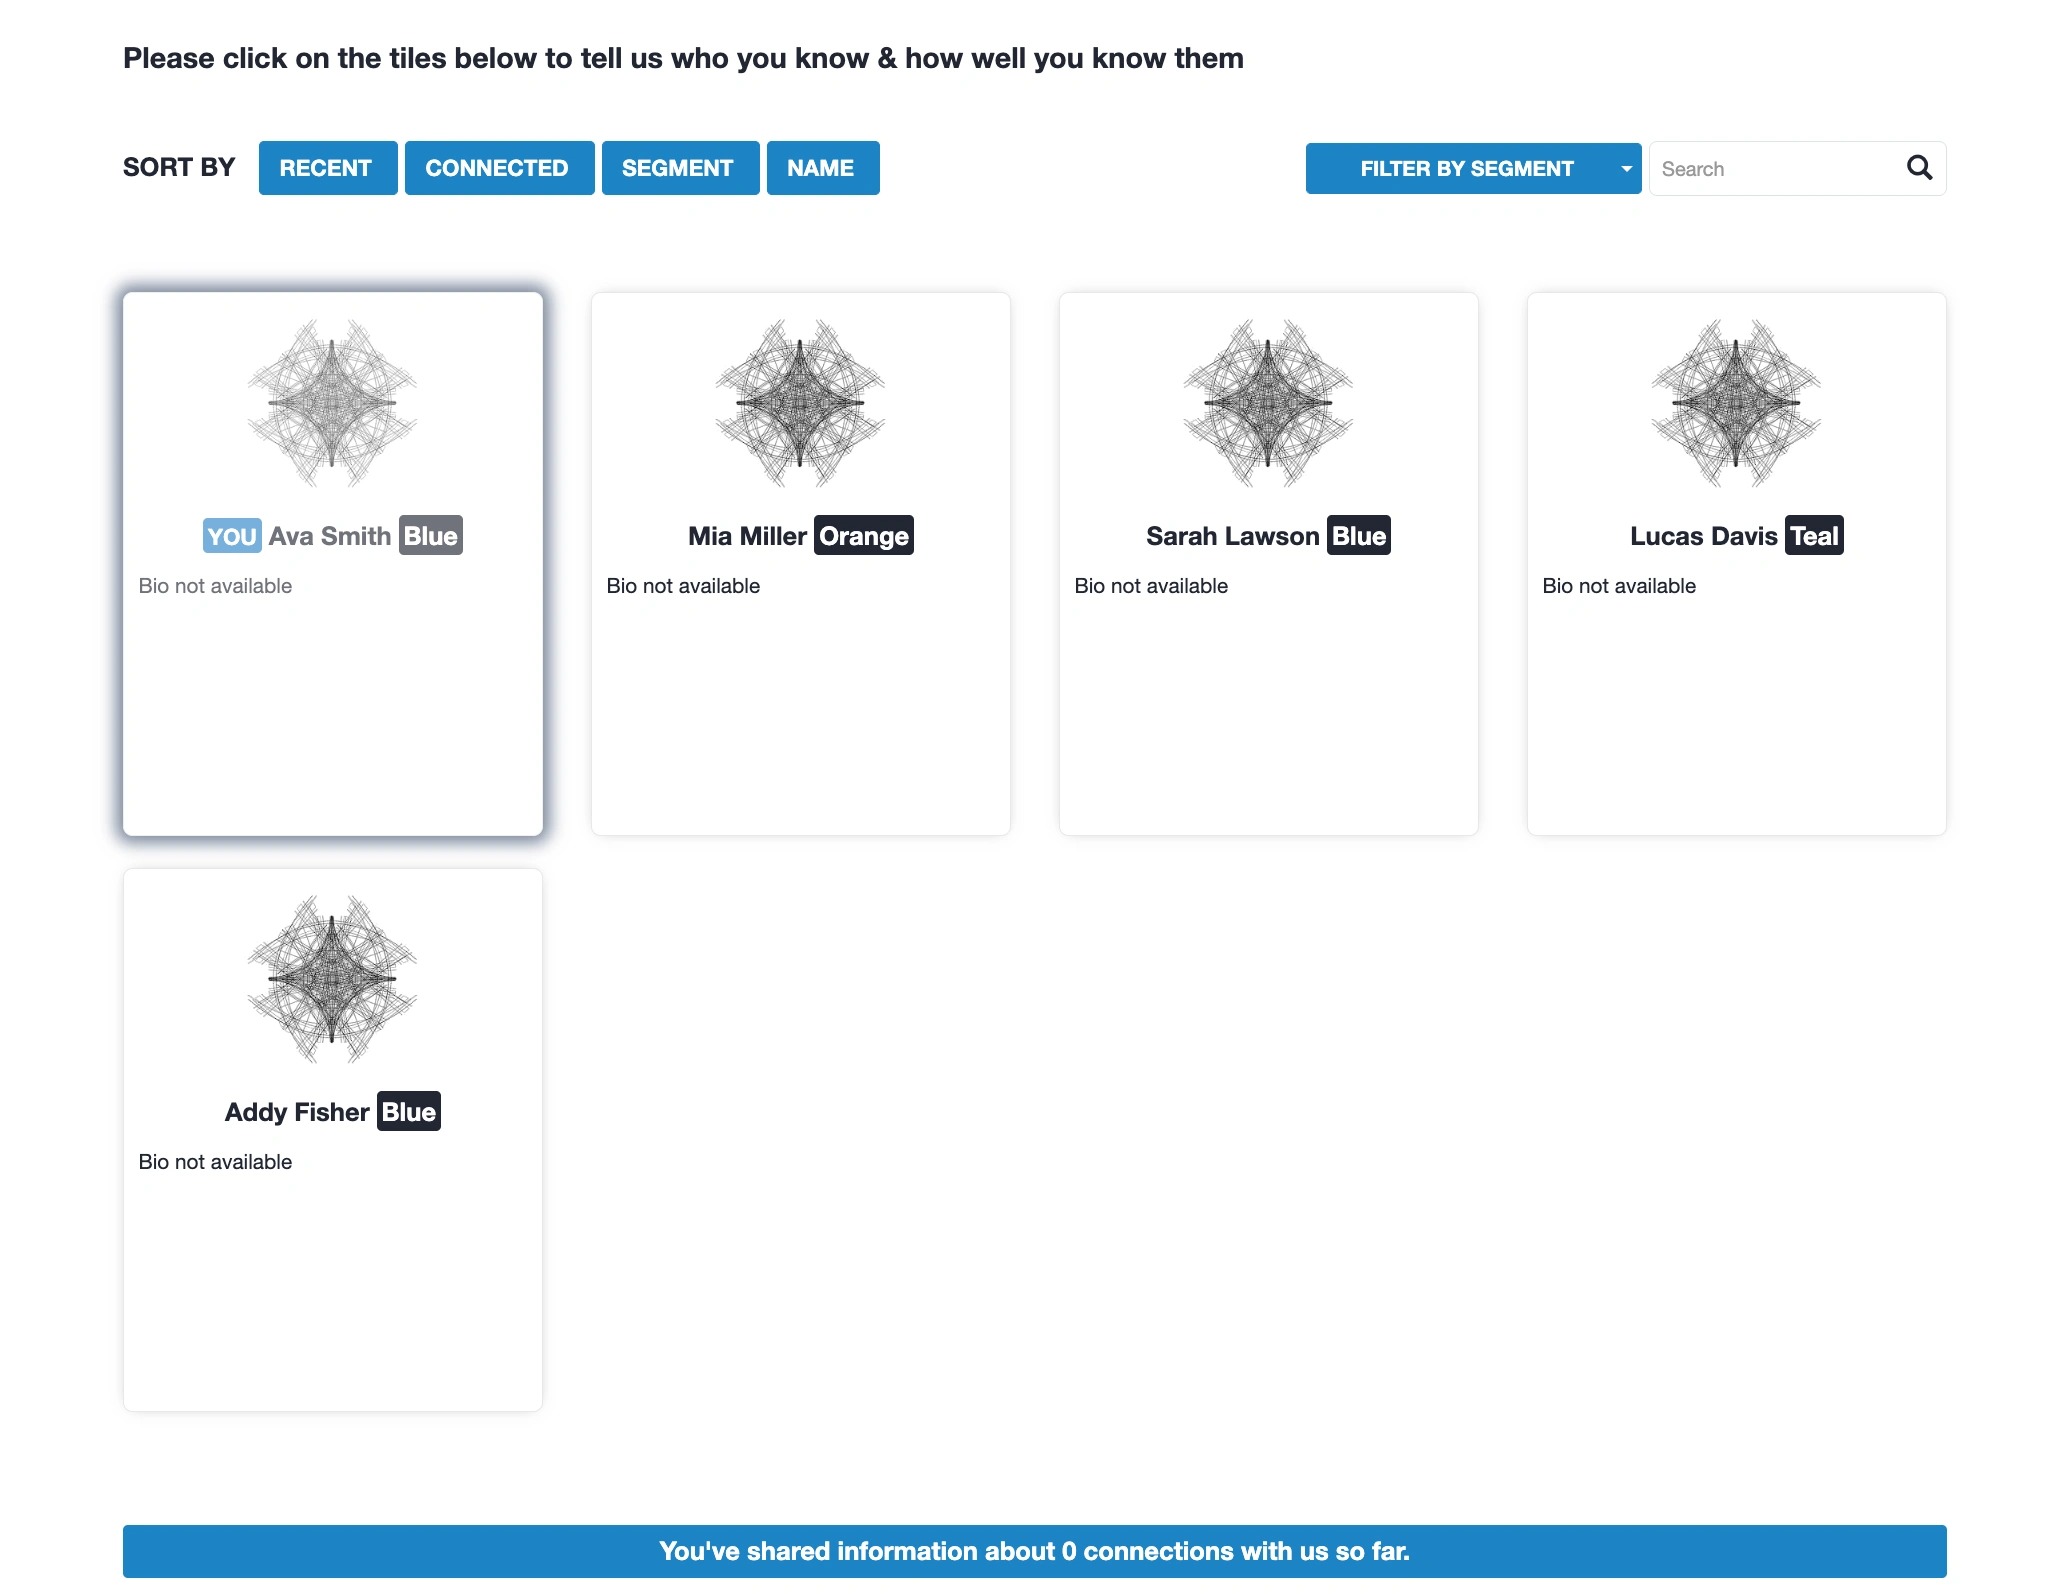
4. Members assigned to the Segment selected will appear in the member tiles below. The segment appears on the right in a box.
5. You can filter by multiple Segments at a time.
6. All members assigned to the Segments selected will appear.
1. Click “Connections” to find members you want to add a connection to.
2. Select “Filter by segment” to view the segments in your network.
3. Select the Segment(s) you want to filter on.
4. Members assigned to the Segment selected will appear in the member tiles below. The segment appears on the right in a box.
5. You can filter by multiple Segments at a time.
6. All members assigned to the Segments selected will appear.
Settings for all Tiers
The aspects of the Member Views (outside of the survey and the connection options) that can be edited are managed in Setup > Settings:
Features of the settings page are:
1) Indicates you’re in the ‘Setup’ phase of sumApp.
2) Shows you’re on the ‘Define Settings’ page.
3) Network name – shows at top of all member view pages, in ‘network_name’ tags, and on your project list. Originally defined when creating the project, it can be changed here. Each project name must be unique.
4) Tiers II, III & IV include the survey. It can be toggled off and on, depending on your context. Checking the checkbox will show the survey in the member view, unchecking it will hide it from the member view.
5) The ‘Hello Text’ shows at the top of the member view bio page and connections page – you edit to suit your situation and can use tags to personalize the page.
6) List of tags available in the hello text
7) Welcome text – shows in body of the member view bio page. Use it to invite, orient and direct your members in the use and purpose of sumApp and your mapping project.
8) Data usage text – shows right under the welcome text on the member view bio page. Use this to be explicit about how member’s data will be used.
9) Completion message – shows when members click on ‘Finish’ at the bottom of the member view connections page. Use it to thank members and suggest/link to next steps if appropriate.
10) When checked, shows the map page option in the member view. Use this once you have at least a prototype map started in Kumu to embed the prototype into sumApp. Helps members understand why you’re collecting this data from them, enables them to start to engage with the map and to offer feedback into the map design.
11) Insert the map embed code from Kumu here so that map shows up in the map tab. How to add the embed.
12) Cancel changes made above.
13) Save changes made above.
14) Archive or delete this project. Requires account password.
Extra settings in Tier IV
Tier IV was originally created because we needed to be able to change the member view language in places to accommodate projects that looked at connections between organizations as opposed to individuals. The settings page reflects that additional needed flexibility.
You’ll see these additional fields in your settings page if you have a Tier IV account.
Tier IV Settings:
1) Element type – this doesn’t show anywhere in the sumApp interface, but it is exported with your dataset, so that if you’re merging data-sets you can specify what kinds of elements sumApp is generating. Can be whatever makes sense, such as ‘organization’, ‘team’, ‘project’ – What kind of entity are you surveying, if not persons?
2) Bio nav title – if you’re surveying organizations, ‘bio’ doesn’t make a lot of sense. You can change it to something like ‘Profile’ – shows on member view navigation bar.
3) Bio upload button text. Can change the button text on the member view bio page to something more appropriate for the entity you are surveying – such as ‘logo’.
4) Bio about help text. Shows underneath the bio field on the member view bio page. Can be edited to suit your type of entity.
5) Bio about placeholder. The text in the member view bio page bio field can be edited to suit your type of entity.
6) Bio not available. This text shows up in the member tiles on the member view connections page when a member has not yet input anything into their bio field. Can be edited to suit the entity type you’re dealing with.
7) Connections page title. Shows just above the sorting buttons on the member view connections page. Can be edited to suit the type of entity you are dealing with.
8) Connections modal title. Shows in the popped-open member tile, below the image and bio, above the connection questions. Can be edited to suit the type of entity you are dealing with.
Settings for all Tiers
The aspects of the Member Views (outside of the survey and the connection options) that can be edited are managed in Setup > Settings:
Features of the settings page are:
1) Indicates you’re in the ‘Setup’ phase of sumApp.
2) Shows you’re on the ‘Define Settings’ page.
3) Network name – shows at top of all member view pages, in ‘network_name’ tags, and on your project list. Originally defined when creating the project, it can be changed here. Each project name must be unique.
4) Tiers II, III & IV include the survey. It can be toggled off and on, depending on your context. Checking the checkbox will show the survey in the member view, unchecking it will hide it from the member view.
5) The ‘Hello Text’ shows at the top of the member view bio page and connections page – you edit to suit your situation and can use tags to personalize the page.
6) List of tags available in the hello text
7) Welcome text – shows in body of the member view bio page. Use it to invite, orient and direct your members in the use and purpose of sumApp and your mapping project.
8) Data usage text – shows right under the welcome text on the member view bio page. Use this to be explicit about how member’s data will be used.
9) Completion message – shows when members click on ‘Finish’ at the bottom of the member view connections page. Use it to thank members and suggest/link to next steps if appropriate.
10) When checked, shows the map page option in the member view. Use this once you have at least a prototype map started in Kumu to embed the prototype into sumApp. Helps members understand why you’re collecting this data from them, enables them to start to engage with the map and to offer feedback into the map design.
11) Insert the map embed code from Kumu here so that map shows up in the map tab. How to add the embed.
12) Cancel changes made above.
13) Save changes made above.
14) Archive or delete this project. Requires account password.
Extra settings in Tier IV
Tier IV was originally created because we needed to be able to change the member view language in places to accommodate projects that looked at connections between organizations as opposed to individuals. The settings page reflects that additional needed flexibility.
You’ll see these additional fields in your settings page if you have a Tier IV account.
Tier IV Settings:
1) Element type – this doesn’t show anywhere in the sumApp interface, but it is exported with your dataset, so that if you’re merging data-sets you can specify what kinds of elements sumApp is generating. Can be whatever makes sense, such as ‘organization’, ‘team’, ‘project’ – What kind of entity are you surveying, if not persons?
2) Bio nav title – if you’re surveying organizations, ‘bio’ doesn’t make a lot of sense. You can change it to something like ‘Profile’ – shows on member view navigation bar.
3) Bio upload button text. Can change the button text on the member view bio page to something more appropriate for the entity you are surveying – such as ‘logo’.
4) Bio about help text. Shows underneath the bio field on the member view bio page. Can be edited to suit your type of entity.
5) Bio about placeholder. The text in the member view bio page bio field can be edited to suit your type of entity.
6) Bio not available. This text shows up in the member tiles on the member view connections page when a member has not yet input anything into their bio field. Can be edited to suit the entity type you’re dealing with.
7) Connections page title. Shows just above the sorting buttons on the member view connections page. Can be edited to suit the type of entity you are dealing with.
8) Connections modal title. Shows in the popped-open member tile, below the image and bio, above the connection questions. Can be edited to suit the type of entity you are dealing with.
Settings for all Tiers
The aspects of the Member Views (outside of the survey and the connection options) that can be edited are managed in Setup > Settings:
Features of the settings page are:
1) Indicates you’re in the ‘Setup’ phase of sumApp.
2) Shows you’re on the ‘Define Settings’ page.
3) Network name – shows at top of all member view pages, in ‘network_name’ tags, and on your project list. Originally defined when creating the project, it can be changed here. Each project name must be unique.
4) Tiers II, III & IV include the survey. It can be toggled off and on, depending on your context. Checking the checkbox will show the survey in the member view, unchecking it will hide it from the member view.
5) The ‘Hello Text’ shows at the top of the member view bio page and connections page – you edit to suit your situation and can use tags to personalize the page.
6) List of tags available in the hello text
7) Welcome text – shows in body of the member view bio page. Use it to invite, orient and direct your members in the use and purpose of sumApp and your mapping project.
8) Data usage text – shows right under the welcome text on the member view bio page. Use this to be explicit about how member’s data will be used.
9) Completion message – shows when members click on ‘Finish’ at the bottom of the member view connections page. Use it to thank members and suggest/link to next steps if appropriate.
10) When checked, shows the map page option in the member view. Use this once you have at least a prototype map started in Kumu to embed the prototype into sumApp. Helps members understand why you’re collecting this data from them, enables them to start to engage with the map and to offer feedback into the map design.
11) Insert the map embed code from Kumu here so that map shows up in the map tab. How to add the embed.
12) Cancel changes made above.
13) Save changes made above.
14) Archive or delete this project. Requires account password.
Extra settings in Tier IV
Tier IV was originally created because we needed to be able to change the member view language in places to accommodate projects that looked at connections between organizations as opposed to individuals. The settings page reflects that additional needed flexibility.
You’ll see these additional fields in your settings page if you have a Tier IV account.
Tier IV Settings:
1) Element type – this doesn’t show anywhere in the sumApp interface, but it is exported with your dataset, so that if you’re merging data-sets you can specify what kinds of elements sumApp is generating. Can be whatever makes sense, such as ‘organization’, ‘team’, ‘project’ – What kind of entity are you surveying, if not persons?
2) Bio nav title – if you’re surveying organizations, ‘bio’ doesn’t make a lot of sense. You can change it to something like ‘Profile’ – shows on member view navigation bar.
3) Bio upload button text. Can change the button text on the member view bio page to something more appropriate for the entity you are surveying – such as ‘logo’.
4) Bio about help text. Shows underneath the bio field on the member view bio page. Can be edited to suit your type of entity.
5) Bio about placeholder. The text in the member view bio page bio field can be edited to suit your type of entity.
6) Bio not available. This text shows up in the member tiles on the member view connections page when a member has not yet input anything into their bio field. Can be edited to suit the entity type you’re dealing with.
7) Connections page title. Shows just above the sorting buttons on the member view connections page. Can be edited to suit the type of entity you are dealing with.
8) Connections modal title. Shows in the popped-open member tile, below the image and bio, above the connection questions. Can be edited to suit the type of entity you are dealing with.
Settings for all Tiers
The aspects of the Member Views (outside of the survey and the connection options) that can be edited are managed in Setup > Settings:
Features of the settings page are:
1) Indicates you’re in the ‘Setup’ phase of sumApp.
2) Shows you’re on the ‘Define Settings’ page.
3) Network name – shows at top of all member view pages, in ‘network_name’ tags, and on your project list. Originally defined when creating the project, it can be changed here. Each project name must be unique.
4) Tiers II, III & IV include the survey. It can be toggled off and on, depending on your context. Checking the checkbox will show the survey in the member view, unchecking it will hide it from the member view.
5) The ‘Hello Text’ shows at the top of the member view bio page and connections page – you edit to suit your situation and can use tags to personalize the page.
6) List of tags available in the hello text
7) Welcome text – shows in body of the member view bio page. Use it to invite, orient and direct your members in the use and purpose of sumApp and your mapping project.
8) Data usage text – shows right under the welcome text on the member view bio page. Use this to be explicit about how member’s data will be used.
9) Completion message – shows when members click on ‘Finish’ at the bottom of the member view connections page. Use it to thank members and suggest/link to next steps if appropriate.
10) When checked, shows the map page option in the member view. Use this once you have at least a prototype map started in Kumu to embed the prototype into sumApp. Helps members understand why you’re collecting this data from them, enables them to start to engage with the map and to offer feedback into the map design.
11) Insert the map embed code from Kumu here so that map shows up in the map tab. How to add the embed.
12) Cancel changes made above.
13) Save changes made above.
14) Archive or delete this project. Requires account password.
Extra settings in Tier IV
Tier IV was originally created because we needed to be able to change the member view language in places to accommodate projects that looked at connections between organizations as opposed to individuals. The settings page reflects that additional needed flexibility.
You’ll see these additional fields in your settings page if you have a Tier IV account.
Tier IV Settings:
1) Element type – this doesn’t show anywhere in the sumApp interface, but it is exported with your dataset, so that if you’re merging data-sets you can specify what kinds of elements sumApp is generating. Can be whatever makes sense, such as ‘organization’, ‘team’, ‘project’ – What kind of entity are you surveying, if not persons?
2) Bio nav title – if you’re surveying organizations, ‘bio’ doesn’t make a lot of sense. You can change it to something like ‘Profile’ – shows on member view navigation bar.
3) Bio upload button text. Can change the button text on the member view bio page to something more appropriate for the entity you are surveying – such as ‘logo’.
4) Bio about help text. Shows underneath the bio field on the member view bio page. Can be edited to suit your type of entity.
5) Bio about placeholder. The text in the member view bio page bio field can be edited to suit your type of entity.
6) Bio not available. This text shows up in the member tiles on the member view connections page when a member has not yet input anything into their bio field. Can be edited to suit the entity type you’re dealing with.
7) Connections page title. Shows just above the sorting buttons on the member view connections page. Can be edited to suit the type of entity you are dealing with.
8) Connections modal title. Shows in the popped-open member tile, below the image and bio, above the connection questions. Can be edited to suit the type of entity you are dealing with.
Settings for all Tiers
The aspects of the Member Views (outside of the survey and the connection options) that can be edited are managed in Setup > Settings:
Features of the settings page are:
1) Indicates you’re in the ‘Setup’ phase of sumApp.
2) Shows you’re on the ‘Define Settings’ page.
3) Network name – shows at top of all member view pages, in ‘network_name’ tags, and on your project list. Originally defined when creating the project, it can be changed here. Each project name must be unique.
4) Tiers II, III & IV include the survey. It can be toggled off and on, depending on your context. Checking the checkbox will show the survey in the member view, unchecking it will hide it from the member view.
5) The ‘Hello Text’ shows at the top of the member view bio page and connections page – you edit to suit your situation and can use tags to personalize the page.
6) List of tags available in the hello text
7) Welcome text – shows in body of the member view bio page. Use it to invite, orient and direct your members in the use and purpose of sumApp and your mapping project.
8) Data usage text – shows right under the welcome text on the member view bio page. Use this to be explicit about how member’s data will be used.
9) Completion message – shows when members click on ‘Finish’ at the bottom of the member view connections page. Use it to thank members and suggest/link to next steps if appropriate.
10) When checked, shows the map page option in the member view. Use this once you have at least a prototype map started in Kumu to embed the prototype into sumApp. Helps members understand why you’re collecting this data from them, enables them to start to engage with the map and to offer feedback into the map design.
11) Insert the map embed code from Kumu here so that map shows up in the map tab. How to add the embed.
12) Cancel changes made above.
13) Save changes made above.
14) Archive or delete this project. Requires account password.
Extra settings in Tier IV
Tier IV was originally created because we needed to be able to change the member view language in places to accommodate projects that looked at connections between organizations as opposed to individuals. The settings page reflects that additional needed flexibility.
You’ll see these additional fields in your settings page if you have a Tier IV account.
Tier IV Settings:
1) Element type – this doesn’t show anywhere in the sumApp interface, but it is exported with your dataset, so that if you’re merging data-sets you can specify what kinds of elements sumApp is generating. Can be whatever makes sense, such as ‘organization’, ‘team’, ‘project’ – What kind of entity are you surveying, if not persons?
2) Bio nav title – if you’re surveying organizations, ‘bio’ doesn’t make a lot of sense. You can change it to something like ‘Profile’ – shows on member view navigation bar.
3) Bio upload button text. Can change the button text on the member view bio page to something more appropriate for the entity you are surveying – such as ‘logo’.
4) Bio about help text. Shows underneath the bio field on the member view bio page. Can be edited to suit your type of entity.
5) Bio about placeholder. The text in the member view bio page bio field can be edited to suit your type of entity.
6) Bio not available. This text shows up in the member tiles on the member view connections page when a member has not yet input anything into their bio field. Can be edited to suit the entity type you’re dealing with.
7) Connections page title. Shows just above the sorting buttons on the member view connections page. Can be edited to suit the type of entity you are dealing with.
8) Connections modal title. Shows in the popped-open member tile, below the image and bio, above the connection questions. Can be edited to suit the type of entity you are dealing with.
The Bio page is the first page your members will see when they click on the link included in their sumApp invitation email. It is meant to help orient your members to the project’s process and purpose and give each member the opportunity to help others in the network identify them easily on the Connections page.
Features of the Bio page
1) Project name – defined when the project was created. Can be changed in
2) Member View Navigation Bar. Members can skip forward through the app to whichever page they want to see. The Bio tab is editable in Tier IV, in
3) If the member has already shared connections in the connections page, the blue info bar at the top tells them how many they’ve shared.
4) ‘Hello Text’. Editable in all Tiers,
5) ‘Welcome Text’. Editable in all Tiers,
6) ‘Data Usage Text’. Editable in all Tiers, Make sure you are clear and accurate about how private or public the map and the data in it will be.
7) The profile picture upload. Members who have a Gravitar account associated with the email address you are using, their ‘gravitar’ will be pulled in automatically. They can replace it using the upload function if desired. Helps members easily identify one another on the connections page and you can show the picture in the member nodes in the Kumu map. The text on the blue button is editable in Tier IV, in Settings.
8) An (old-school) tweet-sized space for member to share a little info about themselves to help others in the network identify them easily. Limit is 140 characters (not words!). The light blue description text below the field is editable in Tier IV, in Settings.
9) Character countdown showing how many unused characters remain in the field (in #8).
10) Proceed button – saves bio text and proceeds to the survey page.
You can change your options in Setup > Define connection options – #1 & #2 in image below.
Tiers I & II have a simple, single-question interface – #3 in image below.
- Edit the options in #3 in the image above.
- You can use as few or as many options as you like, but don’t use so many it becomes hard for your members to decide.
- Only one option can be selected from the list.
- The options should be general enough to encompass the range of possible connections without making an exhaustive list.
- Don’t include ‘don’t know’ as an option – that will require everyone in the network to reply regarding everyone else in the network, and it will generate a whole lot of unnecessary data.
- Set your options to be ranked with increasing strength.
- You can preview the options in the preview panel below the editor.
- Don’t forget to save! #5 in image.
- Options show up on the member view connections page in the member tiles when they are clicked open.
Settings for all Tiers
The aspects of the Member Views (outside of the survey and the connection options) that can be edited are managed in Setup > Settings:
Features of the settings page are:
1) Indicates you’re in the ‘Setup’ phase of sumApp.
2) Shows you’re on the ‘Define Settings’ page.
3) Network name – shows at top of all member view pages, in ‘network_name’ tags, and on your project list. Originally defined when creating the project, it can be changed here. Each project name must be unique.
4) Tiers II, III & IV include the survey. It can be toggled off and on, depending on your context. Checking the checkbox will show the survey in the member view, unchecking it will hide it from the member view.
5) The ‘Hello Text’ shows at the top of the member view bio page and connections page – you edit to suit your situation and can use tags to personalize the page.
6) List of tags available in the hello text
7) Welcome text – shows in body of the member view bio page. Use it to invite, orient and direct your members in the use and purpose of sumApp and your mapping project.
8) Data usage text – shows right under the welcome text on the member view bio page. Use this to be explicit about how member’s data will be used.
9) Completion message – shows when members click on ‘Finish’ at the bottom of the member view connections page. Use it to thank members and suggest/link to next steps if appropriate.
10) When checked, shows the map page option in the member view. Use this once you have at least a prototype map started in Kumu to embed the prototype into sumApp. Helps members understand why you’re collecting this data from them, enables them to start to engage with the map and to offer feedback into the map design.
11) Insert the map embed code from Kumu here so that map shows up in the map tab. How to add the embed.
12) Cancel changes made above.
13) Save changes made above.
14) Archive or delete this project. Requires account password.
Extra settings in Tier IV
Tier IV was originally created because we needed to be able to change the member view language in places to accommodate projects that looked at connections between organizations as opposed to individuals. The settings page reflects that additional needed flexibility.
You’ll see these additional fields in your settings page if you have a Tier IV account.
Tier IV Settings:
1) Element type – this doesn’t show anywhere in the sumApp interface, but it is exported with your dataset, so that if you’re merging data-sets you can specify what kinds of elements sumApp is generating. Can be whatever makes sense, such as ‘organization’, ‘team’, ‘project’ – What kind of entity are you surveying, if not persons?
2) Bio nav title – if you’re surveying organizations, ‘bio’ doesn’t make a lot of sense. You can change it to something like ‘Profile’ – shows on member view navigation bar.
3) Bio upload button text. Can change the button text on the member view bio page to something more appropriate for the entity you are surveying – such as ‘logo’.
4) Bio about help text. Shows underneath the bio field on the member view bio page. Can be edited to suit your type of entity.
5) Bio about placeholder. The text in the member view bio page bio field can be edited to suit your type of entity.
6) Bio not available. This text shows up in the member tiles on the member view connections page when a member has not yet input anything into their bio field. Can be edited to suit the entity type you’re dealing with.
7) Connections page title. Shows just above the sorting buttons on the member view connections page. Can be edited to suit the type of entity you are dealing with.
8) Connections modal title. Shows in the popped-open member tile, below the image and bio, above the connection questions. Can be edited to suit the type of entity you are dealing with.
Settings for all Tiers
The aspects of the Member Views (outside of the survey and the connection options) that can be edited are managed in Setup > Settings:
Features of the settings page are:
1) Indicates you’re in the ‘Setup’ phase of sumApp.
2) Shows you’re on the ‘Define Settings’ page.
3) Network name – shows at top of all member view pages, in ‘network_name’ tags, and on your project list. Originally defined when creating the project, it can be changed here. Each project name must be unique.
4) Tiers II, III & IV include the survey. It can be toggled off and on, depending on your context. Checking the checkbox will show the survey in the member view, unchecking it will hide it from the member view.
5) The ‘Hello Text’ shows at the top of the member view bio page and connections page – you edit to suit your situation and can use tags to personalize the page.
6) List of tags available in the hello text
7) Welcome text – shows in body of the member view bio page. Use it to invite, orient and direct your members in the use and purpose of sumApp and your mapping project.
8) Data usage text – shows right under the welcome text on the member view bio page. Use this to be explicit about how member’s data will be used.
9) Completion message – shows when members click on ‘Finish’ at the bottom of the member view connections page. Use it to thank members and suggest/link to next steps if appropriate.
10) When checked, shows the map page option in the member view. Use this once you have at least a prototype map started in Kumu to embed the prototype into sumApp. Helps members understand why you’re collecting this data from them, enables them to start to engage with the map and to offer feedback into the map design.
11) Insert the map embed code from Kumu here so that map shows up in the map tab. How to add the embed.
12) Cancel changes made above.
13) Save changes made above.
14) Archive or delete this project. Requires account password.
Extra settings in Tier IV
Tier IV was originally created because we needed to be able to change the member view language in places to accommodate projects that looked at connections between organizations as opposed to individuals. The settings page reflects that additional needed flexibility.
You’ll see these additional fields in your settings page if you have a Tier IV account.
Tier IV Settings:
1) Element type – this doesn’t show anywhere in the sumApp interface, but it is exported with your dataset, so that if you’re merging data-sets you can specify what kinds of elements sumApp is generating. Can be whatever makes sense, such as ‘organization’, ‘team’, ‘project’ – What kind of entity are you surveying, if not persons?
2) Bio nav title – if you’re surveying organizations, ‘bio’ doesn’t make a lot of sense. You can change it to something like ‘Profile’ – shows on member view navigation bar.
3) Bio upload button text. Can change the button text on the member view bio page to something more appropriate for the entity you are surveying – such as ‘logo’.
4) Bio about help text. Shows underneath the bio field on the member view bio page. Can be edited to suit your type of entity.
5) Bio about placeholder. The text in the member view bio page bio field can be edited to suit your type of entity.
6) Bio not available. This text shows up in the member tiles on the member view connections page when a member has not yet input anything into their bio field. Can be edited to suit the entity type you’re dealing with.
7) Connections page title. Shows just above the sorting buttons on the member view connections page. Can be edited to suit the type of entity you are dealing with.
8) Connections modal title. Shows in the popped-open member tile, below the image and bio, above the connection questions. Can be edited to suit the type of entity you are dealing with.
Settings for all Tiers
The aspects of the Member Views (outside of the survey and the connection options) that can be edited are managed in Setup > Settings:
Features of the settings page are:
1) Indicates you’re in the ‘Setup’ phase of sumApp.
2) Shows you’re on the ‘Define Settings’ page.
3) Network name – shows at top of all member view pages, in ‘network_name’ tags, and on your project list. Originally defined when creating the project, it can be changed here. Each project name must be unique.
4) Tiers II, III & IV include the survey. It can be toggled off and on, depending on your context. Checking the checkbox will show the survey in the member view, unchecking it will hide it from the member view.
5) The ‘Hello Text’ shows at the top of the member view bio page and connections page – you edit to suit your situation and can use tags to personalize the page.
6) List of tags available in the hello text
7) Welcome text – shows in body of the member view bio page. Use it to invite, orient and direct your members in the use and purpose of sumApp and your mapping project.
8) Data usage text – shows right under the welcome text on the member view bio page. Use this to be explicit about how member’s data will be used.
9) Completion message – shows when members click on ‘Finish’ at the bottom of the member view connections page. Use it to thank members and suggest/link to next steps if appropriate.
10) When checked, shows the map page option in the member view. Use this once you have at least a prototype map started in Kumu to embed the prototype into sumApp. Helps members understand why you’re collecting this data from them, enables them to start to engage with the map and to offer feedback into the map design.
11) Insert the map embed code from Kumu here so that map shows up in the map tab. How to add the embed.
12) Cancel changes made above.
13) Save changes made above.
14) Archive or delete this project. Requires account password.
Extra settings in Tier IV
Tier IV was originally created because we needed to be able to change the member view language in places to accommodate projects that looked at connections between organizations as opposed to individuals. The settings page reflects that additional needed flexibility.
You’ll see these additional fields in your settings page if you have a Tier IV account.
Tier IV Settings:
1) Element type – this doesn’t show anywhere in the sumApp interface, but it is exported with your dataset, so that if you’re merging data-sets you can specify what kinds of elements sumApp is generating. Can be whatever makes sense, such as ‘organization’, ‘team’, ‘project’ – What kind of entity are you surveying, if not persons?
2) Bio nav title – if you’re surveying organizations, ‘bio’ doesn’t make a lot of sense. You can change it to something like ‘Profile’ – shows on member view navigation bar.
3) Bio upload button text. Can change the button text on the member view bio page to something more appropriate for the entity you are surveying – such as ‘logo’.
4) Bio about help text. Shows underneath the bio field on the member view bio page. Can be edited to suit your type of entity.
5) Bio about placeholder. The text in the member view bio page bio field can be edited to suit your type of entity.
6) Bio not available. This text shows up in the member tiles on the member view connections page when a member has not yet input anything into their bio field. Can be edited to suit the entity type you’re dealing with.
7) Connections page title. Shows just above the sorting buttons on the member view connections page. Can be edited to suit the type of entity you are dealing with.
8) Connections modal title. Shows in the popped-open member tile, below the image and bio, above the connection questions. Can be edited to suit the type of entity you are dealing with.
Settings for all Tiers
The aspects of the Member Views (outside of the survey and the connection options) that can be edited are managed in Setup > Settings:
Features of the settings page are:
1) Indicates you’re in the ‘Setup’ phase of sumApp.
2) Shows you’re on the ‘Define Settings’ page.
3) Network name – shows at top of all member view pages, in ‘network_name’ tags, and on your project list. Originally defined when creating the project, it can be changed here. Each project name must be unique.
4) Tiers II, III & IV include the survey. It can be toggled off and on, depending on your context. Checking the checkbox will show the survey in the member view, unchecking it will hide it from the member view.
5) The ‘Hello Text’ shows at the top of the member view bio page and connections page – you edit to suit your situation and can use tags to personalize the page.
6) List of tags available in the hello text
7) Welcome text – shows in body of the member view bio page. Use it to invite, orient and direct your members in the use and purpose of sumApp and your mapping project.
8) Data usage text – shows right under the welcome text on the member view bio page. Use this to be explicit about how member’s data will be used.
9) Completion message – shows when members click on ‘Finish’ at the bottom of the member view connections page. Use it to thank members and suggest/link to next steps if appropriate.
10) When checked, shows the map page option in the member view. Use this once you have at least a prototype map started in Kumu to embed the prototype into sumApp. Helps members understand why you’re collecting this data from them, enables them to start to engage with the map and to offer feedback into the map design.
11) Insert the map embed code from Kumu here so that map shows up in the map tab. How to add the embed.
12) Cancel changes made above.
13) Save changes made above.
14) Archive or delete this project. Requires account password.
Extra settings in Tier IV
Tier IV was originally created because we needed to be able to change the member view language in places to accommodate projects that looked at connections between organizations as opposed to individuals. The settings page reflects that additional needed flexibility.
You’ll see these additional fields in your settings page if you have a Tier IV account.
Tier IV Settings:
1) Element type – this doesn’t show anywhere in the sumApp interface, but it is exported with your dataset, so that if you’re merging data-sets you can specify what kinds of elements sumApp is generating. Can be whatever makes sense, such as ‘organization’, ‘team’, ‘project’ – What kind of entity are you surveying, if not persons?
2) Bio nav title – if you’re surveying organizations, ‘bio’ doesn’t make a lot of sense. You can change it to something like ‘Profile’ – shows on member view navigation bar.
3) Bio upload button text. Can change the button text on the member view bio page to something more appropriate for the entity you are surveying – such as ‘logo’.
4) Bio about help text. Shows underneath the bio field on the member view bio page. Can be edited to suit your type of entity.
5) Bio about placeholder. The text in the member view bio page bio field can be edited to suit your type of entity.
6) Bio not available. This text shows up in the member tiles on the member view connections page when a member has not yet input anything into their bio field. Can be edited to suit the entity type you’re dealing with.
7) Connections page title. Shows just above the sorting buttons on the member view connections page. Can be edited to suit the type of entity you are dealing with.
8) Connections modal title. Shows in the popped-open member tile, below the image and bio, above the connection questions. Can be edited to suit the type of entity you are dealing with.
Settings for all Tiers
The aspects of the Member Views (outside of the survey and the connection options) that can be edited are managed in Setup > Settings:
Features of the settings page are:
1) Indicates you’re in the ‘Setup’ phase of sumApp.
2) Shows you’re on the ‘Define Settings’ page.
3) Network name – shows at top of all member view pages, in ‘network_name’ tags, and on your project list. Originally defined when creating the project, it can be changed here. Each project name must be unique.
4) Tiers II, III & IV include the survey. It can be toggled off and on, depending on your context. Checking the checkbox will show the survey in the member view, unchecking it will hide it from the member view.
5) The ‘Hello Text’ shows at the top of the member view bio page and connections page – you edit to suit your situation and can use tags to personalize the page.
6) List of tags available in the hello text
7) Welcome text – shows in body of the member view bio page. Use it to invite, orient and direct your members in the use and purpose of sumApp and your mapping project.
8) Data usage text – shows right under the welcome text on the member view bio page. Use this to be explicit about how member’s data will be used.
9) Completion message – shows when members click on ‘Finish’ at the bottom of the member view connections page. Use it to thank members and suggest/link to next steps if appropriate.
10) When checked, shows the map page option in the member view. Use this once you have at least a prototype map started in Kumu to embed the prototype into sumApp. Helps members understand why you’re collecting this data from them, enables them to start to engage with the map and to offer feedback into the map design.
11) Insert the map embed code from Kumu here so that map shows up in the map tab. How to add the embed.
12) Cancel changes made above.
13) Save changes made above.
14) Archive or delete this project. Requires account password.
Extra settings in Tier IV
Tier IV was originally created because we needed to be able to change the member view language in places to accommodate projects that looked at connections between organizations as opposed to individuals. The settings page reflects that additional needed flexibility.
You’ll see these additional fields in your settings page if you have a Tier IV account.
Tier IV Settings:
1) Element type – this doesn’t show anywhere in the sumApp interface, but it is exported with your dataset, so that if you’re merging data-sets you can specify what kinds of elements sumApp is generating. Can be whatever makes sense, such as ‘organization’, ‘team’, ‘project’ – What kind of entity are you surveying, if not persons?
2) Bio nav title – if you’re surveying organizations, ‘bio’ doesn’t make a lot of sense. You can change it to something like ‘Profile’ – shows on member view navigation bar.
3) Bio upload button text. Can change the button text on the member view bio page to something more appropriate for the entity you are surveying – such as ‘logo’.
4) Bio about help text. Shows underneath the bio field on the member view bio page. Can be edited to suit your type of entity.
5) Bio about placeholder. The text in the member view bio page bio field can be edited to suit your type of entity.
6) Bio not available. This text shows up in the member tiles on the member view connections page when a member has not yet input anything into their bio field. Can be edited to suit the entity type you’re dealing with.
7) Connections page title. Shows just above the sorting buttons on the member view connections page. Can be edited to suit the type of entity you are dealing with.
8) Connections modal title. Shows in the popped-open member tile, below the image and bio, above the connection questions. Can be edited to suit the type of entity you are dealing with.
The Bio page is the first page your members will see when they click on the link included in their sumApp invitation email. It is meant to help orient your members to the project’s process and purpose and give each member the opportunity to help others in the network identify them easily on the Connections page.
Features of the Bio page
1) Project name – defined when the project was created. Can be changed in
2) Member View Navigation Bar. Members can skip forward through the app to whichever page they want to see. The Bio tab is editable in Tier IV, in
3) If the member has already shared connections in the connections page, the blue info bar at the top tells them how many they’ve shared.
4) ‘Hello Text’. Editable in all Tiers,
5) ‘Welcome Text’. Editable in all Tiers,
6) ‘Data Usage Text’. Editable in all Tiers, Make sure you are clear and accurate about how private or public the map and the data in it will be.
7) The profile picture upload. Members who have a Gravitar account associated with the email address you are using, their ‘gravitar’ will be pulled in automatically. They can replace it using the upload function if desired. Helps members easily identify one another on the connections page and you can show the picture in the member nodes in the Kumu map. The text on the blue button is editable in Tier IV, in Settings.
8) An (old-school) tweet-sized space for member to share a little info about themselves to help others in the network identify them easily. Limit is 140 characters (not words!). The light blue description text below the field is editable in Tier IV, in Settings.
9) Character countdown showing how many unused characters remain in the field (in #8).
10) Proceed button – saves bio text and proceeds to the survey page.
Settings for all Tiers
The aspects of the Member Views (outside of the survey and the connection options) that can be edited are managed in Setup > Settings:
Features of the settings page are:
1) Indicates you’re in the ‘Setup’ phase of sumApp.
2) Shows you’re on the ‘Define Settings’ page.
3) Network name – shows at top of all member view pages, in ‘network_name’ tags, and on your project list. Originally defined when creating the project, it can be changed here. Each project name must be unique.
4) Tiers II, III & IV include the survey. It can be toggled off and on, depending on your context. Checking the checkbox will show the survey in the member view, unchecking it will hide it from the member view.
5) The ‘Hello Text’ shows at the top of the member view bio page and connections page – you edit to suit your situation and can use tags to personalize the page.
6) List of tags available in the hello text
7) Welcome text – shows in body of the member view bio page. Use it to invite, orient and direct your members in the use and purpose of sumApp and your mapping project.
8) Data usage text – shows right under the welcome text on the member view bio page. Use this to be explicit about how member’s data will be used.
9) Completion message – shows when members click on ‘Finish’ at the bottom of the member view connections page. Use it to thank members and suggest/link to next steps if appropriate.
10) When checked, shows the map page option in the member view. Use this once you have at least a prototype map started in Kumu to embed the prototype into sumApp. Helps members understand why you’re collecting this data from them, enables them to start to engage with the map and to offer feedback into the map design.
11) Insert the map embed code from Kumu here so that map shows up in the map tab. How to add the embed.
12) Cancel changes made above.
13) Save changes made above.
14) Archive or delete this project. Requires account password.
Extra settings in Tier IV
Tier IV was originally created because we needed to be able to change the member view language in places to accommodate projects that looked at connections between organizations as opposed to individuals. The settings page reflects that additional needed flexibility.
You’ll see these additional fields in your settings page if you have a Tier IV account.
Tier IV Settings:
1) Element type – this doesn’t show anywhere in the sumApp interface, but it is exported with your dataset, so that if you’re merging data-sets you can specify what kinds of elements sumApp is generating. Can be whatever makes sense, such as ‘organization’, ‘team’, ‘project’ – What kind of entity are you surveying, if not persons?
2) Bio nav title – if you’re surveying organizations, ‘bio’ doesn’t make a lot of sense. You can change it to something like ‘Profile’ – shows on member view navigation bar.
3) Bio upload button text. Can change the button text on the member view bio page to something more appropriate for the entity you are surveying – such as ‘logo’.
4) Bio about help text. Shows underneath the bio field on the member view bio page. Can be edited to suit your type of entity.
5) Bio about placeholder. The text in the member view bio page bio field can be edited to suit your type of entity.
6) Bio not available. This text shows up in the member tiles on the member view connections page when a member has not yet input anything into their bio field. Can be edited to suit the entity type you’re dealing with.
7) Connections page title. Shows just above the sorting buttons on the member view connections page. Can be edited to suit the type of entity you are dealing with.
8) Connections modal title. Shows in the popped-open member tile, below the image and bio, above the connection questions. Can be edited to suit the type of entity you are dealing with.
Settings for all Tiers
The aspects of the Member Views (outside of the survey and the connection options) that can be edited are managed in Setup > Settings:
Features of the settings page are:
1) Indicates you’re in the ‘Setup’ phase of sumApp.
2) Shows you’re on the ‘Define Settings’ page.
3) Network name – shows at top of all member view pages, in ‘network_name’ tags, and on your project list. Originally defined when creating the project, it can be changed here. Each project name must be unique.
4) Tiers II, III & IV include the survey. It can be toggled off and on, depending on your context. Checking the checkbox will show the survey in the member view, unchecking it will hide it from the member view.
5) The ‘Hello Text’ shows at the top of the member view bio page and connections page – you edit to suit your situation and can use tags to personalize the page.
6) List of tags available in the hello text
7) Welcome text – shows in body of the member view bio page. Use it to invite, orient and direct your members in the use and purpose of sumApp and your mapping project.
8) Data usage text – shows right under the welcome text on the member view bio page. Use this to be explicit about how member’s data will be used.
9) Completion message – shows when members click on ‘Finish’ at the bottom of the member view connections page. Use it to thank members and suggest/link to next steps if appropriate.
10) When checked, shows the map page option in the member view. Use this once you have at least a prototype map started in Kumu to embed the prototype into sumApp. Helps members understand why you’re collecting this data from them, enables them to start to engage with the map and to offer feedback into the map design.
11) Insert the map embed code from Kumu here so that map shows up in the map tab. How to add the embed.
12) Cancel changes made above.
13) Save changes made above.
14) Archive or delete this project. Requires account password.
Extra settings in Tier IV
Tier IV was originally created because we needed to be able to change the member view language in places to accommodate projects that looked at connections between organizations as opposed to individuals. The settings page reflects that additional needed flexibility.
You’ll see these additional fields in your settings page if you have a Tier IV account.
Tier IV Settings:
1) Element type – this doesn’t show anywhere in the sumApp interface, but it is exported with your dataset, so that if you’re merging data-sets you can specify what kinds of elements sumApp is generating. Can be whatever makes sense, such as ‘organization’, ‘team’, ‘project’ – What kind of entity are you surveying, if not persons?
2) Bio nav title – if you’re surveying organizations, ‘bio’ doesn’t make a lot of sense. You can change it to something like ‘Profile’ – shows on member view navigation bar.
3) Bio upload button text. Can change the button text on the member view bio page to something more appropriate for the entity you are surveying – such as ‘logo’.
4) Bio about help text. Shows underneath the bio field on the member view bio page. Can be edited to suit your type of entity.
5) Bio about placeholder. The text in the member view bio page bio field can be edited to suit your type of entity.
6) Bio not available. This text shows up in the member tiles on the member view connections page when a member has not yet input anything into their bio field. Can be edited to suit the entity type you’re dealing with.
7) Connections page title. Shows just above the sorting buttons on the member view connections page. Can be edited to suit the type of entity you are dealing with.
8) Connections modal title. Shows in the popped-open member tile, below the image and bio, above the connection questions. Can be edited to suit the type of entity you are dealing with.
Settings for all Tiers
The aspects of the Member Views (outside of the survey and the connection options) that can be edited are managed in Setup > Settings:
Features of the settings page are:
1) Indicates you’re in the ‘Setup’ phase of sumApp.
2) Shows you’re on the ‘Define Settings’ page.
3) Network name – shows at top of all member view pages, in ‘network_name’ tags, and on your project list. Originally defined when creating the project, it can be changed here. Each project name must be unique.
4) Tiers II, III & IV include the survey. It can be toggled off and on, depending on your context. Checking the checkbox will show the survey in the member view, unchecking it will hide it from the member view.
5) The ‘Hello Text’ shows at the top of the member view bio page and connections page – you edit to suit your situation and can use tags to personalize the page.
6) List of tags available in the hello text
7) Welcome text – shows in body of the member view bio page. Use it to invite, orient and direct your members in the use and purpose of sumApp and your mapping project.
8) Data usage text – shows right under the welcome text on the member view bio page. Use this to be explicit about how member’s data will be used.
9) Completion message – shows when members click on ‘Finish’ at the bottom of the member view connections page. Use it to thank members and suggest/link to next steps if appropriate.
10) When checked, shows the map page option in the member view. Use this once you have at least a prototype map started in Kumu to embed the prototype into sumApp. Helps members understand why you’re collecting this data from them, enables them to start to engage with the map and to offer feedback into the map design.
11) Insert the map embed code from Kumu here so that map shows up in the map tab. How to add the embed.
12) Cancel changes made above.
13) Save changes made above.
14) Archive or delete this project. Requires account password.
Extra settings in Tier IV
Tier IV was originally created because we needed to be able to change the member view language in places to accommodate projects that looked at connections between organizations as opposed to individuals. The settings page reflects that additional needed flexibility.
You’ll see these additional fields in your settings page if you have a Tier IV account.
Tier IV Settings:
1) Element type – this doesn’t show anywhere in the sumApp interface, but it is exported with your dataset, so that if you’re merging data-sets you can specify what kinds of elements sumApp is generating. Can be whatever makes sense, such as ‘organization’, ‘team’, ‘project’ – What kind of entity are you surveying, if not persons?
2) Bio nav title – if you’re surveying organizations, ‘bio’ doesn’t make a lot of sense. You can change it to something like ‘Profile’ – shows on member view navigation bar.
3) Bio upload button text. Can change the button text on the member view bio page to something more appropriate for the entity you are surveying – such as ‘logo’.
4) Bio about help text. Shows underneath the bio field on the member view bio page. Can be edited to suit your type of entity.
5) Bio about placeholder. The text in the member view bio page bio field can be edited to suit your type of entity.
6) Bio not available. This text shows up in the member tiles on the member view connections page when a member has not yet input anything into their bio field. Can be edited to suit the entity type you’re dealing with.
7) Connections page title. Shows just above the sorting buttons on the member view connections page. Can be edited to suit the type of entity you are dealing with.
8) Connections modal title. Shows in the popped-open member tile, below the image and bio, above the connection questions. Can be edited to suit the type of entity you are dealing with.
Settings for all Tiers
The aspects of the Member Views (outside of the survey and the connection options) that can be edited are managed in Setup > Settings:
Features of the settings page are:
1) Indicates you’re in the ‘Setup’ phase of sumApp.
2) Shows you’re on the ‘Define Settings’ page.
3) Network name – shows at top of all member view pages, in ‘network_name’ tags, and on your project list. Originally defined when creating the project, it can be changed here. Each project name must be unique.
4) Tiers II, III & IV include the survey. It can be toggled off and on, depending on your context. Checking the checkbox will show the survey in the member view, unchecking it will hide it from the member view.
5) The ‘Hello Text’ shows at the top of the member view bio page and connections page – you edit to suit your situation and can use tags to personalize the page.
6) List of tags available in the hello text
7) Welcome text – shows in body of the member view bio page. Use it to invite, orient and direct your members in the use and purpose of sumApp and your mapping project.
8) Data usage text – shows right under the welcome text on the member view bio page. Use this to be explicit about how member’s data will be used.
9) Completion message – shows when members click on ‘Finish’ at the bottom of the member view connections page. Use it to thank members and suggest/link to next steps if appropriate.
10) When checked, shows the map page option in the member view. Use this once you have at least a prototype map started in Kumu to embed the prototype into sumApp. Helps members understand why you’re collecting this data from them, enables them to start to engage with the map and to offer feedback into the map design.
11) Insert the map embed code from Kumu here so that map shows up in the map tab. How to add the embed.
12) Cancel changes made above.
13) Save changes made above.
14) Archive or delete this project. Requires account password.
Extra settings in Tier IV
Tier IV was originally created because we needed to be able to change the member view language in places to accommodate projects that looked at connections between organizations as opposed to individuals. The settings page reflects that additional needed flexibility.
You’ll see these additional fields in your settings page if you have a Tier IV account.
Tier IV Settings:
1) Element type – this doesn’t show anywhere in the sumApp interface, but it is exported with your dataset, so that if you’re merging data-sets you can specify what kinds of elements sumApp is generating. Can be whatever makes sense, such as ‘organization’, ‘team’, ‘project’ – What kind of entity are you surveying, if not persons?
2) Bio nav title – if you’re surveying organizations, ‘bio’ doesn’t make a lot of sense. You can change it to something like ‘Profile’ – shows on member view navigation bar.
3) Bio upload button text. Can change the button text on the member view bio page to something more appropriate for the entity you are surveying – such as ‘logo’.
4) Bio about help text. Shows underneath the bio field on the member view bio page. Can be edited to suit your type of entity.
5) Bio about placeholder. The text in the member view bio page bio field can be edited to suit your type of entity.
6) Bio not available. This text shows up in the member tiles on the member view connections page when a member has not yet input anything into their bio field. Can be edited to suit the entity type you’re dealing with.
7) Connections page title. Shows just above the sorting buttons on the member view connections page. Can be edited to suit the type of entity you are dealing with.
8) Connections modal title. Shows in the popped-open member tile, below the image and bio, above the connection questions. Can be edited to suit the type of entity you are dealing with.
Settings for all Tiers
The aspects of the Member Views (outside of the survey and the connection options) that can be edited are managed in Setup > Settings:
Features of the settings page are:
1) Indicates you’re in the ‘Setup’ phase of sumApp.
2) Shows you’re on the ‘Define Settings’ page.
3) Network name – shows at top of all member view pages, in ‘network_name’ tags, and on your project list. Originally defined when creating the project, it can be changed here. Each project name must be unique.
4) Tiers II, III & IV include the survey. It can be toggled off and on, depending on your context. Checking the checkbox will show the survey in the member view, unchecking it will hide it from the member view.
5) The ‘Hello Text’ shows at the top of the member view bio page and connections page – you edit to suit your situation and can use tags to personalize the page.
6) List of tags available in the hello text
7) Welcome text – shows in body of the member view bio page. Use it to invite, orient and direct your members in the use and purpose of sumApp and your mapping project.
8) Data usage text – shows right under the welcome text on the member view bio page. Use this to be explicit about how member’s data will be used.
9) Completion message – shows when members click on ‘Finish’ at the bottom of the member view connections page. Use it to thank members and suggest/link to next steps if appropriate.
10) When checked, shows the map page option in the member view. Use this once you have at least a prototype map started in Kumu to embed the prototype into sumApp. Helps members understand why you’re collecting this data from them, enables them to start to engage with the map and to offer feedback into the map design.
11) Insert the map embed code from Kumu here so that map shows up in the map tab. How to add the embed.
12) Cancel changes made above.
13) Save changes made above.
14) Archive or delete this project. Requires account password.
Extra settings in Tier IV
Tier IV was originally created because we needed to be able to change the member view language in places to accommodate projects that looked at connections between organizations as opposed to individuals. The settings page reflects that additional needed flexibility.
You’ll see these additional fields in your settings page if you have a Tier IV account.
Tier IV Settings:
1) Element type – this doesn’t show anywhere in the sumApp interface, but it is exported with your dataset, so that if you’re merging data-sets you can specify what kinds of elements sumApp is generating. Can be whatever makes sense, such as ‘organization’, ‘team’, ‘project’ – What kind of entity are you surveying, if not persons?
2) Bio nav title – if you’re surveying organizations, ‘bio’ doesn’t make a lot of sense. You can change it to something like ‘Profile’ – shows on member view navigation bar.
3) Bio upload button text. Can change the button text on the member view bio page to something more appropriate for the entity you are surveying – such as ‘logo’.
4) Bio about help text. Shows underneath the bio field on the member view bio page. Can be edited to suit your type of entity.
5) Bio about placeholder. The text in the member view bio page bio field can be edited to suit your type of entity.
6) Bio not available. This text shows up in the member tiles on the member view connections page when a member has not yet input anything into their bio field. Can be edited to suit the entity type you’re dealing with.
7) Connections page title. Shows just above the sorting buttons on the member view connections page. Can be edited to suit the type of entity you are dealing with.
8) Connections modal title. Shows in the popped-open member tile, below the image and bio, above the connection questions. Can be edited to suit the type of entity you are dealing with.
The Bio page is the first page your members will see when they click on the link included in their sumApp invitation email. It is meant to help orient your members to the project’s process and purpose and give each member the opportunity to help others in the network identify them easily on the Connections page.
Features of the Bio page
1) Project name – defined when the project was created. Can be changed in
2) Member View Navigation Bar. Members can skip forward through the app to whichever page they want to see. The Bio tab is editable in Tier IV, in
3) If the member has already shared connections in the connections page, the blue info bar at the top tells them how many they’ve shared.
4) ‘Hello Text’. Editable in all Tiers,
5) ‘Welcome Text’. Editable in all Tiers,
6) ‘Data Usage Text’. Editable in all Tiers, Make sure you are clear and accurate about how private or public the map and the data in it will be.
7) The profile picture upload. Members who have a Gravitar account associated with the email address you are using, their ‘gravitar’ will be pulled in automatically. They can replace it using the upload function if desired. Helps members easily identify one another on the connections page and you can show the picture in the member nodes in the Kumu map. The text on the blue button is editable in Tier IV, in Settings.
8) An (old-school) tweet-sized space for member to share a little info about themselves to help others in the network identify them easily. Limit is 140 characters (not words!). The light blue description text below the field is editable in Tier IV, in Settings.
9) Character countdown showing how many unused characters remain in the field (in #8).
10) Proceed button – saves bio text and proceeds to the survey page.
Settings for all Tiers
The aspects of the Member Views (outside of the survey and the connection options) that can be edited are managed in Setup > Settings:
Features of the settings page are:
1) Indicates you’re in the ‘Setup’ phase of sumApp.
2) Shows you’re on the ‘Define Settings’ page.
3) Network name – shows at top of all member view pages, in ‘network_name’ tags, and on your project list. Originally defined when creating the project, it can be changed here. Each project name must be unique.
4) Tiers II, III & IV include the survey. It can be toggled off and on, depending on your context. Checking the checkbox will show the survey in the member view, unchecking it will hide it from the member view.
5) The ‘Hello Text’ shows at the top of the member view bio page and connections page – you edit to suit your situation and can use tags to personalize the page.
6) List of tags available in the hello text
7) Welcome text – shows in body of the member view bio page. Use it to invite, orient and direct your members in the use and purpose of sumApp and your mapping project.
8) Data usage text – shows right under the welcome text on the member view bio page. Use this to be explicit about how member’s data will be used.
9) Completion message – shows when members click on ‘Finish’ at the bottom of the member view connections page. Use it to thank members and suggest/link to next steps if appropriate.
10) When checked, shows the map page option in the member view. Use this once you have at least a prototype map started in Kumu to embed the prototype into sumApp. Helps members understand why you’re collecting this data from them, enables them to start to engage with the map and to offer feedback into the map design.
11) Insert the map embed code from Kumu here so that map shows up in the map tab. How to add the embed.
12) Cancel changes made above.
13) Save changes made above.
14) Archive or delete this project. Requires account password.
Extra settings in Tier IV
Tier IV was originally created because we needed to be able to change the member view language in places to accommodate projects that looked at connections between organizations as opposed to individuals. The settings page reflects that additional needed flexibility.
You’ll see these additional fields in your settings page if you have a Tier IV account.
Tier IV Settings:
1) Element type – this doesn’t show anywhere in the sumApp interface, but it is exported with your dataset, so that if you’re merging data-sets you can specify what kinds of elements sumApp is generating. Can be whatever makes sense, such as ‘organization’, ‘team’, ‘project’ – What kind of entity are you surveying, if not persons?
2) Bio nav title – if you’re surveying organizations, ‘bio’ doesn’t make a lot of sense. You can change it to something like ‘Profile’ – shows on member view navigation bar.
3) Bio upload button text. Can change the button text on the member view bio page to something more appropriate for the entity you are surveying – such as ‘logo’.
4) Bio about help text. Shows underneath the bio field on the member view bio page. Can be edited to suit your type of entity.
5) Bio about placeholder. The text in the member view bio page bio field can be edited to suit your type of entity.
6) Bio not available. This text shows up in the member tiles on the member view connections page when a member has not yet input anything into their bio field. Can be edited to suit the entity type you’re dealing with.
7) Connections page title. Shows just above the sorting buttons on the member view connections page. Can be edited to suit the type of entity you are dealing with.
8) Connections modal title. Shows in the popped-open member tile, below the image and bio, above the connection questions. Can be edited to suit the type of entity you are dealing with.
You can change your options in Setup > Define connection options – #1 & #2 in image below.
Tiers I & II have a simple, single-question interface – #3 in image below.
- Edit the options in #3 in the image above.
- You can use as few or as many options as you like, but don’t use so many it becomes hard for your members to decide.
- Only one option can be selected from the list.
- The options should be general enough to encompass the range of possible connections without making an exhaustive list.
- Don’t include ‘don’t know’ as an option – that will require everyone in the network to reply regarding everyone else in the network, and it will generate a whole lot of unnecessary data.
- Set your options to be ranked with increasing strength.
- You can preview the options in the preview panel below the editor.
- Don’t forget to save! #5 in image.
- Options show up on the member view connections page in the member tiles when they are clicked open.
Settings for all Tiers
The aspects of the Member Views (outside of the survey and the connection options) that can be edited are managed in Setup > Settings:
Features of the settings page are:
1) Indicates you’re in the ‘Setup’ phase of sumApp.
2) Shows you’re on the ‘Define Settings’ page.
3) Network name – shows at top of all member view pages, in ‘network_name’ tags, and on your project list. Originally defined when creating the project, it can be changed here. Each project name must be unique.
4) Tiers II, III & IV include the survey. It can be toggled off and on, depending on your context. Checking the checkbox will show the survey in the member view, unchecking it will hide it from the member view.
5) The ‘Hello Text’ shows at the top of the member view bio page and connections page – you edit to suit your situation and can use tags to personalize the page.
6) List of tags available in the hello text
7) Welcome text – shows in body of the member view bio page. Use it to invite, orient and direct your members in the use and purpose of sumApp and your mapping project.
8) Data usage text – shows right under the welcome text on the member view bio page. Use this to be explicit about how member’s data will be used.
9) Completion message – shows when members click on ‘Finish’ at the bottom of the member view connections page. Use it to thank members and suggest/link to next steps if appropriate.
10) When checked, shows the map page option in the member view. Use this once you have at least a prototype map started in Kumu to embed the prototype into sumApp. Helps members understand why you’re collecting this data from them, enables them to start to engage with the map and to offer feedback into the map design.
11) Insert the map embed code from Kumu here so that map shows up in the map tab. How to add the embed.
12) Cancel changes made above.
13) Save changes made above.
14) Archive or delete this project. Requires account password.
Extra settings in Tier IV
Tier IV was originally created because we needed to be able to change the member view language in places to accommodate projects that looked at connections between organizations as opposed to individuals. The settings page reflects that additional needed flexibility.
You’ll see these additional fields in your settings page if you have a Tier IV account.
Tier IV Settings:
1) Element type – this doesn’t show anywhere in the sumApp interface, but it is exported with your dataset, so that if you’re merging data-sets you can specify what kinds of elements sumApp is generating. Can be whatever makes sense, such as ‘organization’, ‘team’, ‘project’ – What kind of entity are you surveying, if not persons?
2) Bio nav title – if you’re surveying organizations, ‘bio’ doesn’t make a lot of sense. You can change it to something like ‘Profile’ – shows on member view navigation bar.
3) Bio upload button text. Can change the button text on the member view bio page to something more appropriate for the entity you are surveying – such as ‘logo’.
4) Bio about help text. Shows underneath the bio field on the member view bio page. Can be edited to suit your type of entity.
5) Bio about placeholder. The text in the member view bio page bio field can be edited to suit your type of entity.
6) Bio not available. This text shows up in the member tiles on the member view connections page when a member has not yet input anything into their bio field. Can be edited to suit the entity type you’re dealing with.
7) Connections page title. Shows just above the sorting buttons on the member view connections page. Can be edited to suit the type of entity you are dealing with.
8) Connections modal title. Shows in the popped-open member tile, below the image and bio, above the connection questions. Can be edited to suit the type of entity you are dealing with.
Settings for all Tiers
The aspects of the Member Views (outside of the survey and the connection options) that can be edited are managed in Setup > Settings:
Features of the settings page are:
1) Indicates you’re in the ‘Setup’ phase of sumApp.
2) Shows you’re on the ‘Define Settings’ page.
3) Network name – shows at top of all member view pages, in ‘network_name’ tags, and on your project list. Originally defined when creating the project, it can be changed here. Each project name must be unique.
4) Tiers II, III & IV include the survey. It can be toggled off and on, depending on your context. Checking the checkbox will show the survey in the member view, unchecking it will hide it from the member view.
5) The ‘Hello Text’ shows at the top of the member view bio page and connections page – you edit to suit your situation and can use tags to personalize the page.
6) List of tags available in the hello text
7) Welcome text – shows in body of the member view bio page. Use it to invite, orient and direct your members in the use and purpose of sumApp and your mapping project.
8) Data usage text – shows right under the welcome text on the member view bio page. Use this to be explicit about how member’s data will be used.
9) Completion message – shows when members click on ‘Finish’ at the bottom of the member view connections page. Use it to thank members and suggest/link to next steps if appropriate.
10) When checked, shows the map page option in the member view. Use this once you have at least a prototype map started in Kumu to embed the prototype into sumApp. Helps members understand why you’re collecting this data from them, enables them to start to engage with the map and to offer feedback into the map design.
11) Insert the map embed code from Kumu here so that map shows up in the map tab. How to add the embed.
12) Cancel changes made above.
13) Save changes made above.
14) Archive or delete this project. Requires account password.
Extra settings in Tier IV
Tier IV was originally created because we needed to be able to change the member view language in places to accommodate projects that looked at connections between organizations as opposed to individuals. The settings page reflects that additional needed flexibility.
You’ll see these additional fields in your settings page if you have a Tier IV account.
Tier IV Settings:
1) Element type – this doesn’t show anywhere in the sumApp interface, but it is exported with your dataset, so that if you’re merging data-sets you can specify what kinds of elements sumApp is generating. Can be whatever makes sense, such as ‘organization’, ‘team’, ‘project’ – What kind of entity are you surveying, if not persons?
2) Bio nav title – if you’re surveying organizations, ‘bio’ doesn’t make a lot of sense. You can change it to something like ‘Profile’ – shows on member view navigation bar.
3) Bio upload button text. Can change the button text on the member view bio page to something more appropriate for the entity you are surveying – such as ‘logo’.
4) Bio about help text. Shows underneath the bio field on the member view bio page. Can be edited to suit your type of entity.
5) Bio about placeholder. The text in the member view bio page bio field can be edited to suit your type of entity.
6) Bio not available. This text shows up in the member tiles on the member view connections page when a member has not yet input anything into their bio field. Can be edited to suit the entity type you’re dealing with.
7) Connections page title. Shows just above the sorting buttons on the member view connections page. Can be edited to suit the type of entity you are dealing with.
8) Connections modal title. Shows in the popped-open member tile, below the image and bio, above the connection questions. Can be edited to suit the type of entity you are dealing with.
Settings for all Tiers
The aspects of the Member Views (outside of the survey and the connection options) that can be edited are managed in Setup > Settings:
Features of the settings page are:
1) Indicates you’re in the ‘Setup’ phase of sumApp.
2) Shows you’re on the ‘Define Settings’ page.
3) Network name – shows at top of all member view pages, in ‘network_name’ tags, and on your project list. Originally defined when creating the project, it can be changed here. Each project name must be unique.
4) Tiers II, III & IV include the survey. It can be toggled off and on, depending on your context. Checking the checkbox will show the survey in the member view, unchecking it will hide it from the member view.
5) The ‘Hello Text’ shows at the top of the member view bio page and connections page – you edit to suit your situation and can use tags to personalize the page.
6) List of tags available in the hello text
7) Welcome text – shows in body of the member view bio page. Use it to invite, orient and direct your members in the use and purpose of sumApp and your mapping project.
8) Data usage text – shows right under the welcome text on the member view bio page. Use this to be explicit about how member’s data will be used.
9) Completion message – shows when members click on ‘Finish’ at the bottom of the member view connections page. Use it to thank members and suggest/link to next steps if appropriate.
10) When checked, shows the map page option in the member view. Use this once you have at least a prototype map started in Kumu to embed the prototype into sumApp. Helps members understand why you’re collecting this data from them, enables them to start to engage with the map and to offer feedback into the map design.
11) Insert the map embed code from Kumu here so that map shows up in the map tab. How to add the embed.
12) Cancel changes made above.
13) Save changes made above.
14) Archive or delete this project. Requires account password.
Extra settings in Tier IV
Tier IV was originally created because we needed to be able to change the member view language in places to accommodate projects that looked at connections between organizations as opposed to individuals. The settings page reflects that additional needed flexibility.
You’ll see these additional fields in your settings page if you have a Tier IV account.
Tier IV Settings:
1) Element type – this doesn’t show anywhere in the sumApp interface, but it is exported with your dataset, so that if you’re merging data-sets you can specify what kinds of elements sumApp is generating. Can be whatever makes sense, such as ‘organization’, ‘team’, ‘project’ – What kind of entity are you surveying, if not persons?
2) Bio nav title – if you’re surveying organizations, ‘bio’ doesn’t make a lot of sense. You can change it to something like ‘Profile’ – shows on member view navigation bar.
3) Bio upload button text. Can change the button text on the member view bio page to something more appropriate for the entity you are surveying – such as ‘logo’.
4) Bio about help text. Shows underneath the bio field on the member view bio page. Can be edited to suit your type of entity.
5) Bio about placeholder. The text in the member view bio page bio field can be edited to suit your type of entity.
6) Bio not available. This text shows up in the member tiles on the member view connections page when a member has not yet input anything into their bio field. Can be edited to suit the entity type you’re dealing with.
7) Connections page title. Shows just above the sorting buttons on the member view connections page. Can be edited to suit the type of entity you are dealing with.
8) Connections modal title. Shows in the popped-open member tile, below the image and bio, above the connection questions. Can be edited to suit the type of entity you are dealing with.
Settings for all Tiers
The aspects of the Member Views (outside of the survey and the connection options) that can be edited are managed in Setup > Settings:
Features of the settings page are:
1) Indicates you’re in the ‘Setup’ phase of sumApp.
2) Shows you’re on the ‘Define Settings’ page.
3) Network name – shows at top of all member view pages, in ‘network_name’ tags, and on your project list. Originally defined when creating the project, it can be changed here. Each project name must be unique.
4) Tiers II, III & IV include the survey. It can be toggled off and on, depending on your context. Checking the checkbox will show the survey in the member view, unchecking it will hide it from the member view.
5) The ‘Hello Text’ shows at the top of the member view bio page and connections page – you edit to suit your situation and can use tags to personalize the page.
6) List of tags available in the hello text
7) Welcome text – shows in body of the member view bio page. Use it to invite, orient and direct your members in the use and purpose of sumApp and your mapping project.
8) Data usage text – shows right under the welcome text on the member view bio page. Use this to be explicit about how member’s data will be used.
9) Completion message – shows when members click on ‘Finish’ at the bottom of the member view connections page. Use it to thank members and suggest/link to next steps if appropriate.
10) When checked, shows the map page option in the member view. Use this once you have at least a prototype map started in Kumu to embed the prototype into sumApp. Helps members understand why you’re collecting this data from them, enables them to start to engage with the map and to offer feedback into the map design.
11) Insert the map embed code from Kumu here so that map shows up in the map tab. How to add the embed.
12) Cancel changes made above.
13) Save changes made above.
14) Archive or delete this project. Requires account password.
Extra settings in Tier IV
Tier IV was originally created because we needed to be able to change the member view language in places to accommodate projects that looked at connections between organizations as opposed to individuals. The settings page reflects that additional needed flexibility.
You’ll see these additional fields in your settings page if you have a Tier IV account.
Tier IV Settings:
1) Element type – this doesn’t show anywhere in the sumApp interface, but it is exported with your dataset, so that if you’re merging data-sets you can specify what kinds of elements sumApp is generating. Can be whatever makes sense, such as ‘organization’, ‘team’, ‘project’ – What kind of entity are you surveying, if not persons?
2) Bio nav title – if you’re surveying organizations, ‘bio’ doesn’t make a lot of sense. You can change it to something like ‘Profile’ – shows on member view navigation bar.
3) Bio upload button text. Can change the button text on the member view bio page to something more appropriate for the entity you are surveying – such as ‘logo’.
4) Bio about help text. Shows underneath the bio field on the member view bio page. Can be edited to suit your type of entity.
5) Bio about placeholder. The text in the member view bio page bio field can be edited to suit your type of entity.
6) Bio not available. This text shows up in the member tiles on the member view connections page when a member has not yet input anything into their bio field. Can be edited to suit the entity type you’re dealing with.
7) Connections page title. Shows just above the sorting buttons on the member view connections page. Can be edited to suit the type of entity you are dealing with.
8) Connections modal title. Shows in the popped-open member tile, below the image and bio, above the connection questions. Can be edited to suit the type of entity you are dealing with.
Settings for all Tiers
The aspects of the Member Views (outside of the survey and the connection options) that can be edited are managed in Setup > Settings:
Features of the settings page are:
1) Indicates you’re in the ‘Setup’ phase of sumApp.
2) Shows you’re on the ‘Define Settings’ page.
3) Network name – shows at top of all member view pages, in ‘network_name’ tags, and on your project list. Originally defined when creating the project, it can be changed here. Each project name must be unique.
4) Tiers II, III & IV include the survey. It can be toggled off and on, depending on your context. Checking the checkbox will show the survey in the member view, unchecking it will hide it from the member view.
5) The ‘Hello Text’ shows at the top of the member view bio page and connections page – you edit to suit your situation and can use tags to personalize the page.
6) List of tags available in the hello text
7) Welcome text – shows in body of the member view bio page. Use it to invite, orient and direct your members in the use and purpose of sumApp and your mapping project.
8) Data usage text – shows right under the welcome text on the member view bio page. Use this to be explicit about how member’s data will be used.
9) Completion message – shows when members click on ‘Finish’ at the bottom of the member view connections page. Use it to thank members and suggest/link to next steps if appropriate.
10) When checked, shows the map page option in the member view. Use this once you have at least a prototype map started in Kumu to embed the prototype into sumApp. Helps members understand why you’re collecting this data from them, enables them to start to engage with the map and to offer feedback into the map design.
11) Insert the map embed code from Kumu here so that map shows up in the map tab. How to add the embed.
12) Cancel changes made above.
13) Save changes made above.
14) Archive or delete this project. Requires account password.
Extra settings in Tier IV
Tier IV was originally created because we needed to be able to change the member view language in places to accommodate projects that looked at connections between organizations as opposed to individuals. The settings page reflects that additional needed flexibility.
You’ll see these additional fields in your settings page if you have a Tier IV account.
Tier IV Settings:
1) Element type – this doesn’t show anywhere in the sumApp interface, but it is exported with your dataset, so that if you’re merging data-sets you can specify what kinds of elements sumApp is generating. Can be whatever makes sense, such as ‘organization’, ‘team’, ‘project’ – What kind of entity are you surveying, if not persons?
2) Bio nav title – if you’re surveying organizations, ‘bio’ doesn’t make a lot of sense. You can change it to something like ‘Profile’ – shows on member view navigation bar.
3) Bio upload button text. Can change the button text on the member view bio page to something more appropriate for the entity you are surveying – such as ‘logo’.
4) Bio about help text. Shows underneath the bio field on the member view bio page. Can be edited to suit your type of entity.
5) Bio about placeholder. The text in the member view bio page bio field can be edited to suit your type of entity.
6) Bio not available. This text shows up in the member tiles on the member view connections page when a member has not yet input anything into their bio field. Can be edited to suit the entity type you’re dealing with.
7) Connections page title. Shows just above the sorting buttons on the member view connections page. Can be edited to suit the type of entity you are dealing with.
8) Connections modal title. Shows in the popped-open member tile, below the image and bio, above the connection questions. Can be edited to suit the type of entity you are dealing with.
The Bio page is the first page your members will see when they click on the link included in their sumApp invitation email. It is meant to help orient your members to the project’s process and purpose and give each member the opportunity to help others in the network identify them easily on the Connections page.
Features of the Bio page
1) Project name – defined when the project was created. Can be changed in
2) Member View Navigation Bar. Members can skip forward through the app to whichever page they want to see. The Bio tab is editable in Tier IV, in
3) If the member has already shared connections in the connections page, the blue info bar at the top tells them how many they’ve shared.
4) ‘Hello Text’. Editable in all Tiers,
5) ‘Welcome Text’. Editable in all Tiers,
6) ‘Data Usage Text’. Editable in all Tiers, Make sure you are clear and accurate about how private or public the map and the data in it will be.
7) The profile picture upload. Members who have a Gravitar account associated with the email address you are using, their ‘gravitar’ will be pulled in automatically. They can replace it using the upload function if desired. Helps members easily identify one another on the connections page and you can show the picture in the member nodes in the Kumu map. The text on the blue button is editable in Tier IV, in Settings.
8) An (old-school) tweet-sized space for member to share a little info about themselves to help others in the network identify them easily. Limit is 140 characters (not words!). The light blue description text below the field is editable in Tier IV, in Settings.
9) Character countdown showing how many unused characters remain in the field (in #8).
10) Proceed button – saves bio text and proceeds to the survey page.
Settings for all Tiers
The aspects of the Member Views (outside of the survey and the connection options) that can be edited are managed in Setup > Settings:
Features of the settings page are:
1) Indicates you’re in the ‘Setup’ phase of sumApp.
2) Shows you’re on the ‘Define Settings’ page.
3) Network name – shows at top of all member view pages, in ‘network_name’ tags, and on your project list. Originally defined when creating the project, it can be changed here. Each project name must be unique.
4) Tiers II, III & IV include the survey. It can be toggled off and on, depending on your context. Checking the checkbox will show the survey in the member view, unchecking it will hide it from the member view.
5) The ‘Hello Text’ shows at the top of the member view bio page and connections page – you edit to suit your situation and can use tags to personalize the page.
6) List of tags available in the hello text
7) Welcome text – shows in body of the member view bio page. Use it to invite, orient and direct your members in the use and purpose of sumApp and your mapping project.
8) Data usage text – shows right under the welcome text on the member view bio page. Use this to be explicit about how member’s data will be used.
9) Completion message – shows when members click on ‘Finish’ at the bottom of the member view connections page. Use it to thank members and suggest/link to next steps if appropriate.
10) When checked, shows the map page option in the member view. Use this once you have at least a prototype map started in Kumu to embed the prototype into sumApp. Helps members understand why you’re collecting this data from them, enables them to start to engage with the map and to offer feedback into the map design.
11) Insert the map embed code from Kumu here so that map shows up in the map tab. How to add the embed.
12) Cancel changes made above.
13) Save changes made above.
14) Archive or delete this project. Requires account password.
Extra settings in Tier IV
Tier IV was originally created because we needed to be able to change the member view language in places to accommodate projects that looked at connections between organizations as opposed to individuals. The settings page reflects that additional needed flexibility.
You’ll see these additional fields in your settings page if you have a Tier IV account.
Tier IV Settings:
1) Element type – this doesn’t show anywhere in the sumApp interface, but it is exported with your dataset, so that if you’re merging data-sets you can specify what kinds of elements sumApp is generating. Can be whatever makes sense, such as ‘organization’, ‘team’, ‘project’ – What kind of entity are you surveying, if not persons?
2) Bio nav title – if you’re surveying organizations, ‘bio’ doesn’t make a lot of sense. You can change it to something like ‘Profile’ – shows on member view navigation bar.
3) Bio upload button text. Can change the button text on the member view bio page to something more appropriate for the entity you are surveying – such as ‘logo’.
4) Bio about help text. Shows underneath the bio field on the member view bio page. Can be edited to suit your type of entity.
5) Bio about placeholder. The text in the member view bio page bio field can be edited to suit your type of entity.
6) Bio not available. This text shows up in the member tiles on the member view connections page when a member has not yet input anything into their bio field. Can be edited to suit the entity type you’re dealing with.
7) Connections page title. Shows just above the sorting buttons on the member view connections page. Can be edited to suit the type of entity you are dealing with.
8) Connections modal title. Shows in the popped-open member tile, below the image and bio, above the connection questions. Can be edited to suit the type of entity you are dealing with.
Settings for all Tiers
The aspects of the Member Views (outside of the survey and the connection options) that can be edited are managed in Setup > Settings:
Features of the settings page are:
1) Indicates you’re in the ‘Setup’ phase of sumApp.
2) Shows you’re on the ‘Define Settings’ page.
3) Network name – shows at top of all member view pages, in ‘network_name’ tags, and on your project list. Originally defined when creating the project, it can be changed here. Each project name must be unique.
4) Tiers II, III & IV include the survey. It can be toggled off and on, depending on your context. Checking the checkbox will show the survey in the member view, unchecking it will hide it from the member view.
5) The ‘Hello Text’ shows at the top of the member view bio page and connections page – you edit to suit your situation and can use tags to personalize the page.
6) List of tags available in the hello text
7) Welcome text – shows in body of the member view bio page. Use it to invite, orient and direct your members in the use and purpose of sumApp and your mapping project.
8) Data usage text – shows right under the welcome text on the member view bio page. Use this to be explicit about how member’s data will be used.
9) Completion message – shows when members click on ‘Finish’ at the bottom of the member view connections page. Use it to thank members and suggest/link to next steps if appropriate.
10) When checked, shows the map page option in the member view. Use this once you have at least a prototype map started in Kumu to embed the prototype into sumApp. Helps members understand why you’re collecting this data from them, enables them to start to engage with the map and to offer feedback into the map design.
11) Insert the map embed code from Kumu here so that map shows up in the map tab. How to add the embed.
12) Cancel changes made above.
13) Save changes made above.
14) Archive or delete this project. Requires account password.
Extra settings in Tier IV
Tier IV was originally created because we needed to be able to change the member view language in places to accommodate projects that looked at connections between organizations as opposed to individuals. The settings page reflects that additional needed flexibility.
You’ll see these additional fields in your settings page if you have a Tier IV account.
Tier IV Settings:
1) Element type – this doesn’t show anywhere in the sumApp interface, but it is exported with your dataset, so that if you’re merging data-sets you can specify what kinds of elements sumApp is generating. Can be whatever makes sense, such as ‘organization’, ‘team’, ‘project’ – What kind of entity are you surveying, if not persons?
2) Bio nav title – if you’re surveying organizations, ‘bio’ doesn’t make a lot of sense. You can change it to something like ‘Profile’ – shows on member view navigation bar.
3) Bio upload button text. Can change the button text on the member view bio page to something more appropriate for the entity you are surveying – such as ‘logo’.
4) Bio about help text. Shows underneath the bio field on the member view bio page. Can be edited to suit your type of entity.
5) Bio about placeholder. The text in the member view bio page bio field can be edited to suit your type of entity.
6) Bio not available. This text shows up in the member tiles on the member view connections page when a member has not yet input anything into their bio field. Can be edited to suit the entity type you’re dealing with.
7) Connections page title. Shows just above the sorting buttons on the member view connections page. Can be edited to suit the type of entity you are dealing with.
8) Connections modal title. Shows in the popped-open member tile, below the image and bio, above the connection questions. Can be edited to suit the type of entity you are dealing with.
Settings for all Tiers
The aspects of the Member Views (outside of the survey and the connection options) that can be edited are managed in Setup > Settings:
Features of the settings page are:
1) Indicates you’re in the ‘Setup’ phase of sumApp.
2) Shows you’re on the ‘Define Settings’ page.
3) Network name – shows at top of all member view pages, in ‘network_name’ tags, and on your project list. Originally defined when creating the project, it can be changed here. Each project name must be unique.
4) Tiers II, III & IV include the survey. It can be toggled off and on, depending on your context. Checking the checkbox will show the survey in the member view, unchecking it will hide it from the member view.
5) The ‘Hello Text’ shows at the top of the member view bio page and connections page – you edit to suit your situation and can use tags to personalize the page.
6) List of tags available in the hello text
7) Welcome text – shows in body of the member view bio page. Use it to invite, orient and direct your members in the use and purpose of sumApp and your mapping project.
8) Data usage text – shows right under the welcome text on the member view bio page. Use this to be explicit about how member’s data will be used.
9) Completion message – shows when members click on ‘Finish’ at the bottom of the member view connections page. Use it to thank members and suggest/link to next steps if appropriate.
10) When checked, shows the map page option in the member view. Use this once you have at least a prototype map started in Kumu to embed the prototype into sumApp. Helps members understand why you’re collecting this data from them, enables them to start to engage with the map and to offer feedback into the map design.
11) Insert the map embed code from Kumu here so that map shows up in the map tab. How to add the embed.
12) Cancel changes made above.
13) Save changes made above.
14) Archive or delete this project. Requires account password.
Extra settings in Tier IV
Tier IV was originally created because we needed to be able to change the member view language in places to accommodate projects that looked at connections between organizations as opposed to individuals. The settings page reflects that additional needed flexibility.
You’ll see these additional fields in your settings page if you have a Tier IV account.
Tier IV Settings:
1) Element type – this doesn’t show anywhere in the sumApp interface, but it is exported with your dataset, so that if you’re merging data-sets you can specify what kinds of elements sumApp is generating. Can be whatever makes sense, such as ‘organization’, ‘team’, ‘project’ – What kind of entity are you surveying, if not persons?
2) Bio nav title – if you’re surveying organizations, ‘bio’ doesn’t make a lot of sense. You can change it to something like ‘Profile’ – shows on member view navigation bar.
3) Bio upload button text. Can change the button text on the member view bio page to something more appropriate for the entity you are surveying – such as ‘logo’.
4) Bio about help text. Shows underneath the bio field on the member view bio page. Can be edited to suit your type of entity.
5) Bio about placeholder. The text in the member view bio page bio field can be edited to suit your type of entity.
6) Bio not available. This text shows up in the member tiles on the member view connections page when a member has not yet input anything into their bio field. Can be edited to suit the entity type you’re dealing with.
7) Connections page title. Shows just above the sorting buttons on the member view connections page. Can be edited to suit the type of entity you are dealing with.
8) Connections modal title. Shows in the popped-open member tile, below the image and bio, above the connection questions. Can be edited to suit the type of entity you are dealing with.
Settings for all Tiers
The aspects of the Member Views (outside of the survey and the connection options) that can be edited are managed in Setup > Settings:
Features of the settings page are:
1) Indicates you’re in the ‘Setup’ phase of sumApp.
2) Shows you’re on the ‘Define Settings’ page.
3) Network name – shows at top of all member view pages, in ‘network_name’ tags, and on your project list. Originally defined when creating the project, it can be changed here. Each project name must be unique.
4) Tiers II, III & IV include the survey. It can be toggled off and on, depending on your context. Checking the checkbox will show the survey in the member view, unchecking it will hide it from the member view.
5) The ‘Hello Text’ shows at the top of the member view bio page and connections page – you edit to suit your situation and can use tags to personalize the page.
6) List of tags available in the hello text
7) Welcome text – shows in body of the member view bio page. Use it to invite, orient and direct your members in the use and purpose of sumApp and your mapping project.
8) Data usage text – shows right under the welcome text on the member view bio page. Use this to be explicit about how member’s data will be used.
9) Completion message – shows when members click on ‘Finish’ at the bottom of the member view connections page. Use it to thank members and suggest/link to next steps if appropriate.
10) When checked, shows the map page option in the member view. Use this once you have at least a prototype map started in Kumu to embed the prototype into sumApp. Helps members understand why you’re collecting this data from them, enables them to start to engage with the map and to offer feedback into the map design.
11) Insert the map embed code from Kumu here so that map shows up in the map tab. How to add the embed.
12) Cancel changes made above.
13) Save changes made above.
14) Archive or delete this project. Requires account password.
Extra settings in Tier IV
Tier IV was originally created because we needed to be able to change the member view language in places to accommodate projects that looked at connections between organizations as opposed to individuals. The settings page reflects that additional needed flexibility.
You’ll see these additional fields in your settings page if you have a Tier IV account.
Tier IV Settings:
1) Element type – this doesn’t show anywhere in the sumApp interface, but it is exported with your dataset, so that if you’re merging data-sets you can specify what kinds of elements sumApp is generating. Can be whatever makes sense, such as ‘organization’, ‘team’, ‘project’ – What kind of entity are you surveying, if not persons?
2) Bio nav title – if you’re surveying organizations, ‘bio’ doesn’t make a lot of sense. You can change it to something like ‘Profile’ – shows on member view navigation bar.
3) Bio upload button text. Can change the button text on the member view bio page to something more appropriate for the entity you are surveying – such as ‘logo’.
4) Bio about help text. Shows underneath the bio field on the member view bio page. Can be edited to suit your type of entity.
5) Bio about placeholder. The text in the member view bio page bio field can be edited to suit your type of entity.
6) Bio not available. This text shows up in the member tiles on the member view connections page when a member has not yet input anything into their bio field. Can be edited to suit the entity type you’re dealing with.
7) Connections page title. Shows just above the sorting buttons on the member view connections page. Can be edited to suit the type of entity you are dealing with.
8) Connections modal title. Shows in the popped-open member tile, below the image and bio, above the connection questions. Can be edited to suit the type of entity you are dealing with.
Settings for all Tiers
The aspects of the Member Views (outside of the survey and the connection options) that can be edited are managed in Setup > Settings:
Features of the settings page are:
1) Indicates you’re in the ‘Setup’ phase of sumApp.
2) Shows you’re on the ‘Define Settings’ page.
3) Network name – shows at top of all member view pages, in ‘network_name’ tags, and on your project list. Originally defined when creating the project, it can be changed here. Each project name must be unique.
4) Tiers II, III & IV include the survey. It can be toggled off and on, depending on your context. Checking the checkbox will show the survey in the member view, unchecking it will hide it from the member view.
5) The ‘Hello Text’ shows at the top of the member view bio page and connections page – you edit to suit your situation and can use tags to personalize the page.
6) List of tags available in the hello text
7) Welcome text – shows in body of the member view bio page. Use it to invite, orient and direct your members in the use and purpose of sumApp and your mapping project.
8) Data usage text – shows right under the welcome text on the member view bio page. Use this to be explicit about how member’s data will be used.
9) Completion message – shows when members click on ‘Finish’ at the bottom of the member view connections page. Use it to thank members and suggest/link to next steps if appropriate.
10) When checked, shows the map page option in the member view. Use this once you have at least a prototype map started in Kumu to embed the prototype into sumApp. Helps members understand why you’re collecting this data from them, enables them to start to engage with the map and to offer feedback into the map design.
11) Insert the map embed code from Kumu here so that map shows up in the map tab. How to add the embed.
12) Cancel changes made above.
13) Save changes made above.
14) Archive or delete this project. Requires account password.
Extra settings in Tier IV
Tier IV was originally created because we needed to be able to change the member view language in places to accommodate projects that looked at connections between organizations as opposed to individuals. The settings page reflects that additional needed flexibility.
You’ll see these additional fields in your settings page if you have a Tier IV account.
Tier IV Settings:
1) Element type – this doesn’t show anywhere in the sumApp interface, but it is exported with your dataset, so that if you’re merging data-sets you can specify what kinds of elements sumApp is generating. Can be whatever makes sense, such as ‘organization’, ‘team’, ‘project’ – What kind of entity are you surveying, if not persons?
2) Bio nav title – if you’re surveying organizations, ‘bio’ doesn’t make a lot of sense. You can change it to something like ‘Profile’ – shows on member view navigation bar.
3) Bio upload button text. Can change the button text on the member view bio page to something more appropriate for the entity you are surveying – such as ‘logo’.
4) Bio about help text. Shows underneath the bio field on the member view bio page. Can be edited to suit your type of entity.
5) Bio about placeholder. The text in the member view bio page bio field can be edited to suit your type of entity.
6) Bio not available. This text shows up in the member tiles on the member view connections page when a member has not yet input anything into their bio field. Can be edited to suit the entity type you’re dealing with.
7) Connections page title. Shows just above the sorting buttons on the member view connections page. Can be edited to suit the type of entity you are dealing with.
8) Connections modal title. Shows in the popped-open member tile, below the image and bio, above the connection questions. Can be edited to suit the type of entity you are dealing with.
The Bio page is the first page your members will see when they click on the link included in their sumApp invitation email. It is meant to help orient your members to the project’s process and purpose and give each member the opportunity to help others in the network identify them easily on the Connections page.
Features of the Bio page
1) Project name – defined when the project was created. Can be changed in
2) Member View Navigation Bar. Members can skip forward through the app to whichever page they want to see. The Bio tab is editable in Tier IV, in
3) If the member has already shared connections in the connections page, the blue info bar at the top tells them how many they’ve shared.
4) ‘Hello Text’. Editable in all Tiers,
5) ‘Welcome Text’. Editable in all Tiers,
6) ‘Data Usage Text’. Editable in all Tiers, Make sure you are clear and accurate about how private or public the map and the data in it will be.
7) The profile picture upload. Members who have a Gravitar account associated with the email address you are using, their ‘gravitar’ will be pulled in automatically. They can replace it using the upload function if desired. Helps members easily identify one another on the connections page and you can show the picture in the member nodes in the Kumu map. The text on the blue button is editable in Tier IV, in Settings.
8) An (old-school) tweet-sized space for member to share a little info about themselves to help others in the network identify them easily. Limit is 140 characters (not words!). The light blue description text below the field is editable in Tier IV, in Settings.
9) Character countdown showing how many unused characters remain in the field (in #8).
10) Proceed button – saves bio text and proceeds to the survey page.
Settings for all Tiers
The aspects of the Member Views (outside of the survey and the connection options) that can be edited are managed in Setup > Settings:
Features of the settings page are:
1) Indicates you’re in the ‘Setup’ phase of sumApp.
2) Shows you’re on the ‘Define Settings’ page.
3) Network name – shows at top of all member view pages, in ‘network_name’ tags, and on your project list. Originally defined when creating the project, it can be changed here. Each project name must be unique.
4) Tiers II, III & IV include the survey. It can be toggled off and on, depending on your context. Checking the checkbox will show the survey in the member view, unchecking it will hide it from the member view.
5) The ‘Hello Text’ shows at the top of the member view bio page and connections page – you edit to suit your situation and can use tags to personalize the page.
6) List of tags available in the hello text
7) Welcome text – shows in body of the member view bio page. Use it to invite, orient and direct your members in the use and purpose of sumApp and your mapping project.
8) Data usage text – shows right under the welcome text on the member view bio page. Use this to be explicit about how member’s data will be used.
9) Completion message – shows when members click on ‘Finish’ at the bottom of the member view connections page. Use it to thank members and suggest/link to next steps if appropriate.
10) When checked, shows the map page option in the member view. Use this once you have at least a prototype map started in Kumu to embed the prototype into sumApp. Helps members understand why you’re collecting this data from them, enables them to start to engage with the map and to offer feedback into the map design.
11) Insert the map embed code from Kumu here so that map shows up in the map tab. How to add the embed.
12) Cancel changes made above.
13) Save changes made above.
14) Archive or delete this project. Requires account password.
Extra settings in Tier IV
Tier IV was originally created because we needed to be able to change the member view language in places to accommodate projects that looked at connections between organizations as opposed to individuals. The settings page reflects that additional needed flexibility.
You’ll see these additional fields in your settings page if you have a Tier IV account.
Tier IV Settings:
1) Element type – this doesn’t show anywhere in the sumApp interface, but it is exported with your dataset, so that if you’re merging data-sets you can specify what kinds of elements sumApp is generating. Can be whatever makes sense, such as ‘organization’, ‘team’, ‘project’ – What kind of entity are you surveying, if not persons?
2) Bio nav title – if you’re surveying organizations, ‘bio’ doesn’t make a lot of sense. You can change it to something like ‘Profile’ – shows on member view navigation bar.
3) Bio upload button text. Can change the button text on the member view bio page to something more appropriate for the entity you are surveying – such as ‘logo’.
4) Bio about help text. Shows underneath the bio field on the member view bio page. Can be edited to suit your type of entity.
5) Bio about placeholder. The text in the member view bio page bio field can be edited to suit your type of entity.
6) Bio not available. This text shows up in the member tiles on the member view connections page when a member has not yet input anything into their bio field. Can be edited to suit the entity type you’re dealing with.
7) Connections page title. Shows just above the sorting buttons on the member view connections page. Can be edited to suit the type of entity you are dealing with.
8) Connections modal title. Shows in the popped-open member tile, below the image and bio, above the connection questions. Can be edited to suit the type of entity you are dealing with.