

Managing Project and Member Privacy
Privacy in a Social System Map is a particular kind of trust. People aren’t just


Types of fields available in the survey

1) Text input. Open ended short text field
2) Text area. More text
3) Checkbox options. You can use as many checkbox options as you need. Members can select more than one option, but you can set a limit in the field editor. In Tier IV, one of your checkbox questions can be used as an extra custom filter on the member view connections tab.
4) Radio button. With radio button fields, there will always be one button selected. There can not be NO button selected. Be careful how you use this, because if a member doesn’t complete the survey you will be assigning a default value to the member.
5) Select. A dropdown, only one option can be selected.
6) Name field. This is rarely necessary – you already have the member’s name, uploaded into the member list.
7) Instruction text. If you need to put some explanatory or other type of text in the survey without a related input field, use this.
8) Header text. Bigger text without a related input field. Useful for use with the horizontal line (#9) for labeling new sections of the survey.
9) Horizontal rule. Useful for separating the survey into sections.
 Placeholders offer a suggestion about what content you’re looking for. It will be replaced as the member types into the field. If you don’t want it there, delete it via the field editor.
Say more about what you’re looking for with the description text. You can delete description text in the field editor, but you can’t relocate it.
 Use required fields sparingly! If unanswered, they prevent members from saving their survey data, which can be frustrating.
The Field Editor Dialog Box
Checkbox field
The Checkbox field is the most complex – other field editor dialog boxes will have the same fields where relevant, they just won’t have all of them.
1) Question Label. Make sure every question label is unique. Kumu won’t read each instance a field if it is repeated (for example, if you have ‘other’ after more than one checklist – you’ll need to label them something like ‘Other Issues’ ‘Other Genders’, etc.
2) Description. Can be deleted if not useful.
3) Options list. You can add as many options as you need.
4) Delete the option. Be careful with this. If the survey has been open and people have chosen this option, you will get a message saying it has data attached. If you click to delete the option anyway, those specific option-choices will be permanently deleted from the data-set. All other options will remain in the data-set. If you intend to keep the data, and just change the option wording a little, use the pencil instead.
5) Pencil icon. Makes the option box editable. You can make minor changes to the option wording without losing existing data. Be sure to click the checkmark that replaces the pencil when you are done editing.
6) Add button. Use this to add more options.
7) Elevator bar. When you add more options, they’re usually not visible because they’re at the end of list. Use the elevator bar to scroll to the bottom of the list to edit the new option.
8) Required checkbox – makes it so members can’t proceed through the survey without answering this question – use sparingly!
9) Custom filter checkbox – Tier IV only – read more about the custom filter feature.
10) Maximum number of choices – enables you to limit how many responses members can select from a list.
This is a choice with inherent tension – it’s tempting not to limit members (because it feels more liberating, people don’t like limits). However you’ll often find that w/o a limit, many people will chose almost all of the options. When you map that, it becomes meaningless – it looks like everyone is into everything and makes it much harder to identify those for whom any topic is core to their work or being, etc.. A little bit of constraint here increases meaningfulness in the map.
11) Save the changes to this question.
12) Cancel changes to this question.
13) Delete the question.
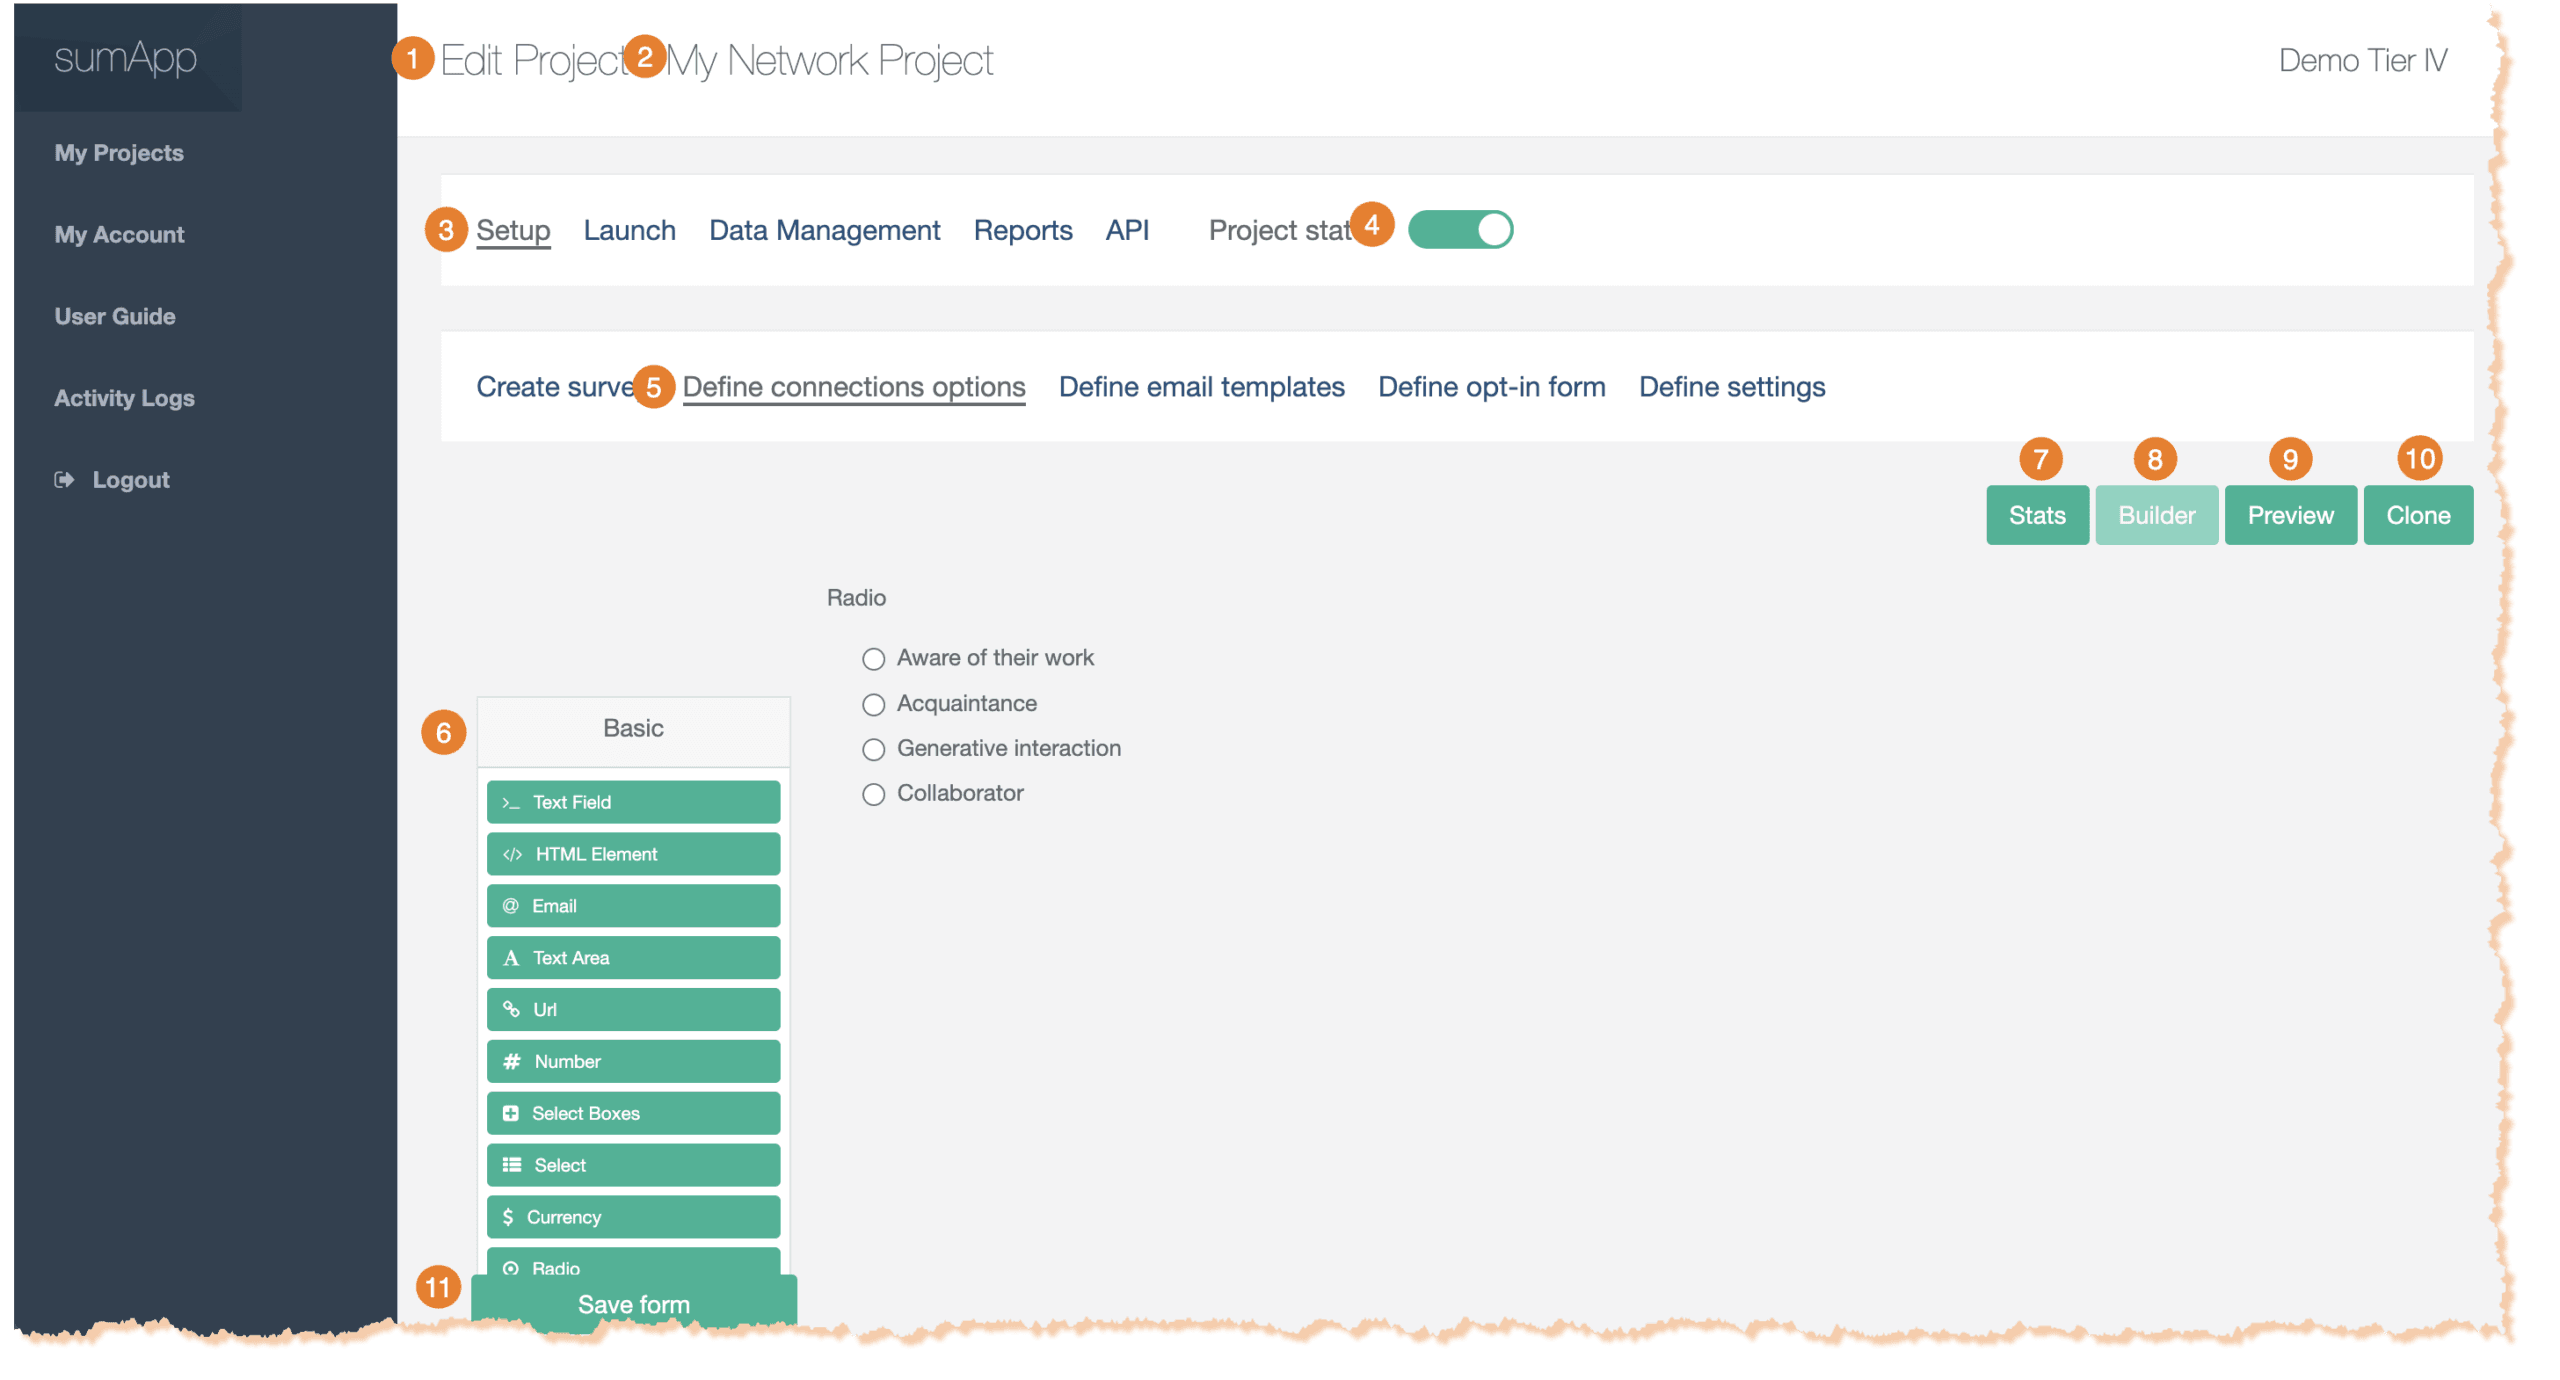
Parts of the Workspace
1) Indicates what page you’re on, within your project.
2) Indicates which project you’re currently working on.
3) Shows you’re in the first tab of the project phases navigation bar – Setup.
4) Shows your project status. Toggle on to enable project members to submit their survey responses.
5) Shows you’re in the ‘Define connection options’ tab of the Setup phase.
6) On the left you can select from your field options to drag onto the Connection options Builder canvas.
7) Use to view the stats on your connection fields, including the number of map members who have submitted a connection to another map member for the field.
8) On the right is the Connection Builder – you’ll drag fields from the left side of the workspace to the right. There you can put them in the order you want and edit the field content.
9) Enables you to preview the connection form.
10) Clone enables you to copy connection options from your account as a starting point. Existing fields will be over-written when you clone as survey.
11) Save the whole survey – don’t forget to save frequently!
Why have three templates?
sumApp was designed to be what we call ‘evergreen’ – in other words, we wanted a tool that didn’t just create a snapshot in time, but could also continue to evolve as the network changes and as their mapping needs become more sophisticated. An important part of that evergreen characteristic means having the ability to add new members to the map’s databases as they join the network and to invite existing members back into sumApp to show their existing relationships to the new members.
On the one hand, doing that that can be as simple as deciding never to close a survey. But if your bulk email invitations don’t differentiate which phase you’re asking members to address, you’ll confuse and annoy people. It would be bad form to ask members to do something they’ve already done, without:
- Explaining that you’re not implying they didn’t do it.
- Making clear that it’s not a re-do – that what they’ve done is safe and intact.
- Making it clear that the reason you’re asking them back is because something has changed and those changes might be relevant for them to address.
- Making sure they know it will be a super-quick thing.
- Such as: “please go take a quick peek at the 10 brand new members at the top of the list, and if you know any, share that – then you’re done!”
So – in another SNA tool, you maybe COULD simply keep the survey open (tho, naaaw, it’d still be messy for other technical reasons, but we’ll ignore those right now . . . ),
but you’d have to revise the email over and over depending on who you’re sending to.
We thought that was dumb. So we make it easier by using three different email templates, each meant to be framed for a different context, depending on what stage your members are at in the evergreen cycle.
- The initial invitation – Frame this text for the brand-new member who has never seen sumApp & has no idea what you’re up to.
- The ‘new faces’ email – Frame this one for the initiated. Those who’ve done sumApp already, or at least have chosen to ignore previous invites (they know it’s been happening whether they’ve engaged or not). Framing in ‘new faces’ should, ideally, include all the bullet points above.
- The ‘reminder’ email – This is a follow-up framed generically for everyone. Use it when you want to address everyone at once.
The email template interface
Features of the email template interface:
1) Shows you’re in the sumApp setup phase.
2) Shows you’re on the ‘define email templates’ page.
3) Input name of sender here. This is a required field. Use a name that is as recognizable as possible for the whole population. All templates will come from this sender.
4) Input email of sender. This is a required field. Can be a different email than that belonging to the ‘from’ person’s name.
5) Deadline. Not required. Will fill into the template where you’ve inserted the {survey_deadline} tag. It has no functional effect (it won’t close your survey on that date). It’s simply there to make it easy to insert a date into your emails and change it in a single place, instead of digging into each email template to change it.
6) Field tags you can use in your email. {url} is required in each email template. No other fields are required. Read more about the curly-bracket tags.
7) The Invitation Email template WYSIWYG. More about the WYSIWYG interface.
8) The New Faces Email template WYSIWYG. More about the WYSIWYG interface.
9) The Reminder Email template WYSIWYG. More about the WYSIWYG interface.
10) Cancel – this will remove all changes you’ve made since your last save.
11) Save – Don’t forget to save when you’ve made changes anywhere on this page!!
Email template tags:
You find these fields at the top of the Email Templates page – they apply to each email type in your project:
1) Input name of sender here. This is a required field. Use a name that is as recognizable as possible for the whole population. All templates will come from this sender.
2) Input email of sender. This is a required field. Can be a different email than that belonging to the ‘from’ person’s name.
3) Deadline. Not required. Will fill into the template where you’ve inserted the {survey_deadline} tag. It has no functional effect (it won’t close your survey on that date). It’s simply there to make it easy to insert a date into your emails and change it in a single place, instead of digging into each email template to change it.
You also have tags that can be used in your email templates. They function as placeholders for inserting data from other fields within sumApp into the emails. They include:
4) {first_name} inserts the first name of the member receiving the email. Not mandatory.
5) {last_name} inserts the last name of the member receiving the email. Not mandatory.
6) {network_name} inserts the project name, which you can see at the top of the page. Not mandatory.
7) {survey_deadline} inserts the date in field #3 ‘Deadline’. Not mandatory.
8) {url} inserts the unique sumApp url belonging to the user receiving the email. This field is mandatory for all three templates.
9) {segment} inserts the segment you’re assigned to the user receiving the email, if you’ve assigned one. Not mandatory.
10 {sender_name} Inserts the name in the 3@ above ‘Sender email’. Not mandatory in the body of the email.
and again – a reminder 11) the {url} tag is mandatory for all email templates. If you’ve removed it, the save button won’t work until you replace it in all 3 templates.
The WYSIWYG
What is a WYSIWYG editor?
HTML markup tells a web browser how to display the text, images and other forms of multimedia on a webpage. A WYSIWYG is an interface designed to editing HTML without having to know or see the underlying code.
It it beyond the scope of this knowledge base to explain all the parts of this particular WYSIWYG interface, but we’ll point out a few basics.
1) Indicates which template you’re working on.
2) Defines the email’s subject line – it can include tags if desired.
3) The body of the email is edited in within the WYSIWYG editor.
A common cause of frustration using WYSIWYG editors:
You’ll often copy text from another editing tool into the email template. For instance if you’ve collaborated on the text in a google doc, or you’re pasting from Word. Each of those tools uses underlying code (such as HTML) to tell the browser or application how to render the content (headers, etc.)
Often when copying and pasting text from one editor into another, you also inadvertently copy over a bunch of hidden code as well. Sometimes that works fine & you get the formatting you want, but often it turns into a challenge. You can prevent this by copying your text into a non-formatting editor, such as NotePad before pasting it into the WYSWYG.
But if you haven’t already stripped the hidden code from your text before inserting it into a WYSIWYG, if the editor starts to behave strangely – such as not implementing changes you’re trying to make, you usually need to either examine the underlying HTML to remove junk code, or simply strip all formatting out of the text and start formatting fresh. You can either ‘view source’ or ‘remove formatting’.
4) The ‘source’ button in the WYSIWYG dashboard enables you to examine and edit the underlying HTML code. Even if you have no idea what HTML is, taking a peek will give you at least a sense of what’s going on.
5) The Tx icon will remove all hidden formatting code from the text so you can start fresh. The text to be cleaned must be selected first. You can double-check that it got removed by looking at the source code under #4.
The other buttons in the WYSWYG dashboard are either self-explanatory or not that relevant in this context.
6) If you want to start over, select ‘Reset Default’
7) The green ‘Preview’ button enables you to preview your content.
Once you’ve edited each template – don’t forget to click ‘save’ at the bottom of the page!
How sending works with each template
You send emails from the Launch > Manage Invitations page in sumApp.
Here is an overview explaining when each type is sent.
Invitation Email
- Is sent when you click the ‘Send Invitation Emails’ button or the ‘Send Invitation & New Faces Emails’ button in Launch > Manage Invitations page. It will only go out to members who have never previously been sent the first invitation.
- You can also send the Invitation Email to anyone, regardless of if they’ve been sent it before, on a case-by-case basis in the member list in Launch > Manage Members.
New Faces Email
- Is sent when you click the ‘Send Invitation & New Faces Emails’ button or the ‘Send New Faces Emails’ button in Launch > Manage Invitations page. It will only go out to members who have ALREADY been sent the first invitation at some point in the past.
- You can also send the New Faces Email to anyone, regardless of what they’ve been sent it before, on a case-by-case basis in the member list in Launch > Manage Members.
Reminder Email
- Is sent when you click the the ‘Send Reminders’ button in Launch > Manage Invitations page. It will go out to everyone in your member list, regardless of what they’ve been sent in the past.
- You can also send the Reminder Email to anyone, regardless of what they’ve been sent it before, on a case-by-case basis in the member list in Launch > Manage Members.
Custom survey filter email template – Tier IV
If you’re using the custom survey filter feature in Tier IV, you have another email template option. You can send a custom email to a sub-set of the population, based on their responses to the custom filter survey question you’re using.
You can access this extra functionality in Launch > Manage Invitations – Under the ‘Actions’ section of the page, find and click on the 5th sending button ‘Custom Filter Email’.
Why have three templates?
sumApp was designed to be what we call ‘evergreen’ – in other words, we wanted a tool that didn’t just create a snapshot in time, but could also continue to evolve as the network changes and as their mapping needs become more sophisticated. An important part of that evergreen characteristic means having the ability to add new members to the map’s databases as they join the network and to invite existing members back into sumApp to show their existing relationships to the new members.
On the one hand, doing that that can be as simple as deciding never to close a survey. But if your bulk email invitations don’t differentiate which phase you’re asking members to address, you’ll confuse and annoy people. It would be bad form to ask members to do something they’ve already done, without:
- Explaining that you’re not implying they didn’t do it.
- Making clear that it’s not a re-do – that what they’ve done is safe and intact.
- Making it clear that the reason you’re asking them back is because something has changed and those changes might be relevant for them to address.
- Making sure they know it will be a super-quick thing.
- Such as: “please go take a quick peek at the 10 brand new members at the top of the list, and if you know any, share that – then you’re done!”
So – in another SNA tool, you maybe COULD simply keep the survey open (tho, naaaw, it’d still be messy for other technical reasons, but we’ll ignore those right now . . . ),
but you’d have to revise the email over and over depending on who you’re sending to.
We thought that was dumb. So we make it easier by using three different email templates, each meant to be framed for a different context, depending on what stage your members are at in the evergreen cycle.
- The initial invitation – Frame this text for the brand-new member who has never seen sumApp & has no idea what you’re up to.
- The ‘new faces’ email – Frame this one for the initiated. Those who’ve done sumApp already, or at least have chosen to ignore previous invites (they know it’s been happening whether they’ve engaged or not). Framing in ‘new faces’ should, ideally, include all the bullet points above.
- The ‘reminder’ email – This is a follow-up framed generically for everyone. Use it when you want to address everyone at once.
The email template interface
Features of the email template interface:
1) Shows you’re in the sumApp setup phase.
2) Shows you’re on the ‘define email templates’ page.
3) Input name of sender here. This is a required field. Use a name that is as recognizable as possible for the whole population. All templates will come from this sender.
4) Input email of sender. This is a required field. Can be a different email than that belonging to the ‘from’ person’s name.
5) Deadline. Not required. Will fill into the template where you’ve inserted the {survey_deadline} tag. It has no functional effect (it won’t close your survey on that date). It’s simply there to make it easy to insert a date into your emails and change it in a single place, instead of digging into each email template to change it.
6) Field tags you can use in your email. {url} is required in each email template. No other fields are required. Read more about the curly-bracket tags.
7) The Invitation Email template WYSIWYG. More about the WYSIWYG interface.
8) The New Faces Email template WYSIWYG. More about the WYSIWYG interface.
9) The Reminder Email template WYSIWYG. More about the WYSIWYG interface.
10) Cancel – this will remove all changes you’ve made since your last save.
11) Save – Don’t forget to save when you’ve made changes anywhere on this page!!
Email template tags:
You find these fields at the top of the Email Templates page – they apply to each email type in your project:
1) Input name of sender here. This is a required field. Use a name that is as recognizable as possible for the whole population. All templates will come from this sender.
2) Input email of sender. This is a required field. Can be a different email than that belonging to the ‘from’ person’s name.
3) Deadline. Not required. Will fill into the template where you’ve inserted the {survey_deadline} tag. It has no functional effect (it won’t close your survey on that date). It’s simply there to make it easy to insert a date into your emails and change it in a single place, instead of digging into each email template to change it.
You also have tags that can be used in your email templates. They function as placeholders for inserting data from other fields within sumApp into the emails. They include:
4) {first_name} inserts the first name of the member receiving the email. Not mandatory.
5) {last_name} inserts the last name of the member receiving the email. Not mandatory.
6) {network_name} inserts the project name, which you can see at the top of the page. Not mandatory.
7) {survey_deadline} inserts the date in field #3 ‘Deadline’. Not mandatory.
8) {url} inserts the unique sumApp url belonging to the user receiving the email. This field is mandatory for all three templates.
9) {segment} inserts the segment you’re assigned to the user receiving the email, if you’ve assigned one. Not mandatory.
10 {sender_name} Inserts the name in the 3@ above ‘Sender email’. Not mandatory in the body of the email.
and again – a reminder 11) the {url} tag is mandatory for all email templates. If you’ve removed it, the save button won’t work until you replace it in all 3 templates.
The WYSIWYG
What is a WYSIWYG editor?
HTML markup tells a web browser how to display the text, images and other forms of multimedia on a webpage. A WYSIWYG is an interface designed to editing HTML without having to know or see the underlying code.
It it beyond the scope of this knowledge base to explain all the parts of this particular WYSIWYG interface, but we’ll point out a few basics.
1) Indicates which template you’re working on.
2) Defines the email’s subject line – it can include tags if desired.
3) The body of the email is edited in within the WYSIWYG editor.
A common cause of frustration using WYSIWYG editors:
You’ll often copy text from another editing tool into the email template. For instance if you’ve collaborated on the text in a google doc, or you’re pasting from Word. Each of those tools uses underlying code (such as HTML) to tell the browser or application how to render the content (headers, etc.)
Often when copying and pasting text from one editor into another, you also inadvertently copy over a bunch of hidden code as well. Sometimes that works fine & you get the formatting you want, but often it turns into a challenge. You can prevent this by copying your text into a non-formatting editor, such as NotePad before pasting it into the WYSWYG.
But if you haven’t already stripped the hidden code from your text before inserting it into a WYSIWYG, if the editor starts to behave strangely – such as not implementing changes you’re trying to make, you usually need to either examine the underlying HTML to remove junk code, or simply strip all formatting out of the text and start formatting fresh. You can either ‘view source’ or ‘remove formatting’.
4) The ‘source’ button in the WYSIWYG dashboard enables you to examine and edit the underlying HTML code. Even if you have no idea what HTML is, taking a peek will give you at least a sense of what’s going on.
5) The Tx icon will remove all hidden formatting code from the text so you can start fresh. The text to be cleaned must be selected first. You can double-check that it got removed by looking at the source code under #4.
The other buttons in the WYSWYG dashboard are either self-explanatory or not that relevant in this context.
6) If you want to start over, select ‘Reset Default’
7) The green ‘Preview’ button enables you to preview your content.
Once you’ve edited each template – don’t forget to click ‘save’ at the bottom of the page!
How sending works with each template
You send emails from the Launch > Manage Invitations page in sumApp.
Here is an overview explaining when each type is sent.
Invitation Email
- Is sent when you click the ‘Send Invitation Emails’ button or the ‘Send Invitation & New Faces Emails’ button in Launch > Manage Invitations page. It will only go out to members who have never previously been sent the first invitation.
- You can also send the Invitation Email to anyone, regardless of if they’ve been sent it before, on a case-by-case basis in the member list in Launch > Manage Members.
New Faces Email
- Is sent when you click the ‘Send Invitation & New Faces Emails’ button or the ‘Send New Faces Emails’ button in Launch > Manage Invitations page. It will only go out to members who have ALREADY been sent the first invitation at some point in the past.
- You can also send the New Faces Email to anyone, regardless of what they’ve been sent it before, on a case-by-case basis in the member list in Launch > Manage Members.
Reminder Email
- Is sent when you click the the ‘Send Reminders’ button in Launch > Manage Invitations page. It will go out to everyone in your member list, regardless of what they’ve been sent in the past.
- You can also send the Reminder Email to anyone, regardless of what they’ve been sent it before, on a case-by-case basis in the member list in Launch > Manage Members.
Custom survey filter email template – Tier IV
If you’re using the custom survey filter feature in Tier IV, you have another email template option. You can send a custom email to a sub-set of the population, based on their responses to the custom filter survey question you’re using.
You can access this extra functionality in Launch > Manage Invitations – Under the ‘Actions’ section of the page, find and click on the 5th sending button ‘Custom Filter Email’.
Why have three templates?
sumApp was designed to be what we call ‘evergreen’ – in other words, we wanted a tool that didn’t just create a snapshot in time, but could also continue to evolve as the network changes and as their mapping needs become more sophisticated. An important part of that evergreen characteristic means having the ability to add new members to the map’s databases as they join the network and to invite existing members back into sumApp to show their existing relationships to the new members.
On the one hand, doing that that can be as simple as deciding never to close a survey. But if your bulk email invitations don’t differentiate which phase you’re asking members to address, you’ll confuse and annoy people. It would be bad form to ask members to do something they’ve already done, without:
- Explaining that you’re not implying they didn’t do it.
- Making clear that it’s not a re-do – that what they’ve done is safe and intact.
- Making it clear that the reason you’re asking them back is because something has changed and those changes might be relevant for them to address.
- Making sure they know it will be a super-quick thing.
- Such as: “please go take a quick peek at the 10 brand new members at the top of the list, and if you know any, share that – then you’re done!”
So – in another SNA tool, you maybe COULD simply keep the survey open (tho, naaaw, it’d still be messy for other technical reasons, but we’ll ignore those right now . . . ),
but you’d have to revise the email over and over depending on who you’re sending to.
We thought that was dumb. So we make it easier by using three different email templates, each meant to be framed for a different context, depending on what stage your members are at in the evergreen cycle.
- The initial invitation – Frame this text for the brand-new member who has never seen sumApp & has no idea what you’re up to.
- The ‘new faces’ email – Frame this one for the initiated. Those who’ve done sumApp already, or at least have chosen to ignore previous invites (they know it’s been happening whether they’ve engaged or not). Framing in ‘new faces’ should, ideally, include all the bullet points above.
- The ‘reminder’ email – This is a follow-up framed generically for everyone. Use it when you want to address everyone at once.
The email template interface
Features of the email template interface:
1) Shows you’re in the sumApp setup phase.
2) Shows you’re on the ‘define email templates’ page.
3) Input name of sender here. This is a required field. Use a name that is as recognizable as possible for the whole population. All templates will come from this sender.
4) Input email of sender. This is a required field. Can be a different email than that belonging to the ‘from’ person’s name.
5) Deadline. Not required. Will fill into the template where you’ve inserted the {survey_deadline} tag. It has no functional effect (it won’t close your survey on that date). It’s simply there to make it easy to insert a date into your emails and change it in a single place, instead of digging into each email template to change it.
6) Field tags you can use in your email. {url} is required in each email template. No other fields are required. Read more about the curly-bracket tags.
7) The Invitation Email template WYSIWYG. More about the WYSIWYG interface.
8) The New Faces Email template WYSIWYG. More about the WYSIWYG interface.
9) The Reminder Email template WYSIWYG. More about the WYSIWYG interface.
10) Cancel – this will remove all changes you’ve made since your last save.
11) Save – Don’t forget to save when you’ve made changes anywhere on this page!!
Email template tags:
You find these fields at the top of the Email Templates page – they apply to each email type in your project:
1) Input name of sender here. This is a required field. Use a name that is as recognizable as possible for the whole population. All templates will come from this sender.
2) Input email of sender. This is a required field. Can be a different email than that belonging to the ‘from’ person’s name.
3) Deadline. Not required. Will fill into the template where you’ve inserted the {survey_deadline} tag. It has no functional effect (it won’t close your survey on that date). It’s simply there to make it easy to insert a date into your emails and change it in a single place, instead of digging into each email template to change it.
You also have tags that can be used in your email templates. They function as placeholders for inserting data from other fields within sumApp into the emails. They include:
4) {first_name} inserts the first name of the member receiving the email. Not mandatory.
5) {last_name} inserts the last name of the member receiving the email. Not mandatory.
6) {network_name} inserts the project name, which you can see at the top of the page. Not mandatory.
7) {survey_deadline} inserts the date in field #3 ‘Deadline’. Not mandatory.
8) {url} inserts the unique sumApp url belonging to the user receiving the email. This field is mandatory for all three templates.
9) {segment} inserts the segment you’re assigned to the user receiving the email, if you’ve assigned one. Not mandatory.
10 {sender_name} Inserts the name in the 3@ above ‘Sender email’. Not mandatory in the body of the email.
and again – a reminder 11) the {url} tag is mandatory for all email templates. If you’ve removed it, the save button won’t work until you replace it in all 3 templates.
The WYSIWYG
What is a WYSIWYG editor?
HTML markup tells a web browser how to display the text, images and other forms of multimedia on a webpage. A WYSIWYG is an interface designed to editing HTML without having to know or see the underlying code.
It it beyond the scope of this knowledge base to explain all the parts of this particular WYSIWYG interface, but we’ll point out a few basics.
1) Indicates which template you’re working on.
2) Defines the email’s subject line – it can include tags if desired.
3) The body of the email is edited in within the WYSIWYG editor.
A common cause of frustration using WYSIWYG editors:
You’ll often copy text from another editing tool into the email template. For instance if you’ve collaborated on the text in a google doc, or you’re pasting from Word. Each of those tools uses underlying code (such as HTML) to tell the browser or application how to render the content (headers, etc.)
Often when copying and pasting text from one editor into another, you also inadvertently copy over a bunch of hidden code as well. Sometimes that works fine & you get the formatting you want, but often it turns into a challenge. You can prevent this by copying your text into a non-formatting editor, such as NotePad before pasting it into the WYSWYG.
But if you haven’t already stripped the hidden code from your text before inserting it into a WYSIWYG, if the editor starts to behave strangely – such as not implementing changes you’re trying to make, you usually need to either examine the underlying HTML to remove junk code, or simply strip all formatting out of the text and start formatting fresh. You can either ‘view source’ or ‘remove formatting’.
4) The ‘source’ button in the WYSIWYG dashboard enables you to examine and edit the underlying HTML code. Even if you have no idea what HTML is, taking a peek will give you at least a sense of what’s going on.
5) The Tx icon will remove all hidden formatting code from the text so you can start fresh. The text to be cleaned must be selected first. You can double-check that it got removed by looking at the source code under #4.
The other buttons in the WYSWYG dashboard are either self-explanatory or not that relevant in this context.
6) If you want to start over, select ‘Reset Default’
7) The green ‘Preview’ button enables you to preview your content.
Once you’ve edited each template – don’t forget to click ‘save’ at the bottom of the page!
How sending works with each template
You send emails from the Launch > Manage Invitations page in sumApp.
Here is an overview explaining when each type is sent.
Invitation Email
- Is sent when you click the ‘Send Invitation Emails’ button or the ‘Send Invitation & New Faces Emails’ button in Launch > Manage Invitations page. It will only go out to members who have never previously been sent the first invitation.
- You can also send the Invitation Email to anyone, regardless of if they’ve been sent it before, on a case-by-case basis in the member list in Launch > Manage Members.
New Faces Email
- Is sent when you click the ‘Send Invitation & New Faces Emails’ button or the ‘Send New Faces Emails’ button in Launch > Manage Invitations page. It will only go out to members who have ALREADY been sent the first invitation at some point in the past.
- You can also send the New Faces Email to anyone, regardless of what they’ve been sent it before, on a case-by-case basis in the member list in Launch > Manage Members.
Reminder Email
- Is sent when you click the the ‘Send Reminders’ button in Launch > Manage Invitations page. It will go out to everyone in your member list, regardless of what they’ve been sent in the past.
- You can also send the Reminder Email to anyone, regardless of what they’ve been sent it before, on a case-by-case basis in the member list in Launch > Manage Members.
Custom survey filter email template – Tier IV
If you’re using the custom survey filter feature in Tier IV, you have another email template option. You can send a custom email to a sub-set of the population, based on their responses to the custom filter survey question you’re using.
You can access this extra functionality in Launch > Manage Invitations – Under the ‘Actions’ section of the page, find and click on the 5th sending button ‘Custom Filter Email’.
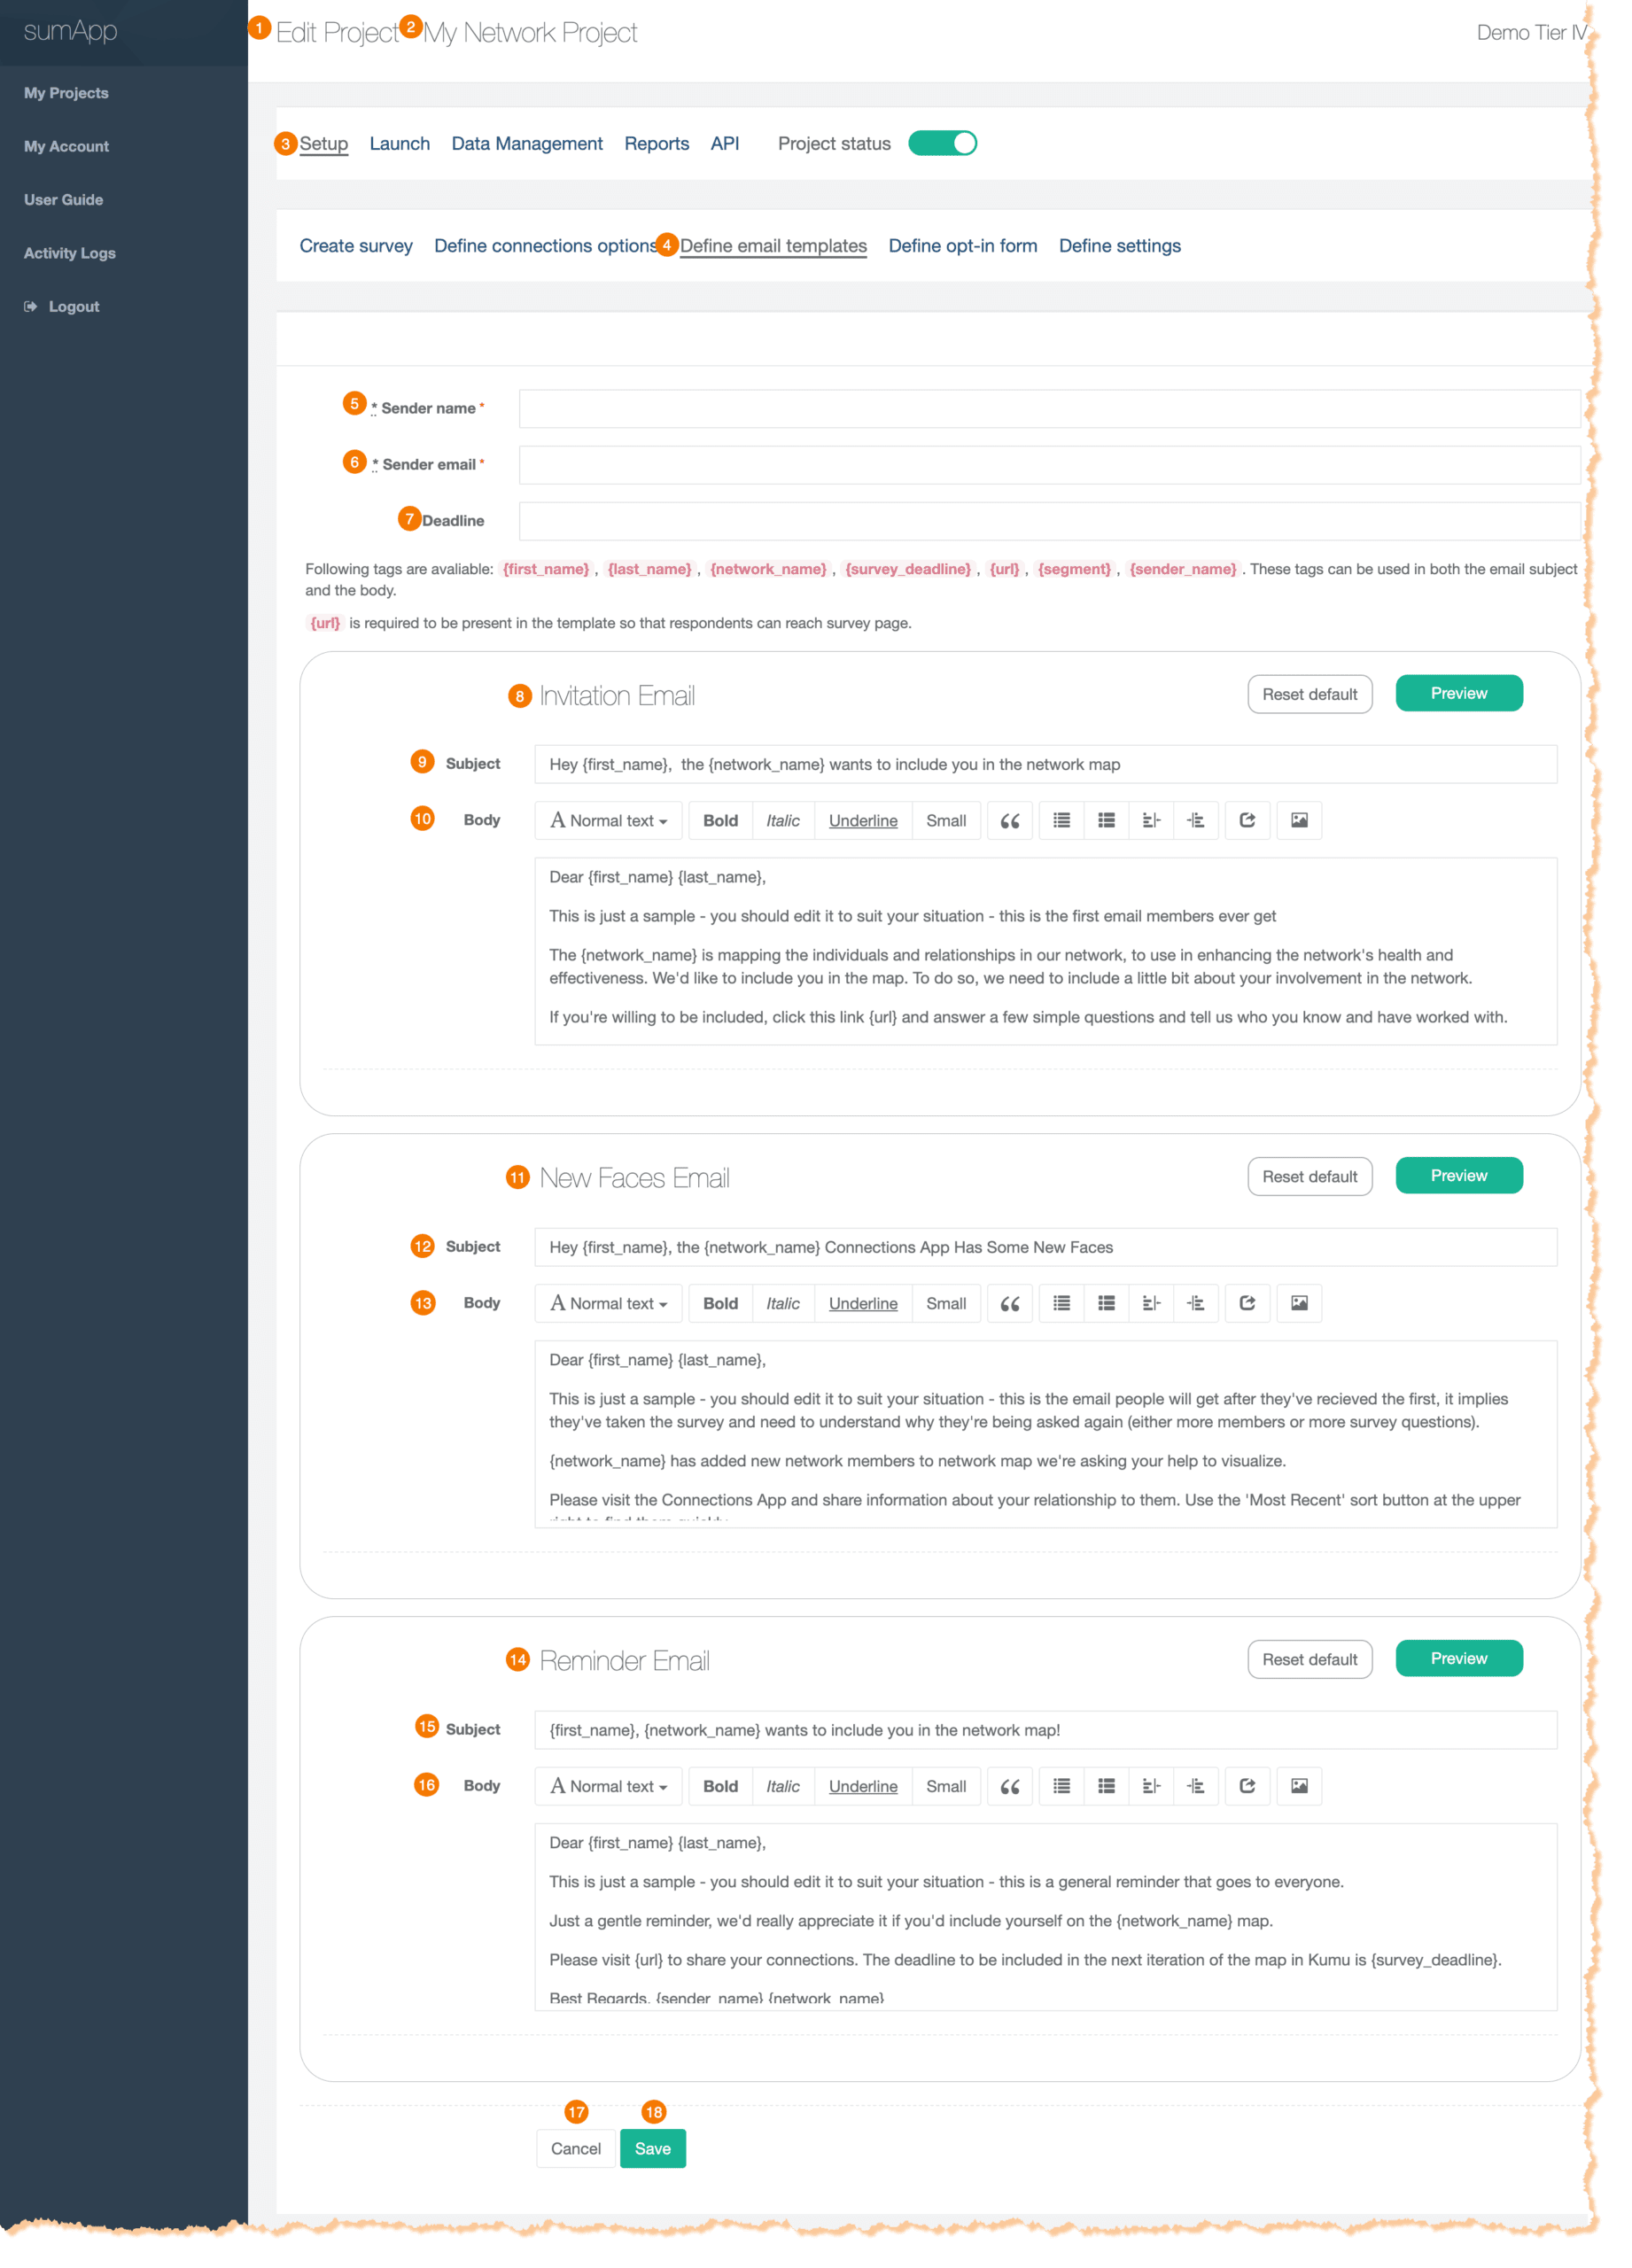
Parts of the Workspace
1) Indicates what page you’re on, within your project.
2) Indicates which project you’re currently working on.
3) Shows you’re in the first tab of the project phases navigation bar – Setup.
4) Shows you’re in the ‘Define email templates’ tab of the Setup phase.
5) Add the sender name you want to appear when map members receive an email from your project.
6) Add the email address you want to appear when map members receive an email from your project.
7) Add a deadline if you would like to include a date for map members to add responses by. Must use {survey_deadline} in your template for the date to appear.
8) The Template.
9) The Invitation Email Customizable Subject Line.
10) The Invitation Email Customizable Body.
11) The Email Template.
12) The New Faces Email Customizable Subject Line.
13) The New Faces Email Customizable Body.
14) The Email Template.
15) The Reminder Email Customizable Subject Line.
16) The Reminder Email Customizable Body.
17) Cancel button. Changes will not be saved!
18) Save button. Be sure to save changes frequently!
Sometimes you want to enable several specific people who are already on the map to go into sumApp.
For instance, you’re doing a presentation and you’re asking them to update their profiles & connections, or to navigate the map from their own sumApp instance.
But you don’t want to send an email blast to the whole network.
You COULD select each one from the member list and send the invite to them manually, and you COULD pull each person’s URL from the status report and put that into, for instance a zoom chat.
But that’s distracting in the middle of a meeting.
The simplest approach would be to put the ‘send me my link form’ into your zoom chat instead.
Or you might want to post the ‘send me my link form’ somewhere anyone on the map can find it, such as an internal map landing page, or in the map sidepanel itself – that way, if a map member loses their personal sumApp link, they can retrieve it themselves.
Why It’s Helpful
- Saves you from digging through the member list or resending invitations.
- Gives access back to the members.
- Helps members remember how they got their link (in case they lose it again).
Important Notes
- 🚫 This form doesn’t ADD people to the member list, it only works for a member who is in the list already, and they need to use the same email that’s already in the list.
- You can use this functionality even if you’re not using your Opt-In form.
✅ How to Share the “Send Me My Link” Form

From the ‘Setup’ menu under the “Define opt-in form” submenu
- Scroll to the ‘Send me my link form’ section.
- Click the 📋 clipboard icon to copy the link.
If it helps to watch a visual walk through, we have a quick TechTalk video demonstrating this feature, here.
What Happens When Members Use This Form

- They’ll be prompted to enter the same email they were added with initially.
- If the email matches, sumApp will automatically send them their unique access link.
- If it doesn’t match, they’ll be prompted to try another email or contact you.
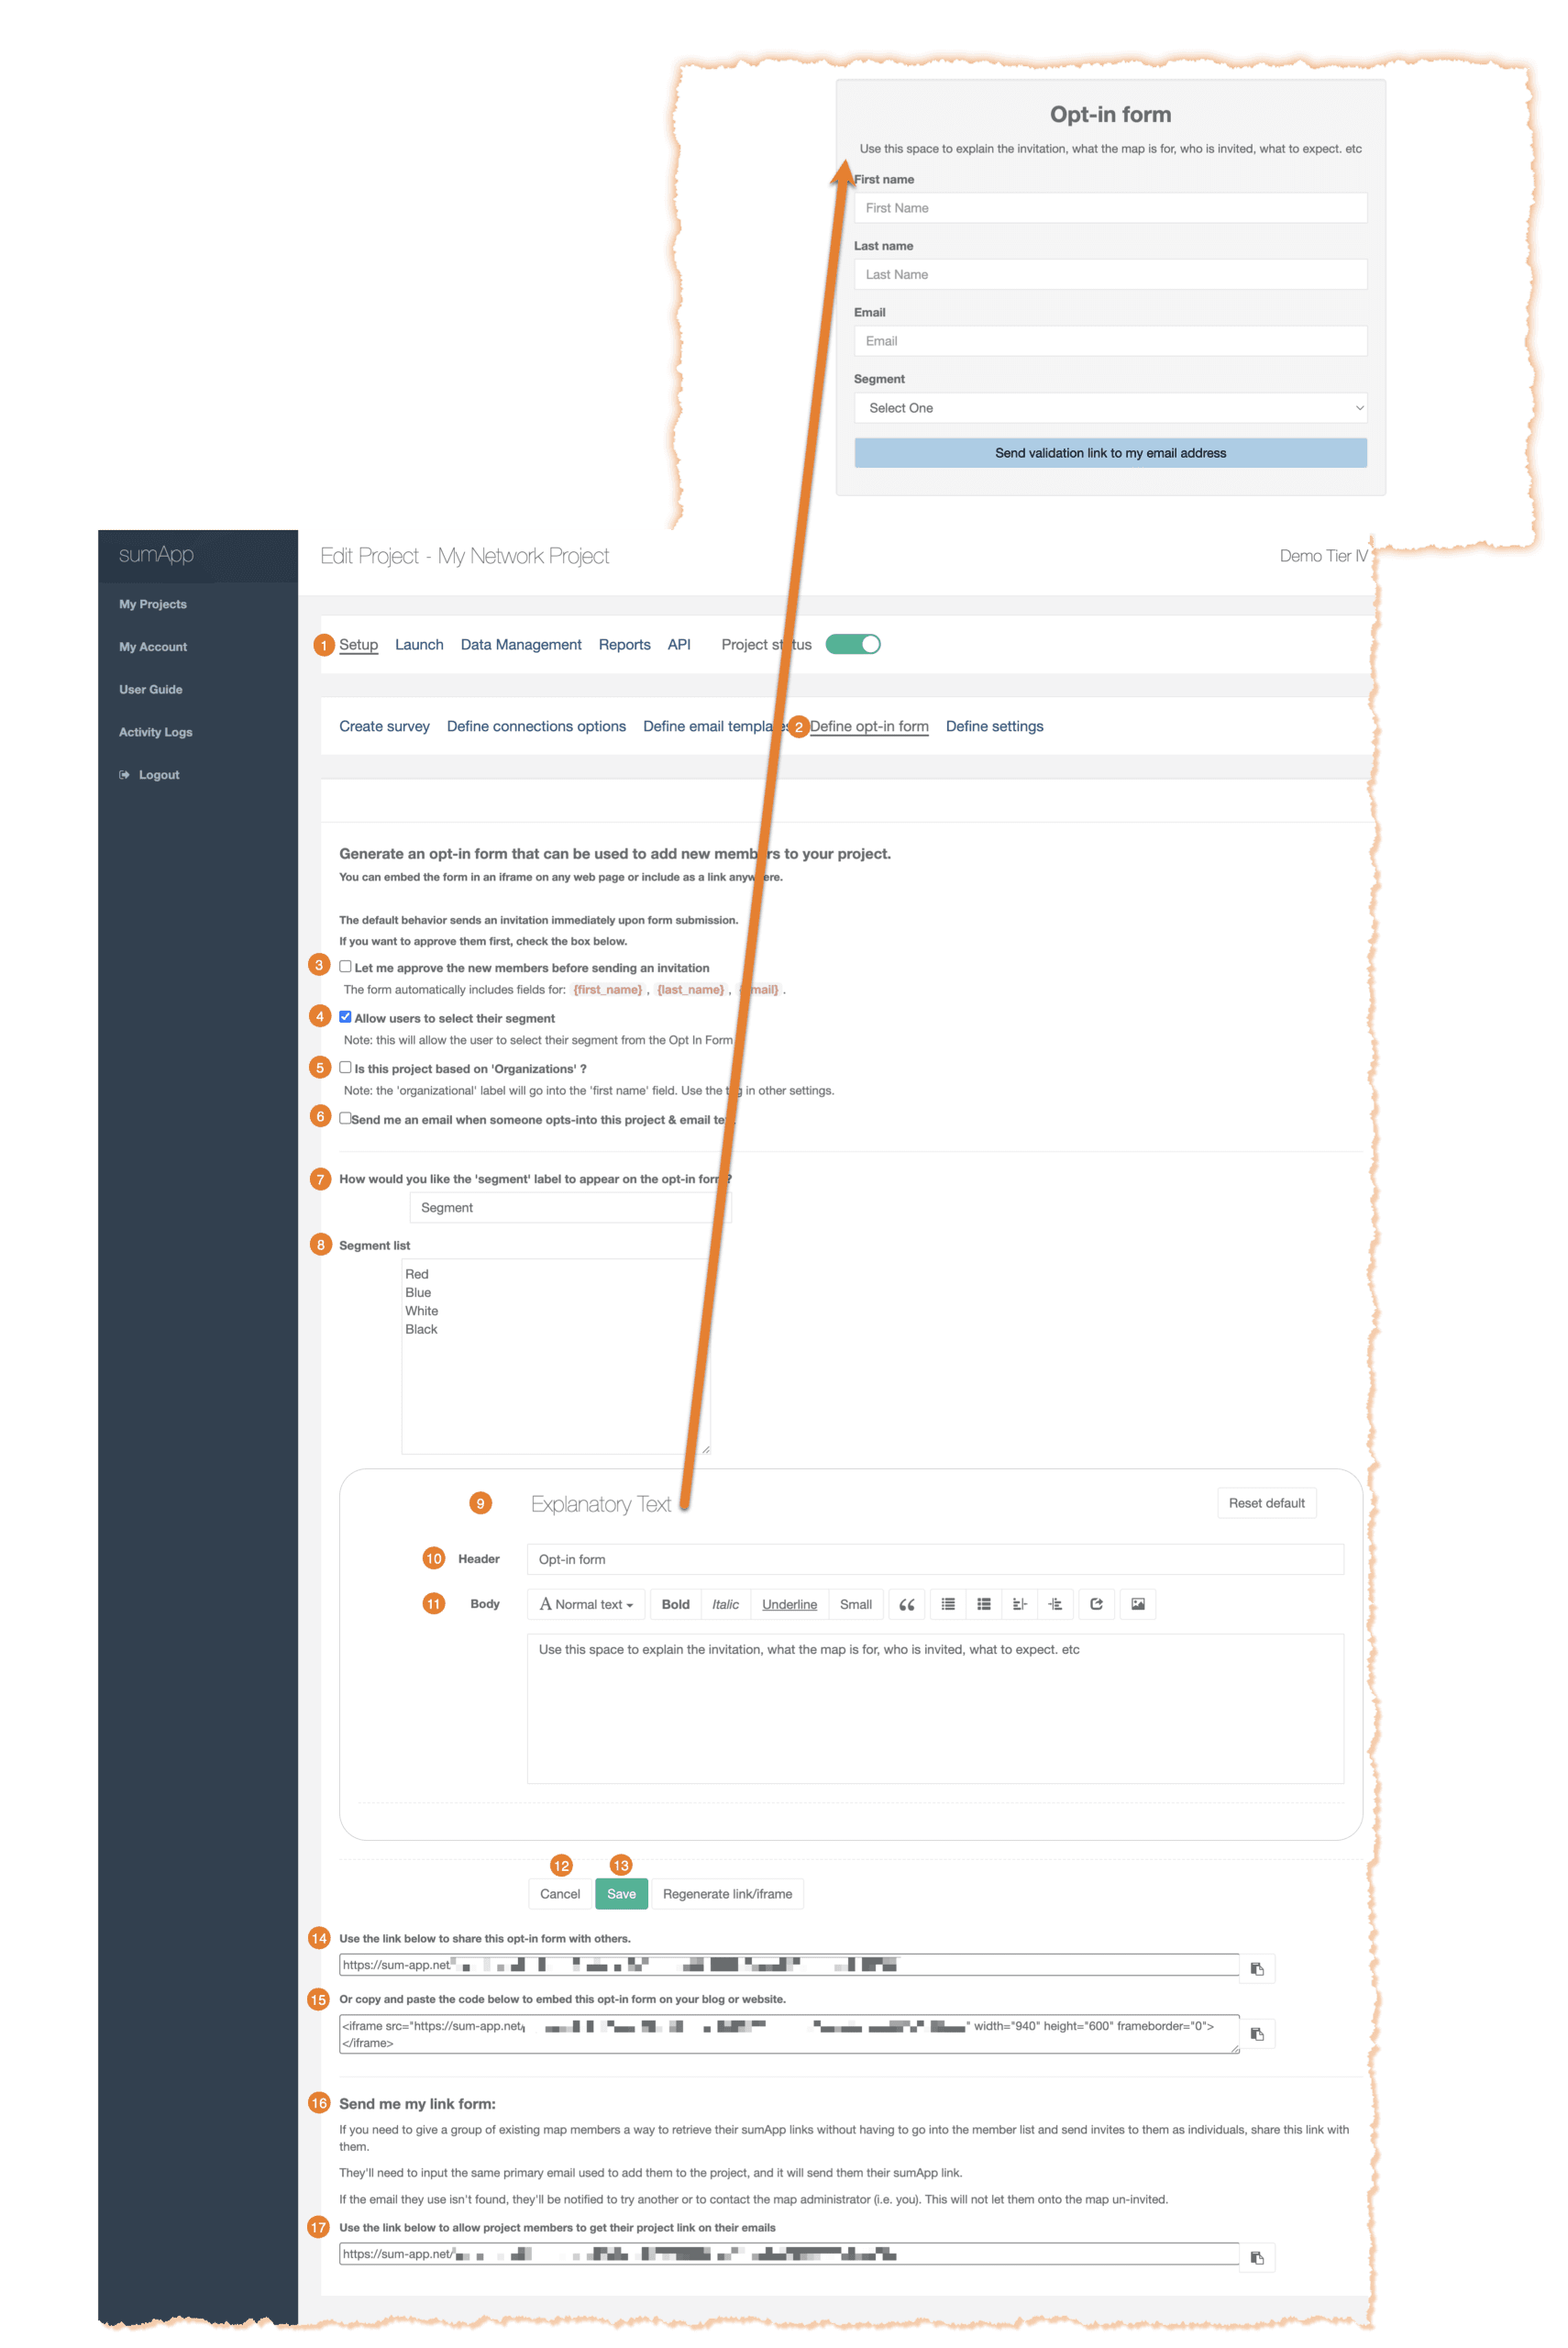
Parts of the Workspace
- Shows you’re in the first tab of the project phases navigation bar – Setup.
- Shows you’re in the ‘Define opt-in form’ tab of the Setup phase.
- Turn on/off member approval by the project admin before adding a new map member.
- Turn on/off allowing users to choose which segment they belong to.
- Turn on/off representing your project members as organizations.
- Sends an email to the project admin when a new project member opts in.
- Customizable ‘‘ label for member opt-in form.
- Segment List. Each unique segment label must be separated by a hard return.
- The Template.
- Customizable header of form.
- Customizable body of form.
- Cancel button. Changes will not be saved!
- Save button. Be sure to save changes frequently!
- Use this custom link to share your opt-in form with project members.
- The can also be embedded into a website.
- The form is used to send existing map members a form to retrieve their custom project link in an email.
- Copy the link to send to an existing map member. When they submit the form, if the email address is a project member’s, they will receive an email with their link.
Tier II
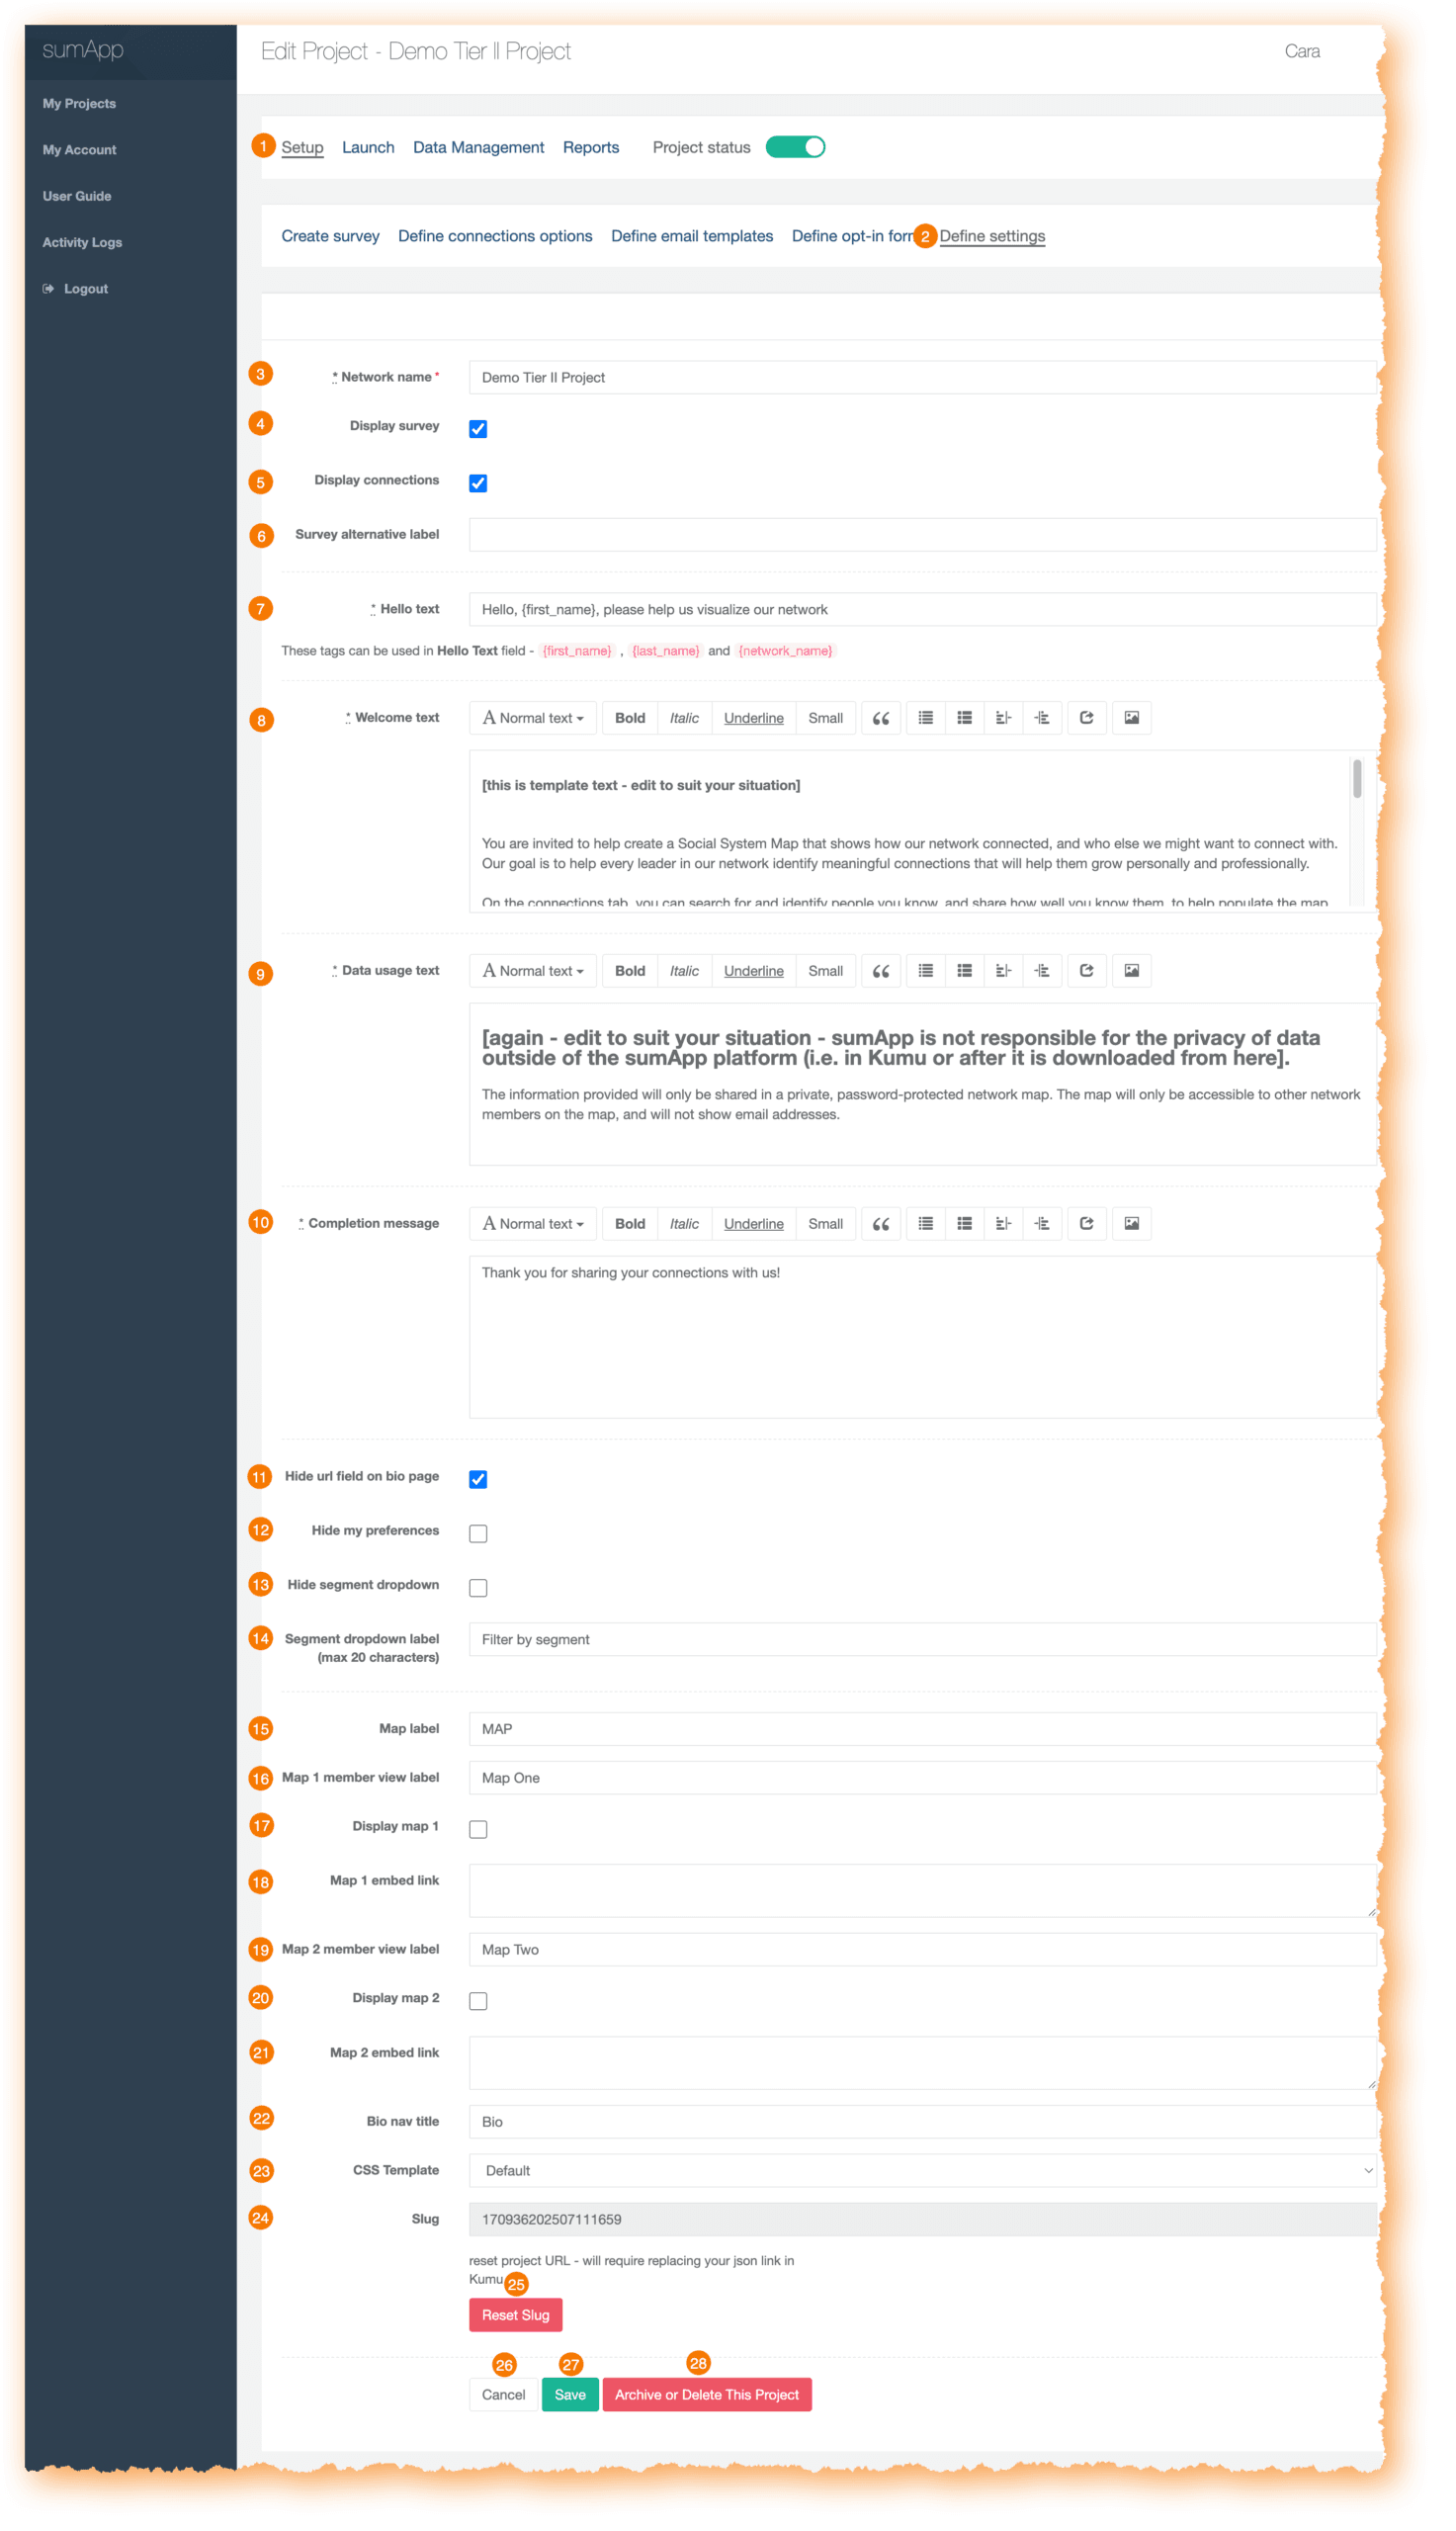
Parts of the Tier II Workspace
- Shows you’re in the first tab of the project phases navigation bar – Setup.
- Shows you’re in the ‘Define settings’ tab of the Setup phase.
- Updates your Network name.
- Turn on/off displaying your survey for map members. Default is on.
- Turn on/off displaying the connection tab of your survey. Default is on.
- Give your survey tab an alternative label.
- Change the hello text for your project member’s profile page.
- Change the Welcome text for your project member’s profile page.
- Change the Data usage text for your project member’s profile page.
- Change the Completion message when a project member submits their survey.
- Turn on/off to Hide the url field on the bio page. Default is on.
- Turn on/off to Hide the my preferences section of the project member profile. Default is off.
- Turn on/off to Hide the segment dropdown. Default is off.
- Change the Segment filter dropdown label on the project member’s connections tab.
- Change the label of your map in a project member’s view. If you only have one map connected, this is the label that will display.
- Change the label of map 1. Only updates if you have two maps connected and displayed.
- Turn on/off to display map 1. Default is off.
- Field to paste your map 1 embed link.
- Change the label of map 2.
- Turn on/off to display map 2. Default is off.
- Field to paste your map 2 embed link.
- Change the label of the Bio tab for project members.
- Change the CSS template of your project. Default is on at the start of a new project.
- Your project slug. This field is uneditable.
- Reset your project slug button. Use extreme caution before using this.
- ‘Cancel’ button.
- ‘Save’ button.
- ‘Archive or Delete This Project’ button.
Tier IV
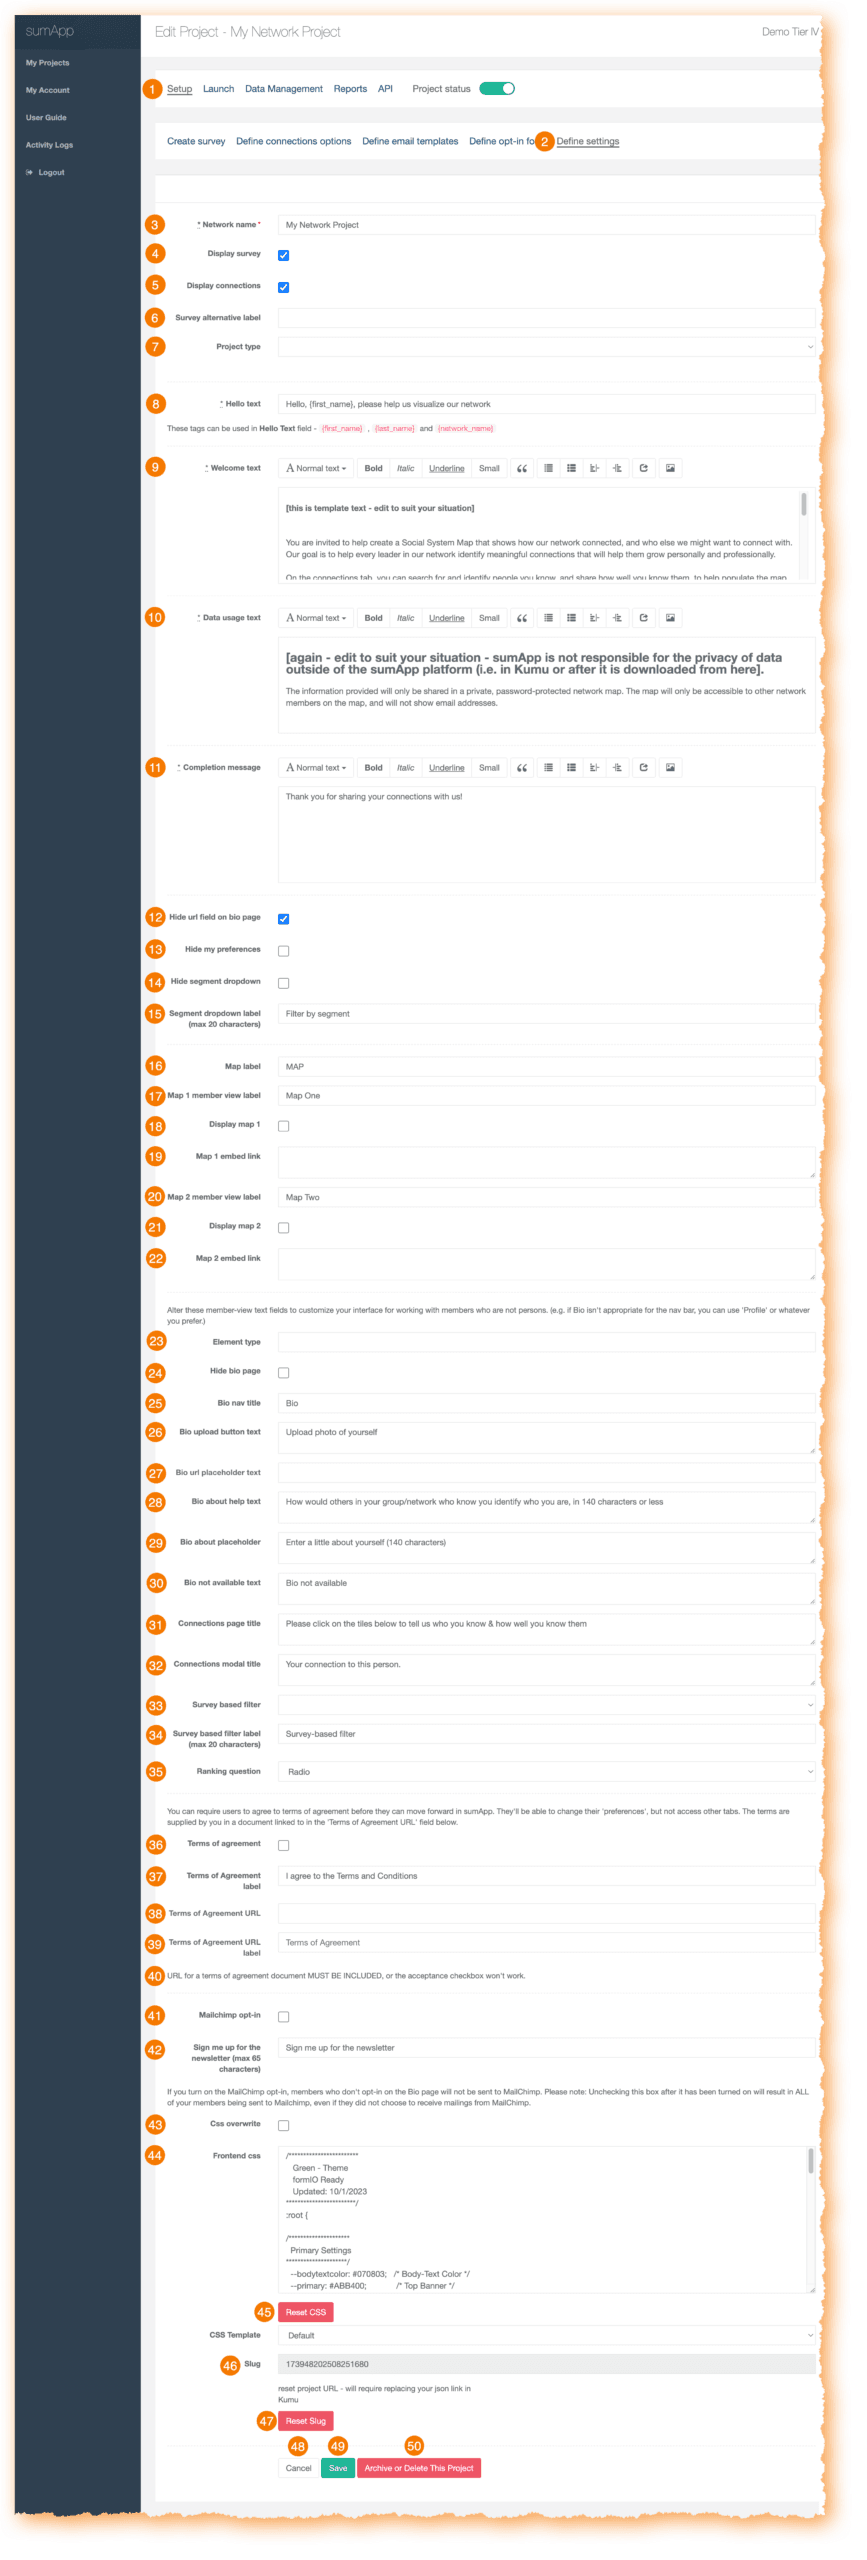
Parts of the Tier IV Workspace
- Shows you’re in the first tab of the project phases navigation bar – Setup.
- Shows you’re in the ‘Define settings’ tab of the Setup phase.
- Updates your Network name.
- Turn on/off displaying your survey for map members. Default is on.
- Turn on/off displaying the connection tab of your survey. Default is on.
- Give your survey tab an alternative label.
- Option to select your project type. Options are persons or organizations. The default project type is unselected.
- Change the hello text for your project member’s profile page.
- Change the Welcome text for your project member’s profile page.
- Change the Data usage text for your project member’s profile page.
- Change the Completion message when a project member submits their survey.
- Turn on/off to Hide the url field on the bio page. Default is on.
- Turn on/off to Hide the my preferences section of the project member profile. Default is off.
- Turn on/off to Hide the segment dropdown. Default is off.
- Updates the Segment filter dropdown label on the project member’s connections tab.
- Updates the label of your map in a project member’s view. If you only have one map connected, this is the label that will display.
- Change the label of map 1. Only updates if you have two maps connected and displayed.
- Turn on/off to display map 1. Default is off.
- Field to paste your map 1 embed link.
- Change the label of map 2.
- Turn on/off to display map 2. Default is off.
- Field to paste your map 2 embed link.
- Field to customize your element label.
- Turn on/off to hide bio page. Default is off.
- Change the label of the Bio tab for project members.
- Change the photo upload button text.
- Change the bio url placeholder text.
- Change the bio about help text.
- Change the bio about placeholder.
- Change the bio not available text.
- Change the connections page title.
- Change the connections modal tile.
- Change the survey-based filter type.
- Change the survey-based filter label.
- Change the survey question used as your ranking question.
- Turn on/off to enable project members to agree to a Terms of Agreement. Default is off.
- Changes the CSS template of your project. Default is on at the start of a new project.
- Your project slug. This field is uneditable.
- Reset your project slug button. Use extreme caution before using this.
- ‘Cancel’ button.
- ‘Save’ button.
- ‘Archive or Delete This Project’ button.
If you have a list of members to add to your sumApp project, follow the steps below.
1. From the ‘Launch’ ‘Add members’ tab, select ‘Choose File’ to attach your CSV file.

Click “Template file” to download the recommended format and update with your member’s data. If you want to include a segment for each of your project members, you can bulk add them using this option.

Select your CSV file containing the member data from your device.
Once your file is attached and appears ready, choose ‘Open’ to close the upload window.
If you have pre-existing survey data and are on a Tier III or Tier IV plan, read How To Load Pre-Existing Data Into sumApp.
If you are running into error messages that are not easily fixed, please reach out to our Slack community. Common error types include missing first name or last name, missing email address, or duplicate email address(es) in CSV file.
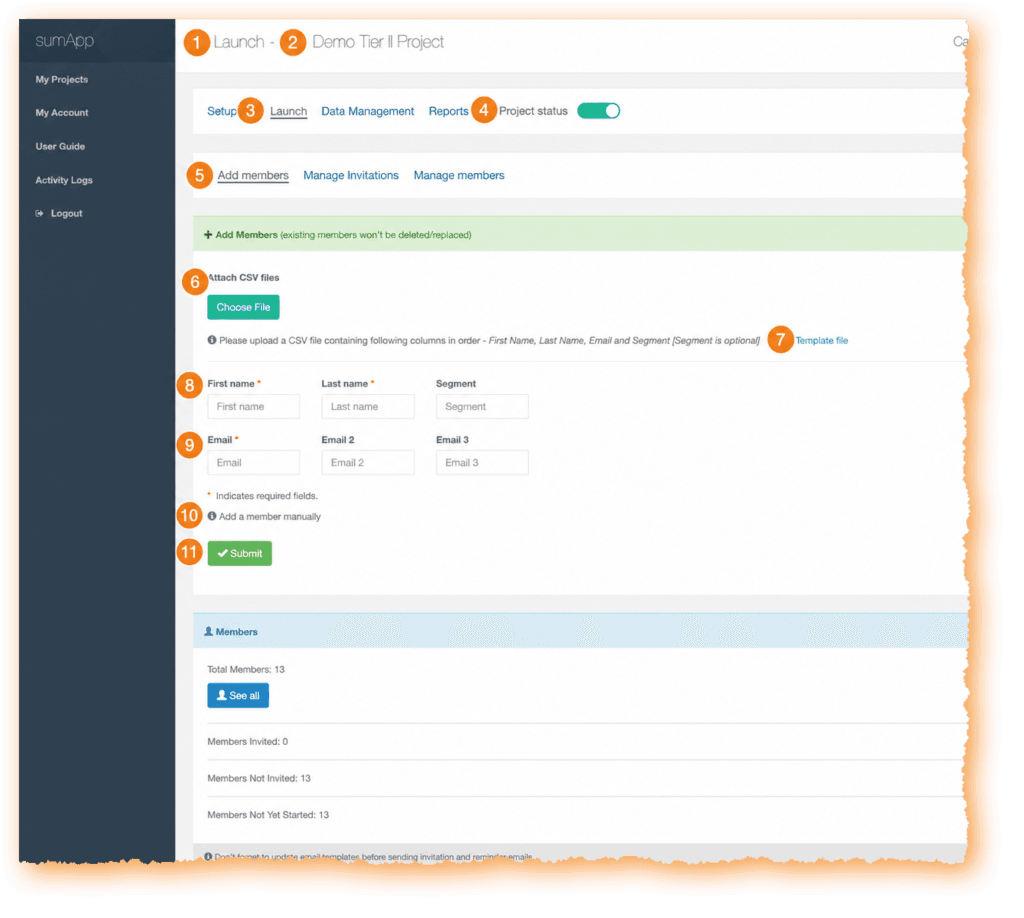
- Indicates what page you’re on, within your project.
- Indicates which project you’re currently working on.
- Shows you’re in the first tab of the project phases navigation bar – Launch.
- Shows your project status. Toggle on to enable project members to submit their survey responses.
- Shows you’re in the ‘add members’ tab of the Launch phase.
- Allows you to attach a with your members basic information. First Name, Last Name, Email, and [optional].
- Click the Template File link to download the template file to upload members by CSV.
- Manually add an individual new member using First Name, Last Name, Segment [optional].
- Add at least one email.
- Indicates you are on the manually add member section.
- Select ‘Submit’ when adding manual members or by CSV upload after attaching your CSV file.
If you have a list of members to add to your sumApp project, follow the steps below.
1. From the ‘Launch’ ‘Add members’ tab, select ‘Choose File’ to attach your CSV file.
Click “Template file” to download the recommended format and update with your member’s data. If you want to include a segment for each of your project members, you can bulk add them using this option.
Select your CSV file containing the member data from your device.
Once your file is attached and appears ready, choose ‘Open’ to close the upload window.
If you have pre-existing survey data and are on a Tier III or Tier IV plan, read How To Load Pre-Existing Data Into sumApp.
If you are running into error messages that are not easily fixed, please reach out to our Slack community. Common error types include missing first name or last name, missing email address, or duplicate email address(es) in CSV file.
To manually add members to your sumApp project, follow the steps below.
1. Choose the ‘Manage’ drop-down for the project to add members to.

2. Click “Add Members”.

3. Fill in your new member’s information.

- Fill in the “First name” field.
- Fill in the “Last name” field.
- (Optional) Enter the “Segment“ to categorize the map member.
- Enter the Member’s Primary Email Address.
- (Optional) Enter the secondary alternate email.
- (Optional) Enter the tertiary alternate email.
- Click the green “Submit” button to add the member.
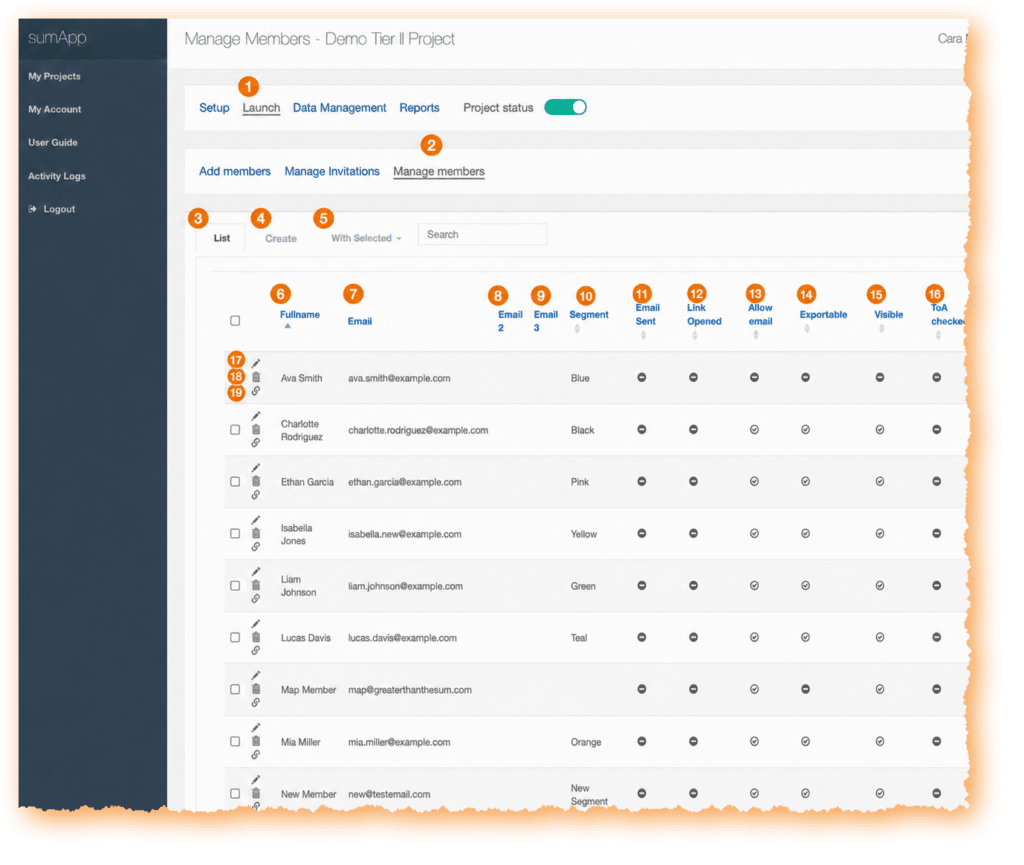
Parts of the Workspace
- Indicates what page you’re on, within your project.
- Shows you’re in the third tab of the launch phases navigation bar – Manage members.
- Shows you’re on the list tab of manage members.
- Click to toggle to the create tab of manage members.
- Choose the carrot drop down to see menu options of within with selected.
- Displays members’ full name.
- Shows members’ primary email.
- Shows members’ secondary email, if provided.
- Shows members’ tertiary email, if provided.
- Shows members’ segment.
- Shows if invite email has been sent.
- Shows if invite link has been opened.
- Shows a checkmark if member has allowed receiving email updates.
- Shows a checkmark if member has allowed their member information to be exported.
- Shows a checkmark if the member has marked themselves as visible in the project map.
- Shows a checkmark if the member has agreed to your Terms of Agreement if required before submitting survey replies.
Why have three templates?
sumApp was designed to be what we call ‘evergreen’ – in other words, we wanted a tool that didn’t just create a snapshot in time, but could also continue to evolve as the network changes and as their mapping needs become more sophisticated. An important part of that evergreen characteristic means having the ability to add new members to the map’s databases as they join the network and to invite existing members back into sumApp to show their existing relationships to the new members.
On the one hand, doing that that can be as simple as deciding never to close a survey. But if your bulk email invitations don’t differentiate which phase you’re asking members to address, you’ll confuse and annoy people. It would be bad form to ask members to do something they’ve already done, without:
- Explaining that you’re not implying they didn’t do it.
- Making clear that it’s not a re-do – that what they’ve done is safe and intact.
- Making it clear that the reason you’re asking them back is because something has changed and those changes might be relevant for them to address.
- Making sure they know it will be a super-quick thing.
- Such as: “please go take a quick peek at the 10 brand new members at the top of the list, and if you know any, share that – then you’re done!”
So – in another SNA tool, you maybe COULD simply keep the survey open (tho, naaaw, it’d still be messy for other technical reasons, but we’ll ignore those right now . . . ),
but you’d have to revise the email over and over depending on who you’re sending to.
We thought that was dumb. So we make it easier by using three different email templates, each meant to be framed for a different context, depending on what stage your members are at in the evergreen cycle.
- The initial invitation – Frame this text for the brand-new member who has never seen sumApp & has no idea what you’re up to.
- The ‘new faces’ email – Frame this one for the initiated. Those who’ve done sumApp already, or at least have chosen to ignore previous invites (they know it’s been happening whether they’ve engaged or not). Framing in ‘new faces’ should, ideally, include all the bullet points above.
- The ‘reminder’ email – This is a follow-up framed generically for everyone. Use it when you want to address everyone at once.
The email template interface
Features of the email template interface:
1) Shows you’re in the sumApp setup phase.
2) Shows you’re on the ‘define email templates’ page.
3) Input name of sender here. This is a required field. Use a name that is as recognizable as possible for the whole population. All templates will come from this sender.
4) Input email of sender. This is a required field. Can be a different email than that belonging to the ‘from’ person’s name.
5) Deadline. Not required. Will fill into the template where you’ve inserted the {survey_deadline} tag. It has no functional effect (it won’t close your survey on that date). It’s simply there to make it easy to insert a date into your emails and change it in a single place, instead of digging into each email template to change it.
6) Field tags you can use in your email. {url} is required in each email template. No other fields are required. Read more about the curly-bracket tags.
7) The Invitation Email template WYSIWYG. More about the WYSIWYG interface.
8) The New Faces Email template WYSIWYG. More about the WYSIWYG interface.
9) The Reminder Email template WYSIWYG. More about the WYSIWYG interface.
10) Cancel – this will remove all changes you’ve made since your last save.
11) Save – Don’t forget to save when you’ve made changes anywhere on this page!!
Email template tags:
You find these fields at the top of the Email Templates page – they apply to each email type in your project:
1) Input name of sender here. This is a required field. Use a name that is as recognizable as possible for the whole population. All templates will come from this sender.
2) Input email of sender. This is a required field. Can be a different email than that belonging to the ‘from’ person’s name.
3) Deadline. Not required. Will fill into the template where you’ve inserted the {survey_deadline} tag. It has no functional effect (it won’t close your survey on that date). It’s simply there to make it easy to insert a date into your emails and change it in a single place, instead of digging into each email template to change it.
You also have tags that can be used in your email templates. They function as placeholders for inserting data from other fields within sumApp into the emails. They include:
4) {first_name} inserts the first name of the member receiving the email. Not mandatory.
5) {last_name} inserts the last name of the member receiving the email. Not mandatory.
6) {network_name} inserts the project name, which you can see at the top of the page. Not mandatory.
7) {survey_deadline} inserts the date in field #3 ‘Deadline’. Not mandatory.
8) {url} inserts the unique sumApp url belonging to the user receiving the email. This field is mandatory for all three templates.
9) {segment} inserts the segment you’re assigned to the user receiving the email, if you’ve assigned one. Not mandatory.
10 {sender_name} Inserts the name in the 3@ above ‘Sender email’. Not mandatory in the body of the email.
and again – a reminder 11) the {url} tag is mandatory for all email templates. If you’ve removed it, the save button won’t work until you replace it in all 3 templates.
The WYSIWYG
What is a WYSIWYG editor?
HTML markup tells a web browser how to display the text, images and other forms of multimedia on a webpage. A WYSIWYG is an interface designed to editing HTML without having to know or see the underlying code.
It it beyond the scope of this knowledge base to explain all the parts of this particular WYSIWYG interface, but we’ll point out a few basics.
1) Indicates which template you’re working on.
2) Defines the email’s subject line – it can include tags if desired.
3) The body of the email is edited in within the WYSIWYG editor.
A common cause of frustration using WYSIWYG editors:
You’ll often copy text from another editing tool into the email template. For instance if you’ve collaborated on the text in a google doc, or you’re pasting from Word. Each of those tools uses underlying code (such as HTML) to tell the browser or application how to render the content (headers, etc.)
Often when copying and pasting text from one editor into another, you also inadvertently copy over a bunch of hidden code as well. Sometimes that works fine & you get the formatting you want, but often it turns into a challenge. You can prevent this by copying your text into a non-formatting editor, such as NotePad before pasting it into the WYSWYG.
But if you haven’t already stripped the hidden code from your text before inserting it into a WYSIWYG, if the editor starts to behave strangely – such as not implementing changes you’re trying to make, you usually need to either examine the underlying HTML to remove junk code, or simply strip all formatting out of the text and start formatting fresh. You can either ‘view source’ or ‘remove formatting’.
4) The ‘source’ button in the WYSIWYG dashboard enables you to examine and edit the underlying HTML code. Even if you have no idea what HTML is, taking a peek will give you at least a sense of what’s going on.
5) The Tx icon will remove all hidden formatting code from the text so you can start fresh. The text to be cleaned must be selected first. You can double-check that it got removed by looking at the source code under #4.
The other buttons in the WYSWYG dashboard are either self-explanatory or not that relevant in this context.
6) If you want to start over, select ‘Reset Default’
7) The green ‘Preview’ button enables you to preview your content.
Once you’ve edited each template – don’t forget to click ‘save’ at the bottom of the page!
How sending works with each template
You send emails from the Launch > Manage Invitations page in sumApp.
Here is an overview explaining when each type is sent.
Invitation Email
- Is sent when you click the ‘Send Invitation Emails’ button or the ‘Send Invitation & New Faces Emails’ button in Launch > Manage Invitations page. It will only go out to members who have never previously been sent the first invitation.
- You can also send the Invitation Email to anyone, regardless of if they’ve been sent it before, on a case-by-case basis in the member list in Launch > Manage Members.
New Faces Email
- Is sent when you click the ‘Send Invitation & New Faces Emails’ button or the ‘Send New Faces Emails’ button in Launch > Manage Invitations page. It will only go out to members who have ALREADY been sent the first invitation at some point in the past.
- You can also send the New Faces Email to anyone, regardless of what they’ve been sent it before, on a case-by-case basis in the member list in Launch > Manage Members.
Reminder Email
- Is sent when you click the the ‘Send Reminders’ button in Launch > Manage Invitations page. It will go out to everyone in your member list, regardless of what they’ve been sent in the past.
- You can also send the Reminder Email to anyone, regardless of what they’ve been sent it before, on a case-by-case basis in the member list in Launch > Manage Members.
Custom survey filter email template – Tier IV
If you’re using the custom survey filter feature in Tier IV, you have another email template option. You can send a custom email to a sub-set of the population, based on their responses to the custom filter survey question you’re using.
You can access this extra functionality in Launch > Manage Invitations – Under the ‘Actions’ section of the page, find and click on the 5th sending button ‘Custom Filter Email’.
Why have three templates?
sumApp was designed to be what we call ‘evergreen’ – in other words, we wanted a tool that didn’t just create a snapshot in time, but could also continue to evolve as the network changes and as their mapping needs become more sophisticated. An important part of that evergreen characteristic means having the ability to add new members to the map’s databases as they join the network and to invite existing members back into sumApp to show their existing relationships to the new members.
On the one hand, doing that that can be as simple as deciding never to close a survey. But if your bulk email invitations don’t differentiate which phase you’re asking members to address, you’ll confuse and annoy people. It would be bad form to ask members to do something they’ve already done, without:
- Explaining that you’re not implying they didn’t do it.
- Making clear that it’s not a re-do – that what they’ve done is safe and intact.
- Making it clear that the reason you’re asking them back is because something has changed and those changes might be relevant for them to address.
- Making sure they know it will be a super-quick thing.
- Such as: “please go take a quick peek at the 10 brand new members at the top of the list, and if you know any, share that – then you’re done!”
So – in another SNA tool, you maybe COULD simply keep the survey open (tho, naaaw, it’d still be messy for other technical reasons, but we’ll ignore those right now . . . ),
but you’d have to revise the email over and over depending on who you’re sending to.
We thought that was dumb. So we make it easier by using three different email templates, each meant to be framed for a different context, depending on what stage your members are at in the evergreen cycle.
- The initial invitation – Frame this text for the brand-new member who has never seen sumApp & has no idea what you’re up to.
- The ‘new faces’ email – Frame this one for the initiated. Those who’ve done sumApp already, or at least have chosen to ignore previous invites (they know it’s been happening whether they’ve engaged or not). Framing in ‘new faces’ should, ideally, include all the bullet points above.
- The ‘reminder’ email – This is a follow-up framed generically for everyone. Use it when you want to address everyone at once.
The email template interface
Features of the email template interface:
1) Shows you’re in the sumApp setup phase.
2) Shows you’re on the ‘define email templates’ page.
3) Input name of sender here. This is a required field. Use a name that is as recognizable as possible for the whole population. All templates will come from this sender.
4) Input email of sender. This is a required field. Can be a different email than that belonging to the ‘from’ person’s name.
5) Deadline. Not required. Will fill into the template where you’ve inserted the {survey_deadline} tag. It has no functional effect (it won’t close your survey on that date). It’s simply there to make it easy to insert a date into your emails and change it in a single place, instead of digging into each email template to change it.
6) Field tags you can use in your email. {url} is required in each email template. No other fields are required. Read more about the curly-bracket tags.
7) The Invitation Email template WYSIWYG. More about the WYSIWYG interface.
8) The New Faces Email template WYSIWYG. More about the WYSIWYG interface.
9) The Reminder Email template WYSIWYG. More about the WYSIWYG interface.
10) Cancel – this will remove all changes you’ve made since your last save.
11) Save – Don’t forget to save when you’ve made changes anywhere on this page!!
Email template tags:
You find these fields at the top of the Email Templates page – they apply to each email type in your project:
1) Input name of sender here. This is a required field. Use a name that is as recognizable as possible for the whole population. All templates will come from this sender.
2) Input email of sender. This is a required field. Can be a different email than that belonging to the ‘from’ person’s name.
3) Deadline. Not required. Will fill into the template where you’ve inserted the {survey_deadline} tag. It has no functional effect (it won’t close your survey on that date). It’s simply there to make it easy to insert a date into your emails and change it in a single place, instead of digging into each email template to change it.
You also have tags that can be used in your email templates. They function as placeholders for inserting data from other fields within sumApp into the emails. They include:
4) {first_name} inserts the first name of the member receiving the email. Not mandatory.
5) {last_name} inserts the last name of the member receiving the email. Not mandatory.
6) {network_name} inserts the project name, which you can see at the top of the page. Not mandatory.
7) {survey_deadline} inserts the date in field #3 ‘Deadline’. Not mandatory.
8) {url} inserts the unique sumApp url belonging to the user receiving the email. This field is mandatory for all three templates.
9) {segment} inserts the segment you’re assigned to the user receiving the email, if you’ve assigned one. Not mandatory.
10 {sender_name} Inserts the name in the 3@ above ‘Sender email’. Not mandatory in the body of the email.
and again – a reminder 11) the {url} tag is mandatory for all email templates. If you’ve removed it, the save button won’t work until you replace it in all 3 templates.
The WYSIWYG
What is a WYSIWYG editor?
HTML markup tells a web browser how to display the text, images and other forms of multimedia on a webpage. A WYSIWYG is an interface designed to editing HTML without having to know or see the underlying code.
It it beyond the scope of this knowledge base to explain all the parts of this particular WYSIWYG interface, but we’ll point out a few basics.
1) Indicates which template you’re working on.
2) Defines the email’s subject line – it can include tags if desired.
3) The body of the email is edited in within the WYSIWYG editor.
A common cause of frustration using WYSIWYG editors:
You’ll often copy text from another editing tool into the email template. For instance if you’ve collaborated on the text in a google doc, or you’re pasting from Word. Each of those tools uses underlying code (such as HTML) to tell the browser or application how to render the content (headers, etc.)
Often when copying and pasting text from one editor into another, you also inadvertently copy over a bunch of hidden code as well. Sometimes that works fine & you get the formatting you want, but often it turns into a challenge. You can prevent this by copying your text into a non-formatting editor, such as NotePad before pasting it into the WYSWYG.
But if you haven’t already stripped the hidden code from your text before inserting it into a WYSIWYG, if the editor starts to behave strangely – such as not implementing changes you’re trying to make, you usually need to either examine the underlying HTML to remove junk code, or simply strip all formatting out of the text and start formatting fresh. You can either ‘view source’ or ‘remove formatting’.
4) The ‘source’ button in the WYSIWYG dashboard enables you to examine and edit the underlying HTML code. Even if you have no idea what HTML is, taking a peek will give you at least a sense of what’s going on.
5) The Tx icon will remove all hidden formatting code from the text so you can start fresh. The text to be cleaned must be selected first. You can double-check that it got removed by looking at the source code under #4.
The other buttons in the WYSWYG dashboard are either self-explanatory or not that relevant in this context.
6) If you want to start over, select ‘Reset Default’
7) The green ‘Preview’ button enables you to preview your content.
Once you’ve edited each template – don’t forget to click ‘save’ at the bottom of the page!
How sending works with each template
You send emails from the Launch > Manage Invitations page in sumApp.
Here is an overview explaining when each type is sent.
Invitation Email
- Is sent when you click the ‘Send Invitation Emails’ button or the ‘Send Invitation & New Faces Emails’ button in Launch > Manage Invitations page. It will only go out to members who have never previously been sent the first invitation.
- You can also send the Invitation Email to anyone, regardless of if they’ve been sent it before, on a case-by-case basis in the member list in Launch > Manage Members.
New Faces Email
- Is sent when you click the ‘Send Invitation & New Faces Emails’ button or the ‘Send New Faces Emails’ button in Launch > Manage Invitations page. It will only go out to members who have ALREADY been sent the first invitation at some point in the past.
- You can also send the New Faces Email to anyone, regardless of what they’ve been sent it before, on a case-by-case basis in the member list in Launch > Manage Members.
Reminder Email
- Is sent when you click the the ‘Send Reminders’ button in Launch > Manage Invitations page. It will go out to everyone in your member list, regardless of what they’ve been sent in the past.
- You can also send the Reminder Email to anyone, regardless of what they’ve been sent it before, on a case-by-case basis in the member list in Launch > Manage Members.
Custom survey filter email template – Tier IV
If you’re using the custom survey filter feature in Tier IV, you have another email template option. You can send a custom email to a sub-set of the population, based on their responses to the custom filter survey question you’re using.
You can access this extra functionality in Launch > Manage Invitations – Under the ‘Actions’ section of the page, find and click on the 5th sending button ‘Custom Filter Email’.
Why have three templates?
sumApp was designed to be what we call ‘evergreen’ – in other words, we wanted a tool that didn’t just create a snapshot in time, but could also continue to evolve as the network changes and as their mapping needs become more sophisticated. An important part of that evergreen characteristic means having the ability to add new members to the map’s databases as they join the network and to invite existing members back into sumApp to show their existing relationships to the new members.
On the one hand, doing that that can be as simple as deciding never to close a survey. But if your bulk email invitations don’t differentiate which phase you’re asking members to address, you’ll confuse and annoy people. It would be bad form to ask members to do something they’ve already done, without:
- Explaining that you’re not implying they didn’t do it.
- Making clear that it’s not a re-do – that what they’ve done is safe and intact.
- Making it clear that the reason you’re asking them back is because something has changed and those changes might be relevant for them to address.
- Making sure they know it will be a super-quick thing.
- Such as: “please go take a quick peek at the 10 brand new members at the top of the list, and if you know any, share that – then you’re done!”
So – in another SNA tool, you maybe COULD simply keep the survey open (tho, naaaw, it’d still be messy for other technical reasons, but we’ll ignore those right now . . . ),
but you’d have to revise the email over and over depending on who you’re sending to.
We thought that was dumb. So we make it easier by using three different email templates, each meant to be framed for a different context, depending on what stage your members are at in the evergreen cycle.
- The initial invitation – Frame this text for the brand-new member who has never seen sumApp & has no idea what you’re up to.
- The ‘new faces’ email – Frame this one for the initiated. Those who’ve done sumApp already, or at least have chosen to ignore previous invites (they know it’s been happening whether they’ve engaged or not). Framing in ‘new faces’ should, ideally, include all the bullet points above.
- The ‘reminder’ email – This is a follow-up framed generically for everyone. Use it when you want to address everyone at once.
The email template interface
Features of the email template interface:
1) Shows you’re in the sumApp setup phase.
2) Shows you’re on the ‘define email templates’ page.
3) Input name of sender here. This is a required field. Use a name that is as recognizable as possible for the whole population. All templates will come from this sender.
4) Input email of sender. This is a required field. Can be a different email than that belonging to the ‘from’ person’s name.
5) Deadline. Not required. Will fill into the template where you’ve inserted the {survey_deadline} tag. It has no functional effect (it won’t close your survey on that date). It’s simply there to make it easy to insert a date into your emails and change it in a single place, instead of digging into each email template to change it.
6) Field tags you can use in your email. {url} is required in each email template. No other fields are required. Read more about the curly-bracket tags.
7) The Invitation Email template WYSIWYG. More about the WYSIWYG interface.
8) The New Faces Email template WYSIWYG. More about the WYSIWYG interface.
9) The Reminder Email template WYSIWYG. More about the WYSIWYG interface.
10) Cancel – this will remove all changes you’ve made since your last save.
11) Save – Don’t forget to save when you’ve made changes anywhere on this page!!
Email template tags:
You find these fields at the top of the Email Templates page – they apply to each email type in your project:
1) Input name of sender here. This is a required field. Use a name that is as recognizable as possible for the whole population. All templates will come from this sender.
2) Input email of sender. This is a required field. Can be a different email than that belonging to the ‘from’ person’s name.
3) Deadline. Not required. Will fill into the template where you’ve inserted the {survey_deadline} tag. It has no functional effect (it won’t close your survey on that date). It’s simply there to make it easy to insert a date into your emails and change it in a single place, instead of digging into each email template to change it.
You also have tags that can be used in your email templates. They function as placeholders for inserting data from other fields within sumApp into the emails. They include:
4) {first_name} inserts the first name of the member receiving the email. Not mandatory.
5) {last_name} inserts the last name of the member receiving the email. Not mandatory.
6) {network_name} inserts the project name, which you can see at the top of the page. Not mandatory.
7) {survey_deadline} inserts the date in field #3 ‘Deadline’. Not mandatory.
8) {url} inserts the unique sumApp url belonging to the user receiving the email. This field is mandatory for all three templates.
9) {segment} inserts the segment you’re assigned to the user receiving the email, if you’ve assigned one. Not mandatory.
10 {sender_name} Inserts the name in the 3@ above ‘Sender email’. Not mandatory in the body of the email.
and again – a reminder 11) the {url} tag is mandatory for all email templates. If you’ve removed it, the save button won’t work until you replace it in all 3 templates.
The WYSIWYG
What is a WYSIWYG editor?
HTML markup tells a web browser how to display the text, images and other forms of multimedia on a webpage. A WYSIWYG is an interface designed to editing HTML without having to know or see the underlying code.
It it beyond the scope of this knowledge base to explain all the parts of this particular WYSIWYG interface, but we’ll point out a few basics.
1) Indicates which template you’re working on.
2) Defines the email’s subject line – it can include tags if desired.
3) The body of the email is edited in within the WYSIWYG editor.
A common cause of frustration using WYSIWYG editors:
You’ll often copy text from another editing tool into the email template. For instance if you’ve collaborated on the text in a google doc, or you’re pasting from Word. Each of those tools uses underlying code (such as HTML) to tell the browser or application how to render the content (headers, etc.)
Often when copying and pasting text from one editor into another, you also inadvertently copy over a bunch of hidden code as well. Sometimes that works fine & you get the formatting you want, but often it turns into a challenge. You can prevent this by copying your text into a non-formatting editor, such as NotePad before pasting it into the WYSWYG.
But if you haven’t already stripped the hidden code from your text before inserting it into a WYSIWYG, if the editor starts to behave strangely – such as not implementing changes you’re trying to make, you usually need to either examine the underlying HTML to remove junk code, or simply strip all formatting out of the text and start formatting fresh. You can either ‘view source’ or ‘remove formatting’.
4) The ‘source’ button in the WYSIWYG dashboard enables you to examine and edit the underlying HTML code. Even if you have no idea what HTML is, taking a peek will give you at least a sense of what’s going on.
5) The Tx icon will remove all hidden formatting code from the text so you can start fresh. The text to be cleaned must be selected first. You can double-check that it got removed by looking at the source code under #4.
The other buttons in the WYSWYG dashboard are either self-explanatory or not that relevant in this context.
6) If you want to start over, select ‘Reset Default’
7) The green ‘Preview’ button enables you to preview your content.
Once you’ve edited each template – don’t forget to click ‘save’ at the bottom of the page!
How sending works with each template
You send emails from the Launch > Manage Invitations page in sumApp.
Here is an overview explaining when each type is sent.
Invitation Email
- Is sent when you click the ‘Send Invitation Emails’ button or the ‘Send Invitation & New Faces Emails’ button in Launch > Manage Invitations page. It will only go out to members who have never previously been sent the first invitation.
- You can also send the Invitation Email to anyone, regardless of if they’ve been sent it before, on a case-by-case basis in the member list in Launch > Manage Members.
New Faces Email
- Is sent when you click the ‘Send Invitation & New Faces Emails’ button or the ‘Send New Faces Emails’ button in Launch > Manage Invitations page. It will only go out to members who have ALREADY been sent the first invitation at some point in the past.
- You can also send the New Faces Email to anyone, regardless of what they’ve been sent it before, on a case-by-case basis in the member list in Launch > Manage Members.
Reminder Email
- Is sent when you click the the ‘Send Reminders’ button in Launch > Manage Invitations page. It will go out to everyone in your member list, regardless of what they’ve been sent in the past.
- You can also send the Reminder Email to anyone, regardless of what they’ve been sent it before, on a case-by-case basis in the member list in Launch > Manage Members.
Custom survey filter email template – Tier IV
If you’re using the custom survey filter feature in Tier IV, you have another email template option. You can send a custom email to a sub-set of the population, based on their responses to the custom filter survey question you’re using.
You can access this extra functionality in Launch > Manage Invitations – Under the ‘Actions’ section of the page, find and click on the 5th sending button ‘Custom Filter Email’.
Why have three templates?
sumApp was designed to be what we call ‘evergreen’ – in other words, we wanted a tool that didn’t just create a snapshot in time, but could also continue to evolve as the network changes and as their mapping needs become more sophisticated. An important part of that evergreen characteristic means having the ability to add new members to the map’s databases as they join the network and to invite existing members back into sumApp to show their existing relationships to the new members.
On the one hand, doing that that can be as simple as deciding never to close a survey. But if your bulk email invitations don’t differentiate which phase you’re asking members to address, you’ll confuse and annoy people. It would be bad form to ask members to do something they’ve already done, without:
- Explaining that you’re not implying they didn’t do it.
- Making clear that it’s not a re-do – that what they’ve done is safe and intact.
- Making it clear that the reason you’re asking them back is because something has changed and those changes might be relevant for them to address.
- Making sure they know it will be a super-quick thing.
- Such as: “please go take a quick peek at the 10 brand new members at the top of the list, and if you know any, share that – then you’re done!”
So – in another SNA tool, you maybe COULD simply keep the survey open (tho, naaaw, it’d still be messy for other technical reasons, but we’ll ignore those right now . . . ),
but you’d have to revise the email over and over depending on who you’re sending to.
We thought that was dumb. So we make it easier by using three different email templates, each meant to be framed for a different context, depending on what stage your members are at in the evergreen cycle.
- The initial invitation – Frame this text for the brand-new member who has never seen sumApp & has no idea what you’re up to.
- The ‘new faces’ email – Frame this one for the initiated. Those who’ve done sumApp already, or at least have chosen to ignore previous invites (they know it’s been happening whether they’ve engaged or not). Framing in ‘new faces’ should, ideally, include all the bullet points above.
- The ‘reminder’ email – This is a follow-up framed generically for everyone. Use it when you want to address everyone at once.
The email template interface
Features of the email template interface:
1) Shows you’re in the sumApp setup phase.
2) Shows you’re on the ‘define email templates’ page.
3) Input name of sender here. This is a required field. Use a name that is as recognizable as possible for the whole population. All templates will come from this sender.
4) Input email of sender. This is a required field. Can be a different email than that belonging to the ‘from’ person’s name.
5) Deadline. Not required. Will fill into the template where you’ve inserted the {survey_deadline} tag. It has no functional effect (it won’t close your survey on that date). It’s simply there to make it easy to insert a date into your emails and change it in a single place, instead of digging into each email template to change it.
6) Field tags you can use in your email. {url} is required in each email template. No other fields are required. Read more about the curly-bracket tags.
7) The Invitation Email template WYSIWYG. More about the WYSIWYG interface.
8) The New Faces Email template WYSIWYG. More about the WYSIWYG interface.
9) The Reminder Email template WYSIWYG. More about the WYSIWYG interface.
10) Cancel – this will remove all changes you’ve made since your last save.
11) Save – Don’t forget to save when you’ve made changes anywhere on this page!!
Email template tags:
You find these fields at the top of the Email Templates page – they apply to each email type in your project:
1) Input name of sender here. This is a required field. Use a name that is as recognizable as possible for the whole population. All templates will come from this sender.
2) Input email of sender. This is a required field. Can be a different email than that belonging to the ‘from’ person’s name.
3) Deadline. Not required. Will fill into the template where you’ve inserted the {survey_deadline} tag. It has no functional effect (it won’t close your survey on that date). It’s simply there to make it easy to insert a date into your emails and change it in a single place, instead of digging into each email template to change it.
You also have tags that can be used in your email templates. They function as placeholders for inserting data from other fields within sumApp into the emails. They include:
4) {first_name} inserts the first name of the member receiving the email. Not mandatory.
5) {last_name} inserts the last name of the member receiving the email. Not mandatory.
6) {network_name} inserts the project name, which you can see at the top of the page. Not mandatory.
7) {survey_deadline} inserts the date in field #3 ‘Deadline’. Not mandatory.
8) {url} inserts the unique sumApp url belonging to the user receiving the email. This field is mandatory for all three templates.
9) {segment} inserts the segment you’re assigned to the user receiving the email, if you’ve assigned one. Not mandatory.
10 {sender_name} Inserts the name in the 3@ above ‘Sender email’. Not mandatory in the body of the email.
and again – a reminder 11) the {url} tag is mandatory for all email templates. If you’ve removed it, the save button won’t work until you replace it in all 3 templates.
The WYSIWYG
What is a WYSIWYG editor?
HTML markup tells a web browser how to display the text, images and other forms of multimedia on a webpage. A WYSIWYG is an interface designed to editing HTML without having to know or see the underlying code.
It it beyond the scope of this knowledge base to explain all the parts of this particular WYSIWYG interface, but we’ll point out a few basics.
1) Indicates which template you’re working on.
2) Defines the email’s subject line – it can include tags if desired.
3) The body of the email is edited in within the WYSIWYG editor.
A common cause of frustration using WYSIWYG editors:
You’ll often copy text from another editing tool into the email template. For instance if you’ve collaborated on the text in a google doc, or you’re pasting from Word. Each of those tools uses underlying code (such as HTML) to tell the browser or application how to render the content (headers, etc.)
Often when copying and pasting text from one editor into another, you also inadvertently copy over a bunch of hidden code as well. Sometimes that works fine & you get the formatting you want, but often it turns into a challenge. You can prevent this by copying your text into a non-formatting editor, such as NotePad before pasting it into the WYSWYG.
But if you haven’t already stripped the hidden code from your text before inserting it into a WYSIWYG, if the editor starts to behave strangely – such as not implementing changes you’re trying to make, you usually need to either examine the underlying HTML to remove junk code, or simply strip all formatting out of the text and start formatting fresh. You can either ‘view source’ or ‘remove formatting’.
4) The ‘source’ button in the WYSIWYG dashboard enables you to examine and edit the underlying HTML code. Even if you have no idea what HTML is, taking a peek will give you at least a sense of what’s going on.
5) The Tx icon will remove all hidden formatting code from the text so you can start fresh. The text to be cleaned must be selected first. You can double-check that it got removed by looking at the source code under #4.
The other buttons in the WYSWYG dashboard are either self-explanatory or not that relevant in this context.
6) If you want to start over, select ‘Reset Default’
7) The green ‘Preview’ button enables you to preview your content.
Once you’ve edited each template – don’t forget to click ‘save’ at the bottom of the page!
How sending works with each template
You send emails from the Launch > Manage Invitations page in sumApp.
Here is an overview explaining when each type is sent.
Invitation Email
- Is sent when you click the ‘Send Invitation Emails’ button or the ‘Send Invitation & New Faces Emails’ button in Launch > Manage Invitations page. It will only go out to members who have never previously been sent the first invitation.
- You can also send the Invitation Email to anyone, regardless of if they’ve been sent it before, on a case-by-case basis in the member list in Launch > Manage Members.
New Faces Email
- Is sent when you click the ‘Send Invitation & New Faces Emails’ button or the ‘Send New Faces Emails’ button in Launch > Manage Invitations page. It will only go out to members who have ALREADY been sent the first invitation at some point in the past.
- You can also send the New Faces Email to anyone, regardless of what they’ve been sent it before, on a case-by-case basis in the member list in Launch > Manage Members.
Reminder Email
- Is sent when you click the the ‘Send Reminders’ button in Launch > Manage Invitations page. It will go out to everyone in your member list, regardless of what they’ve been sent in the past.
- You can also send the Reminder Email to anyone, regardless of what they’ve been sent it before, on a case-by-case basis in the member list in Launch > Manage Members.
Custom survey filter email template – Tier IV
If you’re using the custom survey filter feature in Tier IV, you have another email template option. You can send a custom email to a sub-set of the population, based on their responses to the custom filter survey question you’re using.
You can access this extra functionality in Launch > Manage Invitations – Under the ‘Actions’ section of the page, find and click on the 5th sending button ‘Custom Filter Email’.
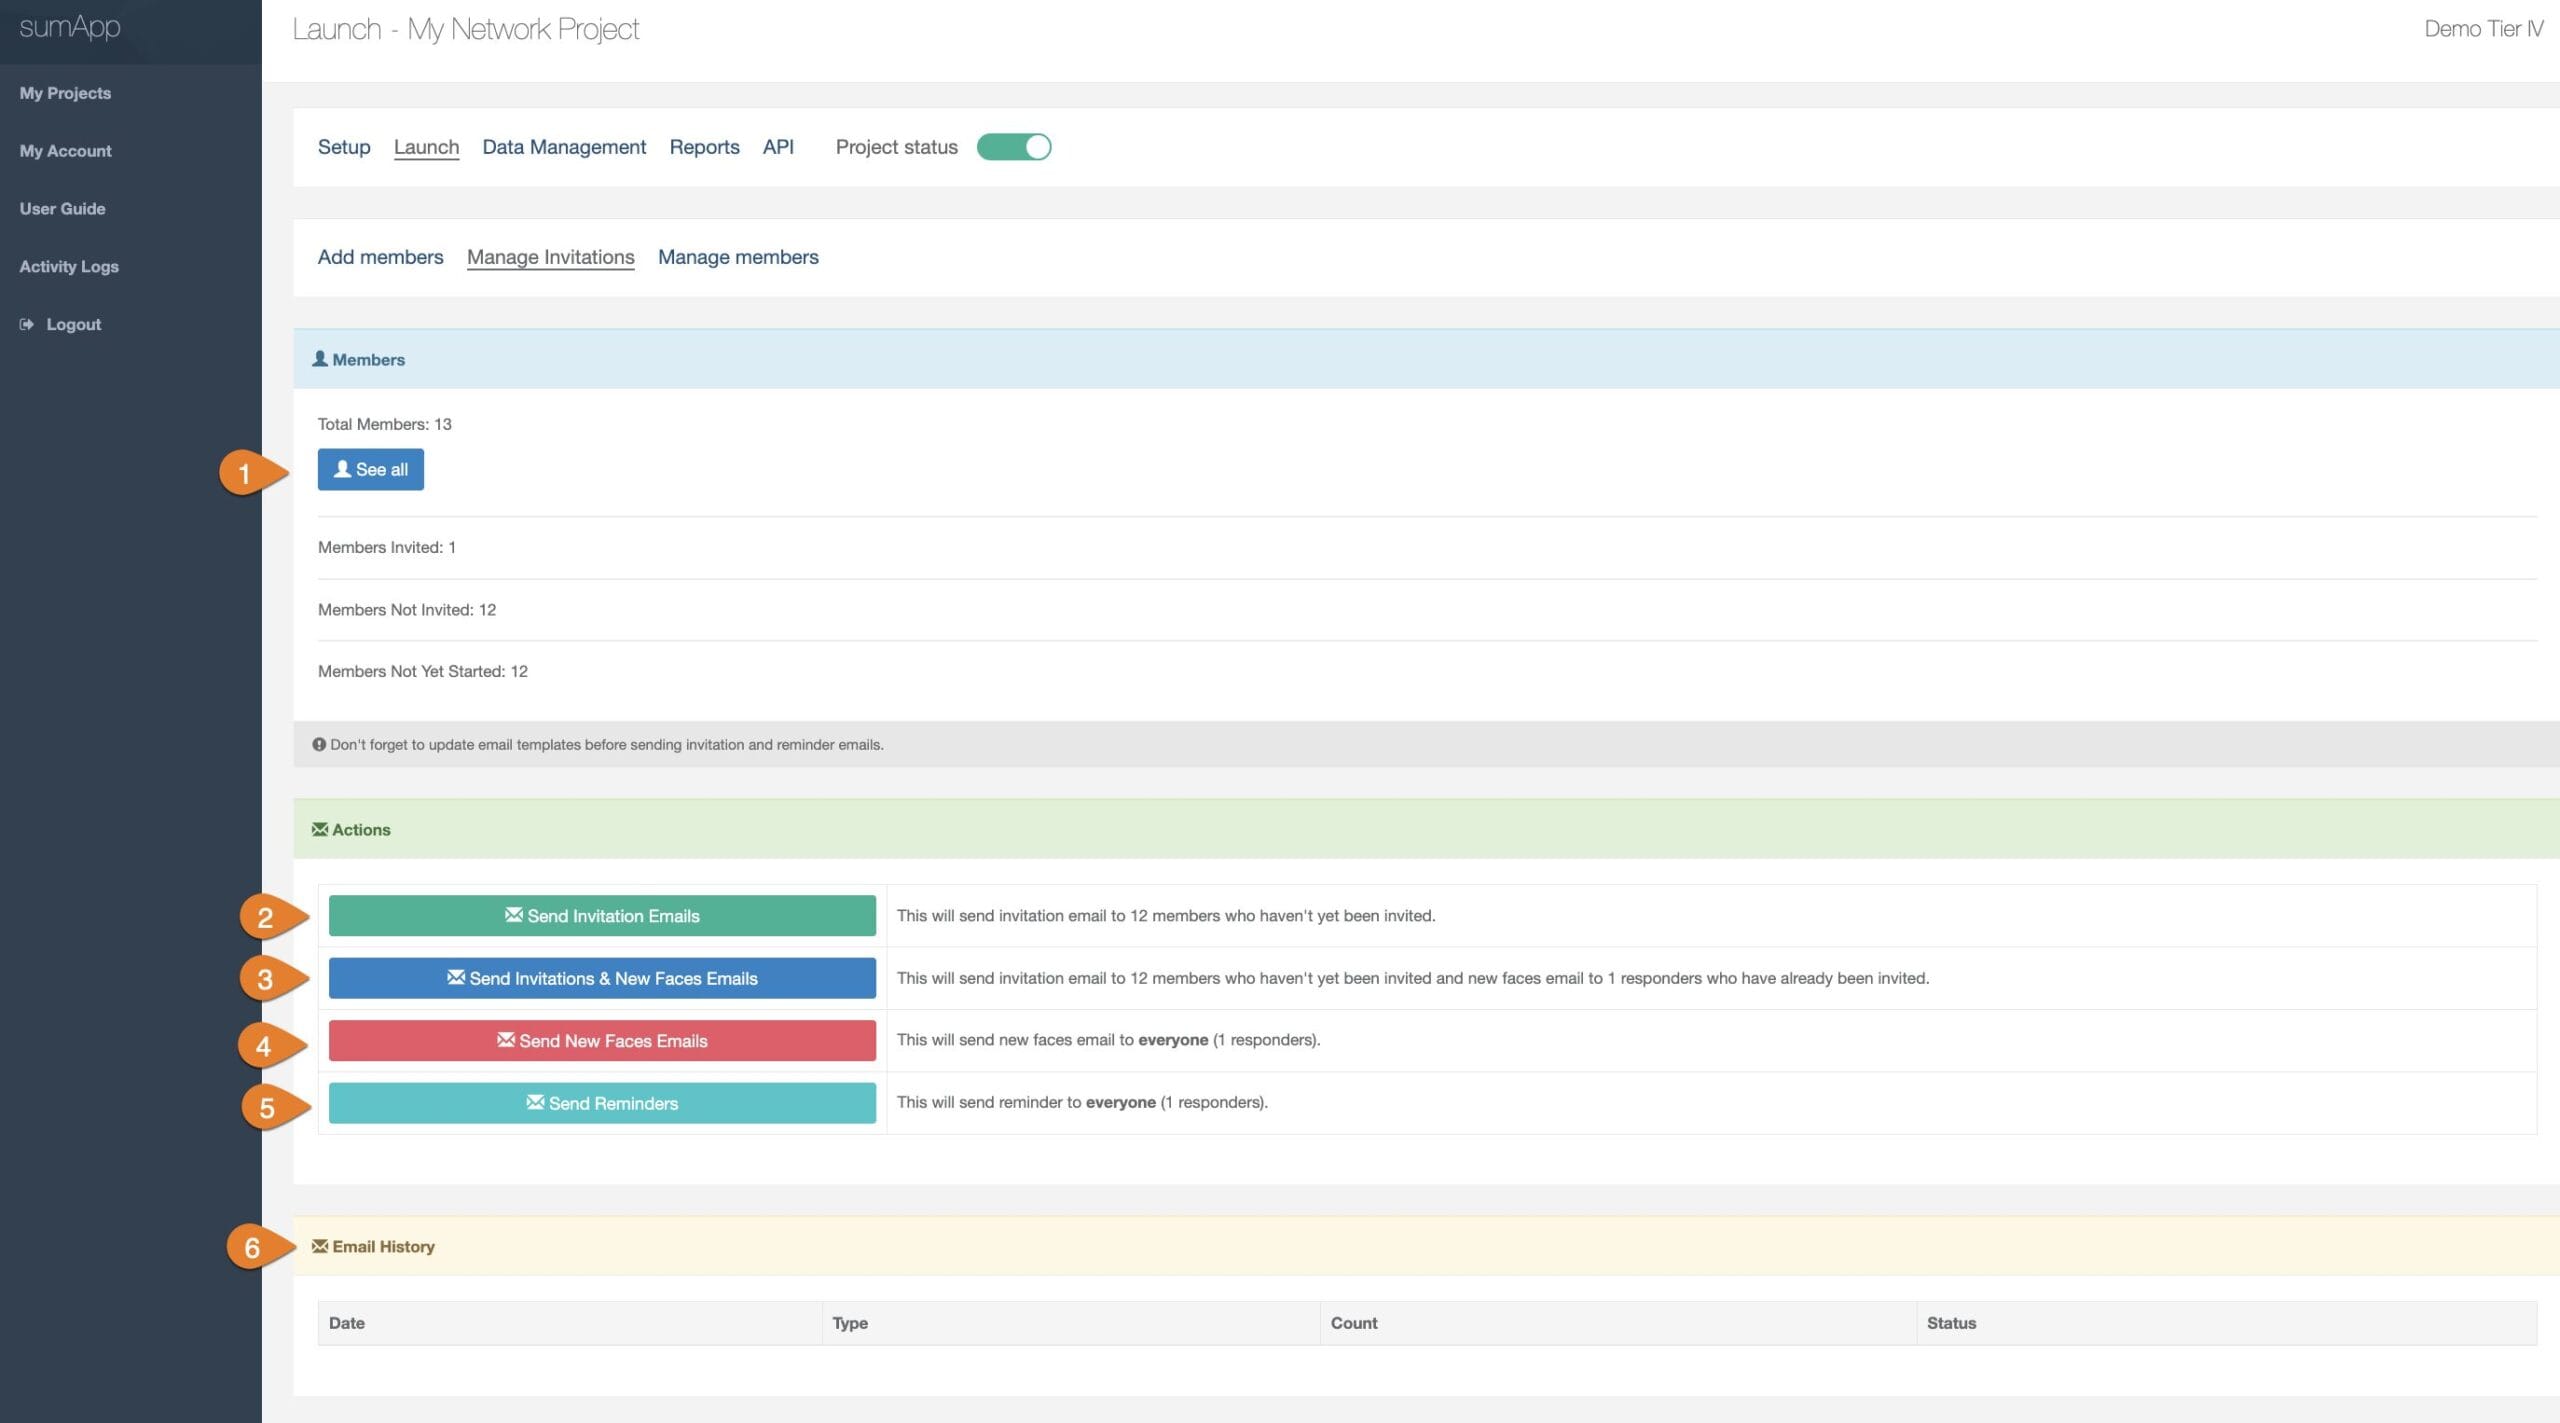
- See a in your project.
- Send an to your member list.
- Send an to members who haven’t been invited and send am email to current members of who is new in your project.
- Send email to everyone in your project.
- Send a to your project members.
Parts of the Workspace
- Indicates what page you’re on, within your project.
- Shows you’re in the third tab of the launch phases navigation bar – Manage members.
- Shows you’re on the list tab of manage members.
- Click to toggle to the create tab of manage members.
- Choose the carrot drop down to see menu options of within with selected.
- Displays members’ full name.
- Shows members’ primary email.
- Shows members’ secondary email, if provided.
- Shows members’ tertiary email, if provided.
- Shows members’ segment.
- Shows if invite email has been sent.
- Shows if invite link has been opened.
- Shows a checkmark if member has allowed receiving email updates.
- Shows a checkmark if member has allowed their member information to be exported.
- Shows a checkmark if the member has marked themselves as visible in the project map.
- Shows a checkmark if the member has agreed to your Terms of Agreement if required before submitting survey replies.
sumApp now works with both Kumu AND Graph Commons!
Graph Commons is an Open Source graph visualization platform that does most things differently from Kumu, and it does some things much better. So to give our sumApp users the best of both worlds, we now have two separate sets of data-output:
- One designed explicitly to work with Kumu.
- Another designed explicitly to work with Graph Commons.
Using your Graph Commons data in sumApp is pretty simple.
Just go to your project’s ‘Data Management’ area, select ‘GraphCom Download’ and select the dataset you want.
Graph Commons doesn’t allow for ‘live linking’ like Kumu does, so updating your data will have to be manual until that changes.

Once you’ve downloaded both the ‘Nodes’ file and the ‘Edges’ file, go to your Graph Commons project. Click the pencil icon

Then ‘IMPORT’

Then ‘EXCEL CSV’

Import your two files one at a time, taking care with node & connection ‘type’ spelling and capitalization.

Voila! Now you have a map!

Some caveats:
Graph Commons is different from Kumu.
We enable you to export all the project data, but don’t expect to be able to use it the same ways you can in Kumu.
For instance, at this point, we haven’t found a way to use time-tagging in Graph Commons, so you probably won’t want that data-set (especially since it dramatically alters the number of connections and will skew your maps drastically).
It’s your data & you might find a way to use it, so we make it available. But that doesn’t mean that each field will be useful in Graph Commons. If there are fields that you don’t want in your map, you can always delete those columns from the .csv file before you import it into Graph Commons
Related posts:
Many of our customers work with different networks that have overlapping members. It is usually the case that each network will be managed in a separate sumApp project, be shown in it’s own Kumu map and have different kinds of questions. But in a Tier IV account, where there is an overlap of members between two or more of the projects within a single account, you can import the rank-able question connections from the population of one project into another – thereby reducing the ‘ask’ of those overlapping members.
Facts about the connection import:
- It will not move members between projects.
- You will not see this option for a project if you don’t have other projects with connections.
- It’s only available if there are connections existing somewhere that could be imported.
- Even if the feature shows – it only means there are other projects with connections. It doesn’t mean there WILL BE members who overlap and have connections. You have run the feature to discover that.
- When running this feature, it first selects all the members who exist in both projects.
- Once it has selected the members in both projects, it looks for the connections between those specific members.
- If it finds connections, you can ‘map’ the rank-able question options from one project to the rank-able question options in another project. Read more about mapping options below.
- It ONLY imports one rank-able question.
- If you have many questions in a tile, the members will still have to manually respond to the extra questions. But at least they’ll be able to sort on ‘connected’ to find which to add more information to.
- Running the connection import is a one-time event – it will not continually feed changes from Project #1 into Project #2.
- However, you can re-run the connection import as often as you want.
- If you have data continuing to come into either project, and will want to re-run the import regularly, you can save the ‘mapped’ options.
- You can also import connections from as many projects as you want, into one project.
- When importing connections, the feature honors and doesn’t over-write the most-recent change.
- For instance, say you have project #1 that’s a year old. Member A said they knew Member B by a rank of 2.
- Then you set up and start to run project #2, and you run the import where A said the knew B by rank 2.
- Then Member A goes into sumApp and says that now they know Member B by rank 4. The member changes the data in Project #2, but not in Project #1 because #1 is inactive.
- If you re-run the import, the old data in Project #1 will not overwrite Member A’s change of connection rank to Member B – because the most recent change is kept, regardless of which project it came from.
How to access the connection import interface
- It will only be available in Tier IV
- Select the project you want to import connections INTO (the ‘receiving’ project)
- Click on #2 ‘Import Connections’
- The option will only show if:
- There are other projects in the account
- Those other projects have connections (see #2 the ‘Connections Made’ column)
 Note: This feature will move very slowly when your project has a large number of connections (such as in some of the projects in the image above)
Working with the connection import interface
Step 1 – Selecting the import process
The first screen you’ll see:
1) Shows you’re in the Data Management phase.
2) Shows you’re on the Import Connects page.
3) Select if you are starting fresh with a new import.
4) Select if you have previously defined an import and saved the option mapping – and you want to re-use that mapping. (greyed-out in this instance because no prior mappings have been saved)
Step 2 – Selecting the ‘sending’ project
After you’ve opted to define a new import,
- You’ll be given a dropdown of the project/network names. #1.
- You’ll only see projects that HAVE connections. #2
- If you have projects in your account where no members have made any connections to other members yet, those projects won’t show up in the dropdown.
- #2 Select the ‘sending’ project i.e. the project you want to import connects FROM, into the current project.
- #3 Click the ‘Import’ button.
Step 3 – Mapping your connection options
Mapping options is necessary because your ranking question options may be different in the two projects, and you may need to make some decisions about how and what to move over.
Once you’ve selected the receiving project and the sending project, and clicked on ‘import’, you’ll be taken to the option-mapping page.
1) On the left is the option list from the rank-able question in the sending project.
2) On the right is a series of drop-downs.
Each dropdown contains all the rank-able question options in the receiving project.
Each dropdown on the right corresponds to the same-place option on the left. You select the appropriate option to map the response on the left into the response on the right.
3) Back – return to the sending project selection list
4) Run the import matching function based on the mapping indicated. Takes you to the next import step.
5) Store the mapping for future use.
Understanding option mapping
When mapping options, you are defining how to translate the selections in one dataset into the, potentially different, options in another datasest.
So, in the example above:
- First note that in this instance, the sending project (#1) and the receiving project (#2) have the same number of options. It could also be that you have more options on either side than the other.
- In this instance, the option language is very similar, so we can just select the corresponding option on the right side for each option on the left.
- It will end up looking like the image below.
It won’t always be that simple a correspondence. You may even choose not to import some responses because there simply isn’t a good option to map it to in the receiving project.
- For instance, suppose you have ‘I know of this person’ on the left, but on the right, you only have options for actual relationships, not just ‘knowing of’. In that case, you shouldn’t map the connection. You’d select ‘None’ from the drop-down list on the right.
- Or perhaps you have 4 options on the left, to move into just 2 options on the right. You might end up with something like the image below.
The bottom line is – be sure to think through your option mapping carefully!
Step 4 – Saving the mapping
If you know you plan to repeat this exact import again, in exactly the same way, it will save a little time if you save what you just mapped out.
To do that, click ‘Store mapping’.
1) Name the mapping set – keeping in mind that each stored mapping has to have a different name, so be as specific as possible.
2) Click on ‘Save mapping’
Step 5 – Review list of possible imports and select whose connections to import
Once you have run your option mapping by clicking on the ‘Map Connections’ button on the mapping page, you will see the import list.
1) It lists everyone who a) exists in both projects and b) had connections to others in both projects
2) It lists how many connections each person has that can be imported – note that it only shows if there are NEW connections to import, it doesn’t count connections imported previously. (in this case, there are only a couple new members in the receiving list for connections to be imported for)
3) Select which members connections to import. You may have some reason not to import someone’s connections – this enables you to leave those individuals not selected.
4) Back – takes you back to the import mapping page.
5) Import – runs the import and takes you to the connections list – which is sorted on the most recent – so you can see the connections that came over.
Why It’s Helpful
Use the Member Activity Log when you want to understand:
- Whether members are interacting with the map after a workshop, convening, or network activity.
- How often members are adding new connections.
- Which members are submitting or updating survey responses.
- Overall engagement levels during a specific phase of your project.
This tool is designed for map project administrators who need visibility into participation patterns across their network.
What Problem It Solves
Map administrators often want to know:
“Who is engaging with the map?”
Before this feature, it was difficult to track member activity without reaching out manually or making assumptions. The Member Activity Log eliminates this uncertainty by providing:
- A central, up-to-date record of member engagement actions.
- Insight into whether communications or events are driving participation.
- A quick way to identify who is taking meaningful steps (sharing answers, viewing maps, making connections).
⚠️ Important Notes:
- Admins do not appear in the activity list.
- This is a new feature, launched on August 30th, 2025.
- The main Activity Log view displays only the X most recent entries.
- To see all activity since the feature launch, you can download the All Member Activity file as a .csv.
How to View the ‘Member Activity Log’
1. Navigate to ‘My Projects’.

2. Click the project ‘Manage’ drop-down for the Activity Logs you want to view.

3. Select ‘Activity Logs’ toward the bottom.

4. This shows who has clicked their sumApp link, what pages they visited, and the date and time. This is a new feature added August 30th, 2025 – the logs only go back to that date.

5. Entries with no name are hits to the Kumu website.

6. To view the entire activity log history (From 8/30/25), download ‘All Member Activity CSV’ for a .csv file.
